If you love the classic combination of chocolate and peanut butter, these 3-Ingredient Chocolate Peanut Butter Bars are the perfect easy dessert. They are rich, creamy, chocolatey, and incredibly simple to prepare. With only three basic ingredients, you can create a delicious no-bake treat without turning on the oven.
These bars are ideal for busy days when you want something homemade but don’t want a complicated recipe. There is no cake batter, no complicated baking technique, and no long list of ingredients. Simply prepare the peanut butter layer, add the chocolate topping, chill until firm, and slice.
The result is a beautiful two-layer dessert with a smooth chocolate topping and a rich peanut butter center. The contrast between the firm chocolate and creamy peanut butter makes every bite satisfying.
Whether you are making dessert for your family, preparing treats for a party, or simply looking for an easy chocolate peanut butter recipe, these bars are worth adding to your recipe collection.
Why You’ll Love These 3-Ingredient Chocolate Peanut Butter Bars
There are plenty of reasons these simple bars are so appealing.
Only 3 ingredients
The recipe keeps things extremely simple. You don’t need a long shopping list or specialty baking ingredients.
No oven required
These are completely no-bake bars. The refrigerator does the work of setting the layers.
Quick preparation
The active preparation takes only a short amount of time. Most of the recipe is simply waiting for the bars to chill.
Rich chocolate flavor
The chocolate topping creates a satisfying contrast against the creamy peanut butter layer.
Creamy and firm texture
The peanut butter remains soft and rich while the chocolate layer becomes firm enough to slice cleanly.
Great for make-ahead desserts
You can prepare these bars several hours ahead or the day before serving.
What Are 3-Ingredient Chocolate Peanut Butter Bars?
These simple dessert bars consist of two main layers.
The bottom layer is made from creamy peanut butter, creating a rich and smooth center.
The top layer is melted chocolate, which sets in the refrigerator and creates a firm chocolate coating.
Depending on the peanut butter and chocolate you use, the final texture can range from soft and creamy to slightly firmer and more fudge-like.
The beauty of this recipe is its simplicity. You can prepare a delicious dessert without making a traditional baked crust or complicated filling.
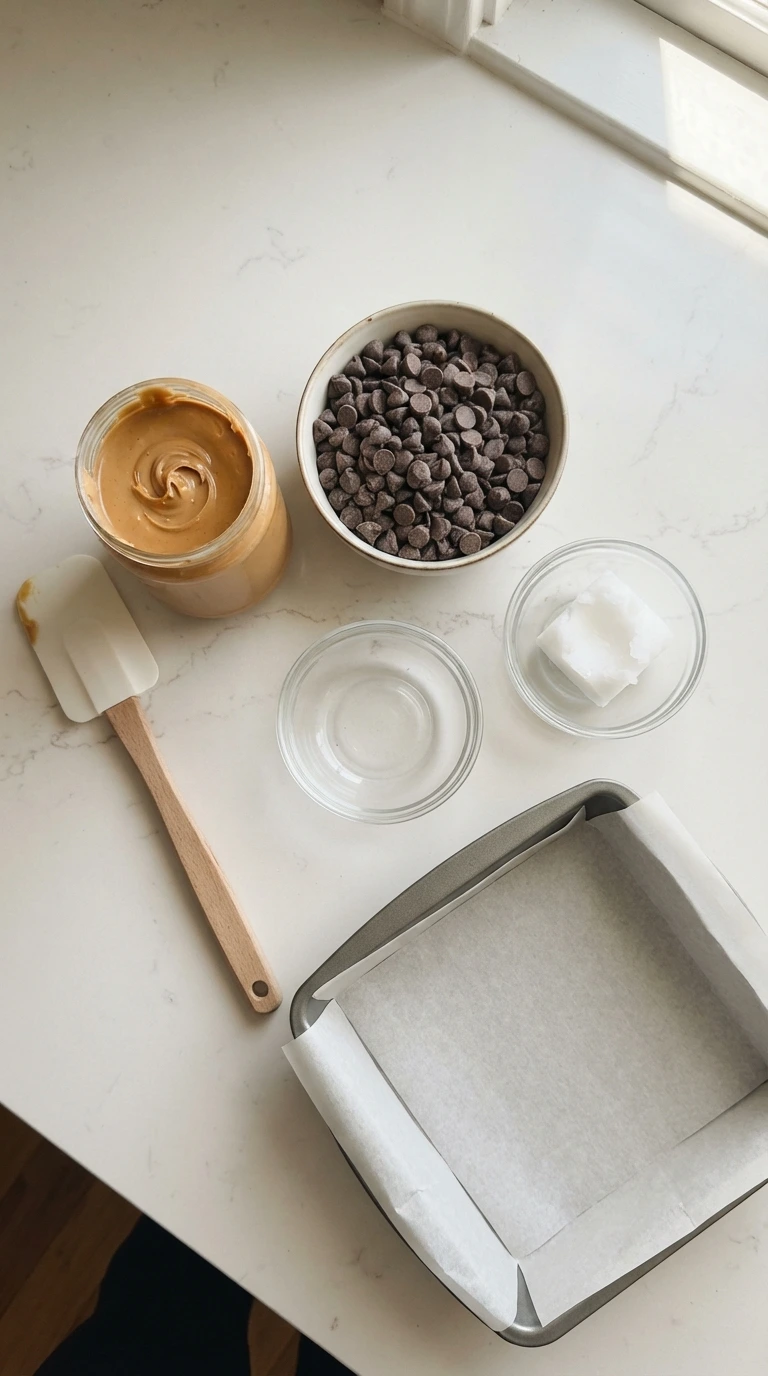
Ingredients
For the basic recipe, you need only three ingredients:
- 1 1/2 cups creamy peanut butter
- 2 cups semi-sweet or milk chocolate chips
- 2 tablespoons coconut oil
That’s it.
The coconut oil is used to help the chocolate melt smoothly and set with a pleasant texture.
If your chocolate melts smoothly without it, you can adjust the amount according to the chocolate you’re using.
Equipment
You only need a few basic kitchen tools:
- 8-inch square baking pan
- Parchment paper
- Microwave-safe bowl
- Rubber spatula
- Measuring cups
- Sharp knife
- Refrigerator
A square pan works particularly well because it makes it easy to create evenly sized bars.
How to Make 3-Ingredient Chocolate Peanut Butter Bars
Step 1: Prepare the Pan
Start by lining an 8-inch square baking pan with parchment paper.
Leave some parchment paper hanging over two opposite sides of the pan.
This creates convenient handles that will help you lift the chilled dessert out of the pan later.
Press the parchment paper into the corners as neatly as possible.
You don’t need to grease the pan if the parchment covers the bottom and sides sufficiently.
Step 2: Add the Peanut Butter
Measure the creamy peanut butter and place it into a microwave-safe bowl.
Warm it gently for a few seconds at a time, stirring between each interval.
The goal is not to make the peanut butter hot. You simply want it soft enough to spread easily.
Pour or spoon the peanut butter into the prepared pan.
Use a rubber spatula to spread it into an even layer.
Try to create a level surface because this will become the base of your chocolate peanut butter bars.
Once the peanut butter is evenly spread, place the pan in the refrigerator for approximately 20–30 minutes.
This gives the bottom layer a chance to firm up before the chocolate is added.
Step 3: Melt the Chocolate
While the peanut butter layer chills, prepare the chocolate topping.
Place the chocolate chips and coconut oil into a microwave-safe bowl.
Heat them in short intervals, stirring thoroughly after each interval.
Continue until the chocolate is smooth and glossy.
Avoid overheating the chocolate.
Chocolate can burn or become thick if it is heated too aggressively, so gentle heating and frequent stirring are important.
You can also melt the chocolate using a double boiler if you prefer.
Once melted, allow it to cool slightly.
It should still be fluid enough to spread but should not be extremely hot.
Step 4: Add the Chocolate Layer
Remove the chilled peanut butter layer from the refrigerator.
Pour the melted chocolate over the top.
Use a rubber spatula to gently spread the chocolate from edge to edge.
Try not to press too hard because you don’t want to disturb the peanut butter layer underneath.
Create an even chocolate layer across the entire surface.
If you want a completely smooth finish, gently run the spatula across the surface.
For a more homemade appearance, you can leave a few subtle swirls in the chocolate.
Step 5: Chill the Bars
Place the pan back into the refrigerator.
Allow the chocolate peanut butter bars to chill for at least 2 hours, or until the chocolate is completely firm.
For the cleanest slices, you can refrigerate the bars for several hours or overnight.
The longer chilling time also makes the dessert easier to remove from the pan without damaging the layers.
Step 6: Remove From the Pan
Once the bars are completely chilled, use the parchment paper handles to carefully lift the entire dessert from the pan.
Place it on a clean cutting board.
If the chocolate feels extremely firm, let the dessert sit at room temperature for a few minutes before cutting.
This helps prevent the chocolate layer from cracking excessively.
Step 7: Cut Into Bars
Use a sharp knife to cut the dessert into rectangles or squares.
For clean edges, run the knife under warm water, dry it thoroughly, and then make a cut.
Repeat this process between cuts.
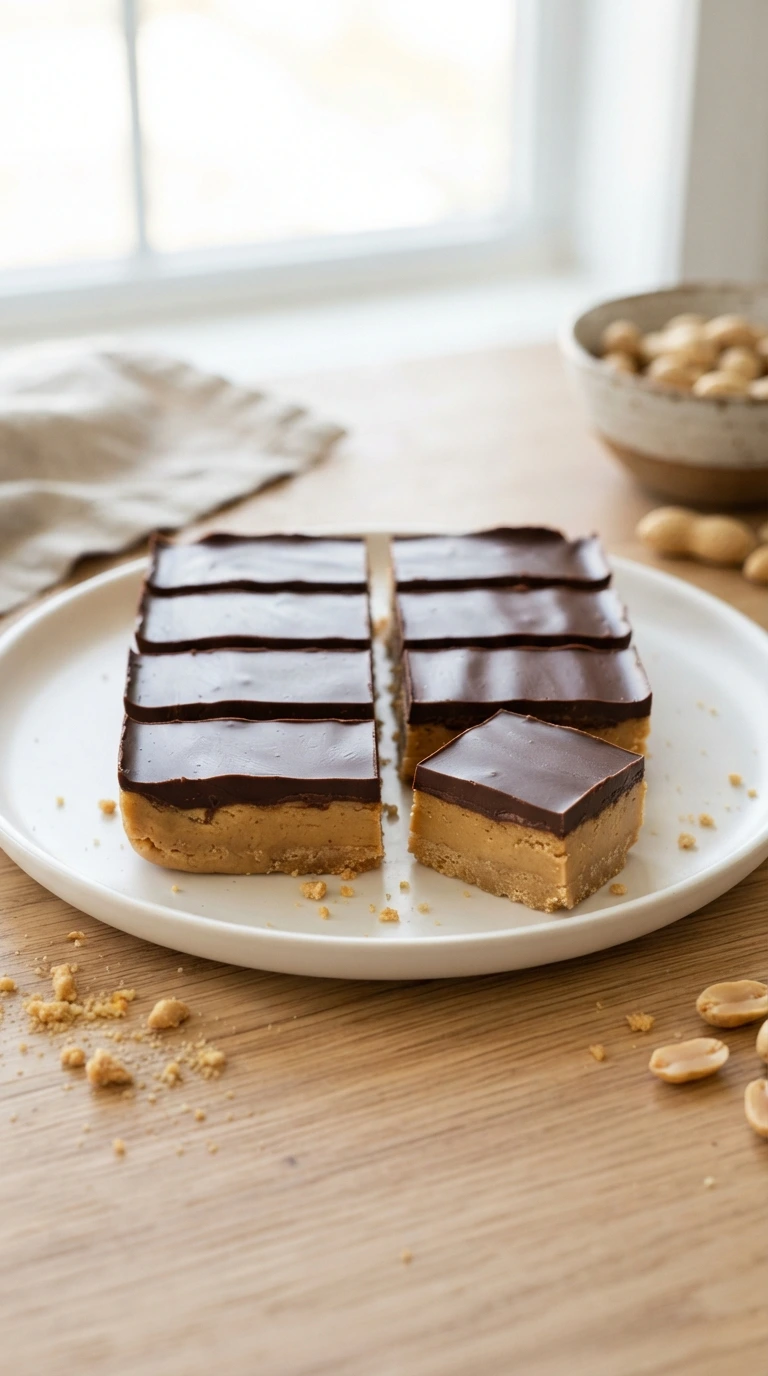
You should now see two distinct layers: a creamy peanut butter base and a smooth chocolate topping.
Arrange the bars on a serving plate and enjoy.
Tips for Perfect Chocolate Peanut Butter Bars
Use creamy peanut butter
Creamy peanut butter creates the smoothest texture and makes the bars easier to cut.
Natural peanut butter can work, but it may separate and produce a softer or more oily layer.
If you use natural peanut butter, stir it thoroughly before measuring.
Don’t overheat the chocolate
Gentle heating is the key to smooth melted chocolate.
Heat it in short intervals and stir frequently.
Residual heat will continue melting the chocolate even after you remove it from the microwave.
Let the peanut butter layer chill
Chilling the peanut butter before adding the chocolate helps keep the layers separate.
If the peanut butter is too soft, the chocolate may mix into it when you spread the topping.
Use parchment paper
Parchment makes removing the finished bars much easier.
It also helps keep the edges of the dessert neat.
Use a sharp knife
A sharp knife gives you cleaner cuts and helps reveal the beautiful two-layer structure.
What Type of Chocolate Should You Use?
You have several options.
Semi-Sweet Chocolate
Semi-sweet chocolate creates a balanced dessert that isn’t excessively sweet.
This is a great everyday choice.
Milk Chocolate
Milk chocolate creates a sweeter, creamier flavor that pairs beautifully with peanut butter.
Dark Chocolate
Dark chocolate creates a richer and more intense dessert.
It also balances the sweetness of the peanut butter particularly well.
Chocolate Chips
Chocolate chips are convenient because they melt easily and are widely available.
Choose the type based on your preferred sweetness.
Can You Use Crunchy Peanut Butter?
Yes.
Crunchy peanut butter will add small pieces of roasted peanuts throughout the bottom layer.
This creates additional texture and makes the bars slightly more rustic.
If you prefer a perfectly smooth dessert, use creamy peanut butter.
Can You Make These Bars Without Coconut Oil?
Yes.
The coconut oil helps the chocolate melt smoothly and creates a pleasant texture once chilled, but you can use chocolate on its own if you prefer.
If your chocolate melts smoothly and has the consistency you want, you may not need additional oil.
How Long Do Chocolate Peanut Butter Bars Need to Chill?
They should chill for at least 2 hours.
However, chilling them for 3–4 hours or overnight can make cutting easier.
The important thing is that the chocolate topping is completely firm before you try to remove and slice the bars.
How to Get Clean Layers
The appearance of these bars is one of their best features.
To create a clean separation between the peanut butter and chocolate:
- Spread the peanut butter evenly.
- Chill it before adding chocolate.
- Let the melted chocolate cool slightly.
- Pour the chocolate gently over the peanut butter.
- Spread the chocolate carefully without pressing deeply.
- Chill thoroughly before slicing.
Following these steps helps keep the layers distinct.
How to Store Chocolate Peanut Butter Bars
Store the bars in an airtight container in the refrigerator.
Place parchment paper between layers if you are stacking them.
Keeping them chilled helps the chocolate maintain its firm texture.
They can also be enjoyed slightly closer to room temperature if you prefer a softer peanut butter center.
Can You Freeze These Bars?
Yes.
These bars freeze very well.
Place them in an airtight freezer-safe container and separate layers with parchment paper.
When you want to serve them, transfer the desired number of bars to the refrigerator and allow them to thaw gradually.
You can also let them sit at room temperature briefly before serving.
Freezing is particularly useful if you want to prepare the dessert well in advance.
Easy Variations
Although the basic recipe contains only three ingredients, you can create different versions depending on your preferences.
Sea Salt Chocolate Peanut Butter Bars
Sprinkle a small amount of flaky sea salt over the melted chocolate before it sets.
The salty contrast works beautifully with chocolate and peanut butter.
Crunchy Peanut Bars
Use crunchy peanut butter for extra texture.
Dark Chocolate Peanut Butter Bars
Use dark chocolate for a deeper, less sweet chocolate flavor.
Milk Chocolate Bars
Use milk chocolate for a sweeter and creamier dessert.
Peanut Butter Swirl
Reserve a small amount of softened peanut butter and swirl it through the melted chocolate before chilling.
This creates a beautiful marbled appearance.
Extra Chocolate
Add a second thin drizzle of chocolate across the top after the main chocolate layer has partially set.
This gives the bars a more decorative finish.
Serving Ideas
These chocolate peanut butter bars are delicious straight from the refrigerator.
For a more indulgent dessert, serve them with:
- Vanilla ice cream
- Whipped cream
- Fresh berries
- Banana slices
- Extra peanut butter
- Chocolate sauce
- A sprinkle of chopped peanuts
You can also cut them into very small squares and serve them as bite-sized treats at parties.
When to Make These Bars
These bars are particularly useful when you need a dessert that can be prepared ahead.
Parties
Make them the day before and keep them refrigerated until serving.
Holidays
Cut them into small squares and add a light sprinkle of sea salt for an elegant dessert platter.
Movie Nights
They are easy to eat and require very little preparation.
Family Gatherings
A single square pan produces multiple servings.
Weeknight Treat
When you want something sweet without baking an entire cake, these bars are a quick option.
Troubleshooting
Why is my chocolate cracking?
Very cold chocolate can crack when cut.
Let the bars sit at room temperature for several minutes before slicing, and use a warm, dry knife.
Why is my peanut butter layer too soft?
Some peanut butters contain more oil than others.
Natural peanut butter can produce a softer layer. Refrigerating the bars longer can help.
Why won’t my chocolate melt smoothly?
The chocolate may have been overheated or exposed to moisture.
Use short microwave intervals and stir frequently.
Make sure the bowl and utensils are completely dry.
Why are my layers mixing together?
The peanut butter layer may not have been chilled enough before the chocolate was added.
Give the peanut butter layer enough time to firm up.
Also allow the melted chocolate to cool slightly before pouring it over the peanut butter.
Frequently Asked Questions
Are these chocolate peanut butter bars really no-bake?
Yes. They don’t require an oven. The refrigerator is used to set the layers.
How many ingredients are in this recipe?
Only three: peanut butter, chocolate chips, and coconut oil.
Can I use almond butter?
Yes, almond butter can be substituted for peanut butter, although the flavor and texture will be different.
Can I use white chocolate?
Yes. White chocolate creates a much sweeter variation and contrasts beautifully with the peanut butter.
Can children help make these?
Yes. The recipe involves simple mixing and spreading, although an adult should handle hot melted chocolate.
Can I make them ahead?
Yes. They are excellent make-ahead treats and can be refrigerated or frozen.
Why This Recipe Works
The success of this recipe comes from the natural compatibility of chocolate and peanut butter.
Peanut butter provides a rich, creamy, slightly salty base.
Chocolate adds sweetness and a firm, smooth topping.
Coconut oil helps the chocolate melt smoothly and contributes to the final texture after chilling.
Because there are so few ingredients, each one plays an important role.
The key is simply to use ingredients you enjoy and allow enough time for the layers to set properly.
Final Thoughts
These 3-Ingredient Chocolate Peanut Butter Bars are proof that an impressive dessert doesn’t need to be complicated.
With just peanut butter, chocolate, and coconut oil, you can create a rich no-bake treat with beautiful layers and an irresistible combination of textures.
The creamy peanut butter center pairs perfectly with the firm chocolate topping, while the simple preparation makes this recipe accessible even if you’re not an experienced baker.
Prepare a batch for a party, keep some in the refrigerator for a quick sweet treat, or freeze them for later.
Once you try how easy these bars are to make, you’ll understand why chocolate and peanut butter remain one of the most popular dessert combinations.
Recipe Card
Recipe: 3-Ingredient Chocolate Peanut Butter Bars
Prep Time: 15 minutes
Chill Time: 2 hours
Total Time: 2 hours 15 minutes
Servings: 16 bars
Course: Dessert
Cuisine: American
Method: No-Bake
Ingredients
- 1 1/2 cups creamy peanut butter
- 2 cups semi-sweet or milk chocolate chips
- 2 tablespoons coconut oil
Instructions
- Line an 8-inch square pan with parchment paper.
- Gently warm the peanut butter until easy to spread.
- Spread the peanut butter evenly in the prepared pan.
- Refrigerate for 20–30 minutes.
- Melt the chocolate chips and coconut oil together, stirring until smooth.
- Allow the chocolate to cool slightly.
- Pour the chocolate over the chilled peanut butter layer.
- Spread into an even layer.
- Refrigerate for at least 2 hours, or until firm.
- Lift the dessert from the pan using the parchment paper.
- Cut into 16 bars using a sharp knife.
- Serve chilled or slightly softened at room temperature.
3-Ingredient Chocolate Peanut Butter Bars
- Total Time: 135 minutes
- Yield: 16 servings 1x
- Diet: Vegetarian
Description
Rich and creamy no-bake dessert bars made with only three ingredients: creamy peanut butter, chocolate chips, and coconut oil.
Ingredients
- 1 1/2 cups creamy peanut butter
- 2 cups semi-sweet or milk chocolate chips
- 2 tablespoons coconut oil
Instructions
- Line an 8-inch square pan with parchment paper.
- Gently warm the peanut butter until easy to spread.
- Spread the peanut butter evenly in the prepared pan.
- Refrigerate for 20–30 minutes.
- Melt the chocolate chips and coconut oil together, stirring until smooth.
- Allow the chocolate to cool slightly.
- Pour the chocolate over the chilled peanut butter layer.
- Spread into an even layer.
- Refrigerate for at least 2 hours, or until firm.
- Lift the dessert from the pan using the parchment paper.
- Cut into 16 bars using a sharp knife.
- Serve chilled or slightly softened at room temperature.
Notes
Use creamy peanut butter for best results. Chilling the layers adequately ensures clean cuts.
- Prep Time: 15 minutes
- Cook Time: 0 minutes
- Category: Dessert
- Method: No-Bake
- Cuisine: American
Nutrition
- Serving Size: 1 bar
- Calories: 200
- Sugar: 10g
- Sodium: 65mg
- Fat: 14g
- Saturated Fat: 6g
- Unsaturated Fat: 8g
- Trans Fat: 0g
- Carbohydrates: 17g
- Fiber: 2g
- Protein: 5g
- Cholesterol: 0mg
Keywords: chocolate, peanut butter, no-bake dessert, easy dessert, bars
2 thoughts on “3-Ingredient Chocolate Peanut Butter Bars”