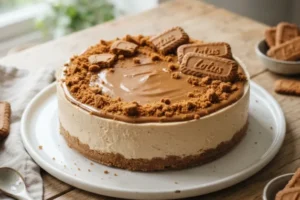
If you are a fan of Biscoff cookies and creamy cheesecake, this No-Bake Biscoff Cheesecake is about to become one of your favorite desserts. It combines a buttery Biscoff cookie crust with an incredibly smooth Biscoff cheesecake filling and a delicious layer of Biscoff spread on top.
The best part? There is absolutely no oven required.
This cheesecake is an easy dessert that looks impressive but requires very little baking experience. Instead of worrying about oven temperatures, water baths, or cracks on the surface, you simply prepare the crust, mix the creamy filling, assemble everything, and let the refrigerator do the hard work.
The result is a rich but wonderfully creamy cheesecake with plenty of caramelized cookie flavor in every bite. The crunchy cookie crust contrasts beautifully with the soft filling, while the smooth Biscoff topping adds another layer of irresistible flavor.
Whether you are preparing dessert for a birthday, holiday, dinner party, afternoon coffee, or simply want something special for the weekend, this no-bake cheesecake is an excellent choice.
Why You’ll Love This Biscoff Cheesecake
There are plenty of reasons why this dessert deserves a place in your recipe collection.
No oven required
The biggest advantage is right in the name. You don’t need to turn on your oven. Everything is assembled and chilled in the refrigerator.
Easy ingredients
You only need a handful of simple ingredients, including Biscoff cookies, Biscoff spread, cream cheese, powdered sugar, vanilla, butter, and heavy cream.
Incredible texture
The cheesecake filling is thick, creamy, and smooth, while the cookie crust provides a satisfying crunch.
Make-ahead friendly
This cheesecake needs several hours to chill, making it perfect for preparing the day before an event.
Beautiful presentation
The golden-brown Biscoff topping and cookie decoration make this dessert look elegant without complicated decorating techniques.
Perfect for Biscoff lovers
Biscoff cookies and spread are used throughout the dessert, giving you plenty of that distinctive caramelized cookie flavor.
What Is Biscoff?
Biscoff cookies are crisp caramelized biscuits known for their slightly spiced flavor and crunchy texture. They are particularly delicious with coffee or tea and have become a popular ingredient in desserts.
Biscoff spread takes the same cookie flavor and turns it into a smooth, creamy spread. It works beautifully in cheesecake because it adds sweetness, caramel notes, and a subtle warm spice flavor.
Using both the cookies and the spread gives this cheesecake a deeper Biscoff flavor than using either ingredient alone.
Ingredients You’ll Need
For the Biscoff Cookie Crust
- 24 Biscoff cookies
- 5 tablespoons unsalted butter, melted
For the Cheesecake Filling
- 16 ounces cream cheese, softened
- 1 cup powdered sugar
- 1 teaspoon vanilla extract
- 1 cup Biscoff spread
- 1 1/2 cups heavy whipping cream
For the Topping
- 1/2 cup Biscoff spread
- 6 Biscoff cookies, crushed
- 4–6 whole Biscoff cookies for decoration, optional
Equipment
You don’t need specialized equipment for this recipe.
- 9-inch springform pan
- Food processor or rolling pin
- Large mixing bowl
- Medium mixing bowl
- Electric hand mixer or stand mixer
- Rubber spatula
- Measuring cups and spoons
- Microwave-safe bowl
- Refrigerator
A springform pan is recommended because it makes removing the chilled cheesecake much easier.

How to Make No-Bake Biscoff Cheesecake
Step 1: Make the Biscoff Crust
Begin by crushing the Biscoff cookies into fine crumbs.
A food processor is the fastest method, but you can also place the cookies in a sealed plastic bag and crush them with a rolling pin.
Try to create fairly fine crumbs. Larger pieces can make the crust difficult to compact evenly.
Transfer the cookie crumbs to a bowl and pour in the melted butter.
Stir until the butter is evenly distributed. The mixture should have the consistency of damp sand.
Line the bottom of your springform pan with parchment paper if desired.
Pour the Biscoff crumb mixture into the pan and spread it evenly.
Use the bottom of a glass or measuring cup to press the crumbs firmly into one compact layer.
This step is important. A firmly packed crust will hold together much better when you cut the finished cheesecake.
Place the crust in the refrigerator while you prepare the filling.
Step 2: Prepare the Cream Cheese
Place softened cream cheese in a large mixing bowl.
Beat it with an electric mixer until smooth and creamy.
Add the powdered sugar and vanilla extract. Continue mixing until everything is completely combined.
Scrape the sides of the bowl occasionally with a rubber spatula to make sure no cream cheese remains unmixed.
Using softened cream cheese is important because it creates a smoother filling and helps prevent lumps.
Step 3: Add the Biscoff Spread
Add the Biscoff spread to the cream cheese mixture.
Mix until the spread is completely incorporated and the filling has a uniform golden-brown color.
At this stage, the mixture should already smell wonderfully caramelized and spiced.
Take a moment to scrape down the sides of the bowl again so all the ingredients are evenly combined.
Step 4: Whip the Heavy Cream
Pour the cold heavy whipping cream into a separate clean bowl.
Using an electric mixer, whip the cream until stiff peaks form.
The cream should be thick enough to hold its shape when the beaters are lifted.
Avoid overmixing because overwhipped cream can become grainy.
Properly whipped cream is one of the ingredients that helps give this no-bake cheesecake its light yet creamy texture.
Step 5: Fold Everything Together
Add the whipped cream to the Biscoff cream cheese mixture.
Using a rubber spatula, gently fold the whipped cream into the filling.
Don’t stir too aggressively. Gentle folding helps preserve the air that was incorporated into the whipped cream.
Continue folding until you have a smooth, evenly mixed cheesecake filling.
The finished mixture should be thick, creamy, and easy to spread.
Step 6: Fill the Crust
Remove the chilled crust from the refrigerator.
Spoon the Biscoff cheesecake filling onto the crust.
Spread the filling evenly with a rubber spatula.
Smooth the top as much as possible.
You can create a completely flat surface for a clean, elegant appearance, or leave a few natural swirls for a more homemade look.
Gently tap the pan against the countertop a couple of times if necessary to help remove large air pockets.
Step 7: Prepare the Biscoff Topping
Place the additional Biscoff spread into a microwave-safe bowl.
Warm it briefly until it becomes softer and easier to spread.
The spread should be fluid enough to move across the surface but not hot.
Pour or spoon the softened Biscoff spread over the top of the cheesecake.
Use a spatula or the back of a spoon to spread it into an even layer.
Let the topping naturally settle over the surface rather than trying to make it perfectly thin.
Step 8: Add the Cookies
Crush several Biscoff cookies into a mixture of fine crumbs and slightly larger pieces.
Sprinkle them over the Biscoff topping.
For a more decorative presentation, place several whole Biscoff cookies around the edge or gently press them into the topping.
You can also leave the center mostly smooth and add crushed cookies around the edges.
Step 9: Chill the Cheesecake
Cover the cheesecake carefully and place it in the refrigerator.
Allow it to chill for at least 6 hours.
For the best results, refrigerate it overnight.
The chilling time allows the cheesecake filling to become firm enough to slice while keeping its creamy texture.
Do not rush this stage. The refrigerator is what gives a no-bake cheesecake its final structure.
Step 10: Slice and Serve
Once the cheesecake has completely chilled, carefully release it from the springform pan.
Transfer it to a serving plate.
For clean slices, use a sharp knife warmed under hot water. Dry the knife thoroughly before cutting.
Make one clean cut, then wipe the knife before making the next slice.
Serve the cheesecake cold.
Each slice should show the beautiful contrast between the golden cookie crust, creamy Biscoff filling, and smooth Biscoff topping.

Tips for the Best No-Bake Biscoff Cheesecake
Use room-temperature cream cheese
Softened cream cheese blends more easily and produces a smoother filling.
Use cold heavy cream
Cold cream generally whips more easily and creates a stable whipped texture.
Pack the crust firmly
Press the cookie mixture firmly into the pan. This helps prevent the crust from crumbling when sliced.
Don’t overheat the Biscoff spread
The spread only needs gentle warming to become easier to spread. It should not be hot when applied to the cheesecake.
Give it enough time to chill
Six hours is a good minimum, but overnight refrigeration is ideal.
Don’t rush the slicing
A chilled cheesecake slices much more cleanly than one that has not fully set.
How to Get Clean Cheesecake Slices
A beautiful cheesecake deserves beautiful slices.
Start by making sure the cheesecake is thoroughly chilled.
Run a sharp knife under hot water for several seconds, then dry it completely.
Make a clean cut through the cheesecake without using a sawing motion.
Wipe the knife clean and repeat before cutting the next slice.
This simple technique helps create smooth edges and makes the layers easier to see.
Can I Make This Cheesecake Ahead of Time?
Absolutely.
In fact, this is one of the best desserts to make ahead.
Prepare the entire cheesecake the day before serving and keep it covered in the refrigerator overnight.
The additional chilling time allows the filling to become even more stable while keeping its creamy texture.
This makes it especially convenient for birthdays, holidays, dinner parties, and other occasions when you don’t want to prepare dessert at the last minute.
How to Store Biscoff Cheesecake
Keep leftover cheesecake covered and refrigerated.
Because the dessert contains cream cheese and heavy cream, it should remain chilled.
Individual slices can be placed into airtight containers and stored in the refrigerator.
For the best texture and flavor, enjoy the cheesecake within several days.
Can You Freeze No-Bake Biscoff Cheesecake?
Yes, you can freeze it.
For the best results, freeze the cheesecake before adding delicate decorative toppings.
Wrap the cheesecake securely in plastic wrap, followed by a layer of aluminum foil or place it inside a freezer-safe airtight container.
When ready to serve, transfer it to the refrigerator and allow it to thaw gradually.
Add fresh crushed cookies or decorative toppings after thawing.
Delicious Variations
Biscoff Chocolate Cheesecake
Add melted chocolate to the cheesecake filling for a chocolate-Biscoff combination.
The deep chocolate flavor pairs beautifully with the caramelized cookie taste.
Biscoff Banana Cheesecake
Add thinly sliced bananas between the crust and cheesecake filling.
The creamy banana flavor works especially well with Biscoff.
Mini Biscoff Cheesecakes
Instead of one large cheesecake, make individual portions in small dessert cups.
This is a great option for parties and gatherings.
Biscoff Cheesecake Bars
Prepare the recipe in a square baking dish and cut it into small bars after chilling.
This makes the dessert easy to serve at parties.
Extra-Crunchy Biscoff Cheesecake
Reserve some larger cookie pieces and fold them into the cheesecake filling for additional texture.
Frequently Asked Questions
Does Biscoff cheesecake need to be baked?
No. This recipe is completely no-bake. The cheesecake sets in the refrigerator.
How long should Biscoff cheesecake chill?
Chill it for at least 6 hours. Overnight refrigeration is recommended for the firmest texture and cleanest slices.
Can I use a different pan?
Yes. A deep pie dish or square baking dish can work, although a springform pan makes it easier to remove the finished cheesecake.
Why is my cheesecake too soft?
The cheesecake may need more refrigeration time. Make sure it has chilled long enough before slicing.
Can I use homemade cookie crumbs?
Yes. Any suitable caramelized biscuit crumbs can be used, although Biscoff cookies provide the classic flavor.
Can I make mini versions?
Yes. Individual Biscoff cheesecakes are perfect for parties and can be assembled in small glasses or dessert cups.
Can I decorate the cheesecake differently?
Absolutely. Try whipped cream, whole Biscoff cookies, cookie crumbs, chocolate curls, or a thin Biscoff drizzle.
What to Serve With Biscoff Cheesecake
This cheesecake is delicious with a cup of coffee or tea.
For an extra-indulgent dessert, serve each slice with a small spoonful of whipped cream and an additional Biscoff cookie.
You can also drizzle a little extra warmed Biscoff spread over individual slices immediately before serving.
The combination of creamy cheesecake, crunchy cookies, and warm caramelized flavor makes every bite satisfying.
Final Thoughts
The crunchy Biscoff crust, creamy cheesecake filling, smooth cookie butter topping, and extra cookie crumbs come together to create a dessert that looks beautiful and tastes even better.
Because there is no oven involved, it is especially convenient when you want a simple dessert that can be prepared ahead of time.
Make it for a special celebration, bring it to a family gathering, or prepare it simply because you are craving Biscoff.
Once you take that first creamy, crunchy bite, you will understand why this easy no-bake dessert is such a crowd-pleaser.
Recipe Information
Prep Time: 30 minutes
Chill Time: 6 hours
Total Time: 6 hours 30 minutes
Servings: 10–12 slices
Course: Dessert
Cuisine: American
Calories: Approximately 480 calories per serving
Quick Recipe Card
Ingredients
Crust
- 24 Biscoff cookies
- 5 tablespoons unsalted butter, melted
Filling
- 16 ounces softened cream cheese
- 1 cup powdered sugar
- 1 teaspoon vanilla extract
- 1 cup Biscoff spread
- 1 1/2 cups heavy whipping cream
Topping
- 1/2 cup Biscoff spread
- 6 crushed Biscoff cookies
- 4–6 whole Biscoff cookies, optional
Instructions
- Crush the Biscoff cookies and combine them with melted butter.
- Press the mixture firmly into a 9-inch springform pan.
- Refrigerate the crust while preparing the filling.
- Beat softened cream cheese until smooth.
- Add powdered sugar, vanilla, and Biscoff spread and mix until creamy.
- Whip the heavy cream separately until stiff peaks form.
- Gently fold the whipped cream into the Biscoff mixture.
- Spread the filling evenly over the chilled crust.
- Warm the remaining Biscoff spread slightly and spread it over the cheesecake.
- Add crushed and whole Biscoff cookies for decoration.
- Refrigerate for at least 6 hours or overnight.
- Remove from the pan, slice, and serve chilled.
No-Bake Biscoff Cheesecake
- Total Time: 390 minutes
- Yield: 10-12 servings 1x
- Diet: Vegetarian
Description
A delightful no-bake cheesecake featuring a buttery Biscoff cookie crust, creamy Biscoff filling, and a smooth layer of Biscoff spread on top.
Ingredients
- 24 Biscoff cookies
- 5 tablespoons unsalted butter, melted
- 16 ounces cream cheese, softened
- 1 cup powdered sugar
- 1 teaspoon vanilla extract
- 1 cup Biscoff spread
- 1 1/2 cups heavy whipping cream
- 1/2 cup Biscoff spread (for topping)
- 6 Biscoff cookies, crushed
- 4–6 whole Biscoff cookies for decoration (optional)
Instructions
- Crush the Biscoff cookies and combine them with melted butter.
- Press the mixture firmly into a 9-inch springform pan.
- Refrigerate the crust while preparing the filling.
- Beat softened cream cheese until smooth.
- Add powdered sugar, vanilla, and Biscoff spread and mix until creamy.
- Whip the heavy cream separately until stiff peaks form.
- Fold the whipped cream into the Biscoff mixture gently.
- Spread the filling evenly over the chilled crust.
- Warm the remaining Biscoff spread slightly and spread it over the cheesecake.
- Add crushed and whole Biscoff cookies for decoration.
- Refrigerate for at least 6 hours or overnight.
- Remove from the pan, slice, and serve chilled.
Notes
Use room-temperature cream cheese for a smoother filling. Ensure the heavy cream is cold for optimal whipping.
- Prep Time: 30 minutes
- Cook Time: 0 minutes
- Category: Dessert
- Method: Refrigeration
- Cuisine: American
Nutrition
- Serving Size: 1 slice
- Calories: 480
- Sugar: 32g
- Sodium: 350mg
- Fat: 36g
- Saturated Fat: 20g
- Unsaturated Fat: 10g
- Trans Fat: 0g
- Carbohydrates: 44g
- Fiber: 1g
- Protein: 5g
- Cholesterol: 120mg
Keywords: No-Bake Cheesecake, Biscoff Dessert, Easy Dessert, Creamy Cheesecake, Biscoff Recipe
1 thought on “No-Bake Biscoff Cheesecake”