If you love rich chocolate desserts and crunchy Oreo cookies, this No-Bake Chocolate Oreo Cheesecake is a recipe you need to try. It has everything you want in an easy dessert: a crunchy Oreo cookie crust, a smooth and creamy chocolate cheesecake filling, and plenty of crushed Oreos on top. Best of all, there is no oven required.
This cheesecake is perfect when you want an impressive dessert without spending hours in the kitchen. The preparation is simple, the ingredients are easy to find, and most of the work happens while the cheesecake chills in the refrigerator.
The finished cheesecake has a beautiful contrast of textures. The Oreo crust is firm and slightly crunchy, while the chocolate cheesecake layer is soft, creamy, and rich. Every bite combines chocolate, vanilla, cream cheese, and Oreo cookies into one irresistible dessert.
Whether you are preparing dessert for a family dinner, birthday celebration, holiday gathering, or simply craving something sweet, this no-bake cheesecake is an excellent choice.
Why You’ll Love This No-Bake Oreo Cheesecake
There are plenty of reasons to add this recipe to your dessert collection.
No oven required: You don’t have to heat up the kitchen or worry about baking times. The refrigerator does the work.
Easy preparation: The recipe uses straightforward ingredients and simple techniques, making it suitable even if you are new to making cheesecake.
Rich chocolate flavor: Chocolate and Oreos create a deep, satisfying flavor without requiring complicated ingredients.
Creamy texture: The filling becomes wonderfully smooth and thick after chilling.
Perfect for entertaining: Because you can prepare it ahead of time, it is an ideal dessert for parties and gatherings.
Beautiful presentation: The dark Oreo crust, creamy chocolate center, and crushed cookie topping make an impressive dessert with very little decorating effort.
What Is a No-Bake Cheesecake?
A no-bake cheesecake is different from a traditional baked cheesecake because it does not need to be cooked in the oven. Instead, the cheesecake filling is prepared and then chilled until it becomes firm enough to slice.
This makes no-bake cheesecake especially convenient during warm weather. There is no need to turn on the oven, and there is less risk of overbaking or cracking the cheesecake.
For this Oreo version, crushed cookies are used to create the crust, while cream cheese, whipped cream, chocolate, powdered sugar, and vanilla create the creamy filling.
The key to a successful no-bake cheesecake is allowing enough refrigeration time. The filling needs several hours to properly set, so patience is important.
Ingredients You’ll Need
For the Oreo Crust
- 24 Oreo cookies
- 5 tablespoons unsalted butter, melted
For the Chocolate Cheesecake Filling
- 16 ounces cream cheese, softened
- 1 cup powdered sugar
- 1 teaspoon vanilla extract
- 8 ounces semi-sweet chocolate, melted and slightly cooled
- 1 1/2 cups heavy whipping cream
- 10 Oreo cookies, finely crushed
For the Topping
- 6 Oreo cookies, roughly crushed
- Whipped cream, optional
- Chocolate shavings, optional
Equipment
You only need a few basic kitchen tools:
- 9-inch springform pan
- Food processor or rolling pin
- Mixing bowls
- Electric hand mixer or stand mixer
- Rubber spatula
- Measuring cups and spoons
- Microwave-safe bowl or double boiler
- Refrigerator
A springform pan is especially useful because it allows you to remove the chilled cheesecake without damaging the sides.

How to Make No-Bake Chocolate Oreo Cheesecake
Step 1: Prepare the Oreo Crust
Start by crushing the Oreo cookies into fine crumbs. You can use a food processor, or place the cookies inside a sealed bag and crush them with a rolling pin.
You want the cookies to become fairly fine crumbs so that the crust holds together properly.
Transfer the crumbs to a mixing bowl and add the melted butter. Stir thoroughly until all of the cookie crumbs are evenly coated.
The mixture should resemble wet sand.
Line the bottom of a 9-inch springform pan with parchment paper if desired. Pour the Oreo mixture into the pan and press it firmly into an even layer.
Use the bottom of a glass or measuring cup to compact the crust. Pressing the crumbs firmly is important because it prevents the crust from falling apart when you slice the cheesecake.
Place the crust in the refrigerator while you prepare the filling.
Step 2: Melt the Chocolate
Melt the semi-sweet chocolate carefully until smooth.
You can melt it in the microwave using short intervals, stirring between each interval, or melt it gently over a double boiler.
Do not overheat the chocolate. Once it is completely smooth, allow it to cool slightly.
The chocolate should remain fluid but should not be extremely hot when added to the cream cheese mixture.
Step 3: Prepare the Cream Cheese Mixture
Place the softened cream cheese into a large mixing bowl.
Beat it until smooth and creamy. Add the powdered sugar and vanilla extract, then continue mixing until everything is well combined.
Make sure the cream cheese is softened before you begin. Room-temperature cream cheese blends much more easily and helps create a smoother filling.
Add the melted chocolate gradually and mix until the filling becomes evenly chocolate-colored.
Scrape down the sides of the bowl with a rubber spatula as needed.
Step 4: Whip the Cream
In a separate clean bowl, whip the heavy cream until it forms stiff peaks.
The whipped cream provides structure and lightness to the no-bake cheesecake filling.
Be careful not to overwhip it. Once the cream holds its shape and forms firm peaks, it is ready.
Step 5: Combine the Filling
Gently fold the whipped cream into the chocolate cream cheese mixture.
Use a rubber spatula and fold rather than aggressively stirring. This helps preserve the airy texture of the whipped cream.
Once the mixture is mostly combined, add the finely crushed Oreo cookies.
Fold them through the chocolate cheesecake mixture until they are evenly distributed.
At this point, the filling should be thick, creamy, and easy to spread.
Step 6: Fill the Cheesecake
Remove the chilled Oreo crust from the refrigerator.
Spoon the chocolate cheesecake filling over the crust and spread it evenly with a spatula.
Smooth the surface as much as possible.
For an especially clean finish, gently tap the pan against the countertop a few times to remove any large air pockets.
Step 7: Add the Oreo Topping
Crush several additional Oreo cookies into a mixture of fine and larger pieces.
Sprinkle them generously over the cheesecake.
You can also decorate the top with small whipped cream swirls and chocolate shavings if you want a more elegant presentation.
Keep the decoration simple if you prefer a classic Oreo cheesecake appearance.
Step 8: Chill Until Firm
Cover the cheesecake and place it in the refrigerator.
Allow it to chill for at least 6 hours, although chilling it overnight is even better.
Do not rush this step.
The cheesecake needs enough time to firm up so that it can be sliced cleanly.
Step 9: Slice and Serve
Once completely chilled, carefully remove the cheesecake from the springform pan.
For cleaner slices, run a sharp knife under hot water, dry it, and then slice the cheesecake.
Repeat the process between slices.
Serve each slice cold and add a little whipped cream or extra crushed Oreo cookies if desired.

Tips for the Best No-Bake Chocolate Oreo Cheesecake
Use softened cream cheese
Cold cream cheese can create lumps in the filling. Let it soften at room temperature before mixing.
Don’t skip the chilling time
A no-bake cheesecake depends on refrigeration to set properly. Give it enough time to become firm.
Don’t add extremely hot chocolate
Allow melted chocolate to cool slightly before incorporating it into the cream cheese mixture.
Press the crust firmly
A loosely packed Oreo crust can crumble when you cut the cheesecake. Compact it firmly using the bottom of a glass.
Use good-quality chocolate
Because chocolate is an important part of the filling, using chocolate you enjoy eating can make a noticeable difference in flavor.
Make it ahead
This dessert is perfect for preparing the day before serving. Overnight refrigeration gives the cheesecake plenty of time to set.
How to Store Oreo Cheesecake
Store the cheesecake covered in the refrigerator.
It should be kept cold until you are ready to serve it.
Individual slices can also be stored in airtight containers in the refrigerator, making it easy to enjoy leftovers over several days.
For the best texture, keep the cheesecake chilled and avoid leaving it at room temperature for extended periods.
Can You Freeze No-Bake Oreo Cheesecake?
Yes, no-bake cheesecake can be frozen.
For best results, freeze the cheesecake without delicate toppings such as whipped cream. Wrap it securely and place it in an airtight freezer-safe container.
When you are ready to serve it, allow it to thaw gradually in the refrigerator.
Add fresh toppings after thawing for the best appearance and texture.
Easy Variations
Extra Chocolate Oreo Cheesecake
For an even more intense chocolate flavor, add additional chocolate shavings to the top or drizzle melted chocolate over each slice before serving.
Mini Oreo Cheesecakes
Instead of using one large springform pan, prepare individual cheesecakes in small dessert cups or a muffin pan lined with cupcake liners.
This is an excellent option for parties because everyone gets an individual serving.
White Chocolate Oreo Cheesecake
Replace the semi-sweet chocolate with melted white chocolate for a sweeter and lighter variation.
Peanut Butter Oreo Cheesecake
Add a layer of creamy peanut butter between the Oreo crust and chocolate cheesecake filling. Chocolate and peanut butter make an especially delicious combination.
Mint Oreo Cheesecake
Add a small amount of peppermint or mint extract to the filling and use mint-flavored Oreo cookies for a refreshing twist.
Frequently Asked Questions
Can I make this cheesecake without a springform pan?
Yes. A deep pie dish can work, although removing individual slices may be slightly more difficult. A springform pan is recommended for the cleanest presentation.
How long does no-bake Oreo cheesecake need to chill?
For the best results, refrigerate the cheesecake for at least 6 hours. Overnight chilling is recommended when possible.
Can I use different cookies?
Absolutely. You can replace traditional Oreos with another chocolate sandwich cookie or experiment with flavored Oreo varieties.
Why is my no-bake cheesecake too soft?
The most common reason is insufficient chilling time. Make sure the cheesecake has been refrigerated long enough to fully set. Also ensure that the whipped cream has been whipped properly.
Can I make it the day before?
Yes. In fact, making it the day before is one of the easiest ways to prepare this dessert for an event.
How do I get clean cheesecake slices?
Use a sharp knife warmed under hot water. Dry the knife before slicing and clean it between cuts.
Serving Ideas
This cheesecake is delicious on its own, but you can easily dress it up for special occasions.
Serve slices with a small swirl of whipped cream, extra Oreo crumbs, chocolate curls, or a drizzle of chocolate sauce.
For parties, cut the cheesecake into smaller slices so guests can enjoy it alongside other desserts.
For a dramatic presentation, place one slice on a white plate and scatter a few Oreo crumbs around it. The contrast between the dark chocolate cheesecake and white plate makes the dessert especially photogenic.
Why This Recipe Is Perfect for Busy Days
One of the best things about this cheesecake is how little active cooking it requires.
There is no cake batter to bake, no water bath to prepare, and no oven temperature to monitor. Most of the preparation involves crushing cookies, mixing the filling, and assembling the layers.
Once everything is assembled, the refrigerator takes over.
That makes this recipe especially useful when you are preparing several dishes at once. You can make the cheesecake earlier in the day or the night before and simply take it out when dessert time arrives.
Final Thoughts
With a crunchy Oreo crust, rich chocolate cheesecake filling, and plenty of crushed cookies on top, every bite delivers the perfect combination of creamy and crunchy textures.
The recipe is simple enough for an ordinary weekend dessert but impressive enough for birthdays, holidays, family dinners, and celebrations.
If you love Oreo cookies and chocolate cheesecake, this is one recipe worth keeping close. Prepare it ahead, let it chill properly, and you will have a beautiful homemade dessert ready to slice and share.
Recipe Summary
Prep Time: 30 minutes
Chill Time: 6 hours
Total Time: 6 hours 30 minutes
Servings: 10–12 slices
Course: Dessert
Cuisine: American
Calories: Approximately 520 calories per serving
Quick Recipe
Crust: Crush 24 Oreos and combine with 5 tablespoons melted butter. Press firmly into a 9-inch springform pan and chill.
Filling: Beat softened cream cheese with powdered sugar and vanilla. Mix in melted chocolate. Whip heavy cream separately and gently fold it into the chocolate mixture. Fold in crushed Oreos.
Assemble: Spread the filling over the chilled Oreo crust. Top with crushed Oreos.
Chill: Refrigerate for at least 6 hours or overnight.
Serve: Remove from the pan, slice with a warm sharp knife, and serve cold with optional whipped cream and chocolate shavings.
Print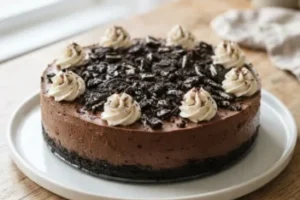
No-Bake Chocolate Oreo Cheesecake
- Total Time: 390 minutes
- Yield: 10-12 servings 1x
- Diet: Vegetarian
Description
A rich and creamy no-bake chocolate cheesecake with a crunchy Oreo cookie crust and topping, perfect for any occasion.
Ingredients
- 24 Oreo cookies
- 5 tablespoons unsalted butter, melted
- 16 ounces cream cheese, softened
- 1 cup powdered sugar
- 1 teaspoon vanilla extract
- 8 ounces semi-sweet chocolate, melted and slightly cooled
- 1 1/2 cups heavy whipping cream
- 10 Oreo cookies, finely crushed
- 6 Oreo cookies, roughly crushed
- Whipped cream, optional
- Chocolate shavings, optional
Instructions
- Prepare the Oreo crust by crushing the cookies into fine crumbs and mixing with melted butter. Press into a 9-inch springform pan and refrigerate.
- Melt the chocolate until smooth and let it cool slightly.
- Beat cream cheese in a bowl until smooth, then add powdered sugar and vanilla, mixing until combined.
- Add the cooled chocolate to the cream cheese mixture and mix until well incorporated.
- Whip the heavy cream in a separate bowl until stiff peaks form.
- Fold the whipped cream into the chocolate mixture gently, then add in finely crushed Oreos.
- Spread the filling over the chilled Oreo crust and smooth the top.
- Sprinkle the roughly crushed Oreos on top for decoration.
- Chill in the refrigerator for at least 6 hours, preferably overnight, to set.
- Slice and serve cold, optionally with whipped cream or chocolate shavings.
Notes
Ensure cream cheese is softened to prevent lumps. Don’t skip chilling time for the cheesecake to set properly.
- Prep Time: 30 minutes
- Cook Time: 0 minutes
- Category: Dessert
- Method: No-Bake
- Cuisine: American
Nutrition
- Serving Size: 1 slice
- Calories: 520
- Sugar: 40g
- Sodium: 210mg
- Fat: 35g
- Saturated Fat: 20g
- Unsaturated Fat: 8g
- Trans Fat: 0g
- Carbohydrates: 50g
- Fiber: 2g
- Protein: 7g
- Cholesterol: 55mg
Keywords: no-bake cheesecake, chocolate cheesecake, Oreo dessert
3 thoughts on “No-Bake Chocolate Oreo Cheesecake”