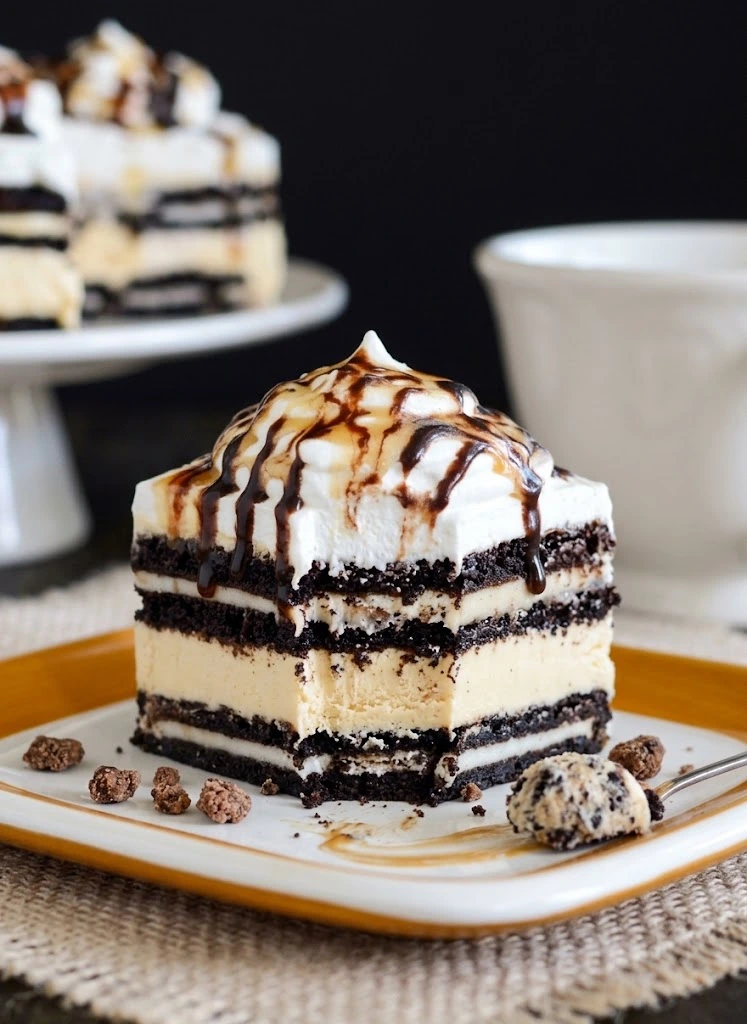
If you love Oreos, caramel, and creamy no-bake desserts, this Salted Caramel Oreo Icebox Cake is about to become one of your favorites. Layers of chocolate sandwich cookies are combined with a silky salted caramel cheesecake filling, then finished with fluffy whipped topping, caramel, chocolate, and a touch of sea salt.
The best part is that there is no baking required. Simply layer everything in an 8×8-inch pan, refrigerate until set, and you’ll have a rich, creamy dessert that’s perfect for parties, holidays, family gatherings, or an easy weeknight treat.
Why You’ll Love This Salted Caramel Oreo Icebox Cake
This easy Oreo icebox cake has everything you could want in a dessert:
- No oven required: Perfect when you want an easy dessert without turning on the oven.
- Only a few ingredients: Simple ingredients come together for an impressive treat.
- Creamy cheesecake filling: Softened cream cheese, caramel, and Cool Whip create a light and luscious filling.
- Chocolate and caramel combination: Oreos and caramel are an irresistible pairing.
- A hint of salt: Coarse sea salt balances the sweetness beautifully.
- Make-ahead friendly: It gets better as it chills and the cookies soften.
Ingredients You’ll Need
For the Salted Caramel Cheesecake Filling
- 1 (8-ounce) package cream cheese, softened
- ½ cup salted caramel ice cream topping
- ¼ teaspoon coarse ground sea salt
- 1 (16-ounce) container Cool Whip, thawed and divided
For the Oreo Layers
- 32 Oreo cookies
- 6 ounces strong brewed coffee, cooled
For the Topping
- Caramel syrup
- Chocolate syrup
- Additional coarse ground sea salt, for garnish
- Extra Cool Whip
How to Make Salted Caramel Oreo Icebox Cake
1. Prepare the Caramel Cheesecake Filling
Place the softened cream cheese, salted caramel ice cream topping, and coarse sea salt in a large mixing bowl.
Beat everything together until the mixture is creamy and smooth.
Make sure your cream cheese is softened before mixing. This helps prevent lumps and gives the filling a silky texture.
2. Fold in the Cool Whip
Measure 2 cups of the thawed Cool Whip and gently fold it into the caramel cream cheese mixture.
Continue folding until the mixture becomes light, fluffy, and evenly combined.
Try not to overmix at this stage. Folding gently helps maintain the airy texture of the whipped topping.
3. Prepare the Oreo Layer
Pour the cooled strong brewed coffee into a shallow bowl.
Dip 16 Oreo cookies, one at a time, briefly into the cooled coffee.
Place the dipped cookies in a single layer across the bottom of an 8×8-inch pan.
The coffee adds a subtle depth to the chocolate cookie flavor while also helping the Oreos soften into the perfect icebox-cake texture.
Don’t leave the cookies in the coffee for too long. A quick dip is enough.
4. Add the First Cheesecake Layer
Spread half of the salted caramel cheesecake mixture evenly over the Oreo layer.
Use a spatula to gently smooth the filling from edge to edge.
You should have a generous layer of creamy caramel cheesecake covering the cookies completely.
5. Repeat the Layers
Dip the remaining 16 Oreo cookies into the cooled coffee, one at a time.
Arrange them over the first cheesecake layer.
Then spread the remaining salted caramel cheesecake mixture evenly over the second layer of Oreos.
At this point, you’ll have two layers of coffee-softened Oreo cookies and two layers of salted caramel cheesecake filling.
6. Add the Whipped Topping
Spread 1 cup of Cool Whip over the top of the cheesecake layer.
Smooth the surface with a spatula or leave it slightly textured for a more homemade appearance.
7. Refrigerate
Cover the pan and place it in the refrigerator until the cake is completely set.
Allowing the dessert to chill gives the flavors time to come together and allows the Oreo cookies to soften, creating that classic icebox cake consistency.
8. Decorate and Serve
When you’re ready to serve, top the cake with additional Cool Whip.
Drizzle generously with caramel syrup and chocolate syrup.
Finish with a light sprinkle of coarse ground sea salt.
Cut into 16 squares and serve chilled.
Yield: 16 squares
Prep Time: 15 minutes
Total Time: 15 minutes
Tips for the Best Oreo Icebox Cake
Use Softened Cream Cheese
Softened cream cheese blends much more easily with the caramel topping. If the cream cheese is too cold, the filling may become lumpy.
Dip the Oreos Quickly
The cookies need enough coffee to soften, but you don’t want them to become soggy before they go into the pan. A quick dip is all they need.
Cool the Coffee Completely
Always allow the brewed coffee to cool before dipping the cookies. Hot coffee can affect the texture of the other ingredients.
Fold the Cool Whip Gently
Use a gentle folding motion when combining the Cool Whip with the cream cheese mixture. This helps keep the filling light and fluffy.
Don’t Skip the Chilling Step
The refrigeration time is an important part of making an icebox cake. The cookies soften as the dessert chills, giving the finished cake its signature texture.
What Is an Icebox Cake?
An icebox cake is a simple no-bake dessert made by layering cookies or wafers with a creamy filling and allowing the dessert to chill in the refrigerator.
As it rests, the cookies absorb moisture from the creamy layers and become soft and cake-like.
That’s exactly what makes this Salted Caramel Oreo Icebox Cake so delicious. You get the familiar chocolate flavor of Oreos combined with a creamy caramel cheesecake filling in every bite.
Can You Make This Dessert Ahead of Time?
Yes! This recipe is especially convenient when you need to prepare dessert in advance.
The entire cake can be assembled, covered, and stored in the refrigerator until you’re ready to serve it.
In fact, allowing the cake to chill thoroughly is what gives the Oreos their soft, cake-like consistency.
For the prettiest presentation, add the final caramel drizzle, chocolate drizzle, and sea salt shortly before serving.
How to Store Salted Caramel Oreo Icebox Cake
Keep the icebox cake tightly covered in the refrigerator.
Because the dessert contains cream cheese and whipped topping, it should remain refrigerated until serving.
Store any leftovers in a sealed container or tightly cover the baking dish.
Serving Suggestions
This dessert is already rich and delicious, but you can dress it up even more when serving.
Try adding:
- Extra Cool Whip
- A generous caramel drizzle
- Chocolate syrup
- Crushed Oreos
- A sprinkle of coarse sea salt
- Mini chocolate chips
- Extra salted caramel sauce
For a party, cut the cake into small squares and arrange them on a dessert platter. The individual squares make this an easy treat for guests to grab and enjoy.
Frequently Asked Questions
Can I make this Oreo icebox cake without coffee?
The coffee is used to briefly dip the Oreos and adds a subtle richness to the chocolate flavor. If you prefer not to use coffee, you can use another liquid suitable for softening the cookies, although the flavor will be slightly different.
Do I have to use salted caramel topping?
The salted caramel topping provides both caramel flavor and a hint of saltiness. If using a regular caramel topping instead, you can still follow the recipe and adjust the additional sea salt to taste.
Why does the dessert need to be refrigerated?
Refrigeration allows the cheesecake filling to firm up and gives the Oreos time to soften. This creates the creamy, cake-like texture that makes an icebox cake so special.
Can I use another type of Oreo?
Yes. While classic Oreos provide the traditional chocolate flavor for this recipe, flavored Oreo varieties can create fun variations. Keep in mind that different flavors may change the overall taste.
How should I cut the cake?
For cleaner squares, use a sharp knife and wipe the blade between cuts. Make sure the cake has chilled thoroughly before slicing.
Final Thoughts
The caramel brings rich sweetness, the sea salt adds balance, and the softened Oreos provide the perfect chocolatey bite. A final drizzle of caramel and chocolate makes every square look as good as it tastes.
Whether you’re preparing dessert for a holiday, birthday, potluck, or simply craving something sweet, this easy no-bake recipe is a fantastic choice.
Chill it, drizzle it, slice it, and enjoy every creamy, chocolatey, salted caramel bite!
Print
Salted Caramel Oreo Icebox Cake
- Total Time: 15 minutes
- Yield: 16 squares 1x
- Diet: Vegetarian
Description
A rich and creamy no-bake dessert featuring layers of Oreos and a salted caramel cheesecake filling, topped with whipped cream, caramel, and chocolate.
Ingredients
- 1 (8-ounce) package cream cheese, softened
- ½ cup salted caramel ice cream topping
- ¼ teaspoon coarse ground sea salt
- 1 (16-ounce) container Cool Whip, thawed and divided
- 32 Oreo cookies
- 6 ounces strong brewed coffee, cooled
- Caramel syrup
- Chocolate syrup
- Additional coarse ground sea salt, for garnish
- Extra Cool Whip
Instructions
- Prepare the Caramel Cheesecake Filling: Place the softened cream cheese, salted caramel ice cream topping, and coarse sea salt in a large mixing bowl. Beat everything together until creamy and smooth.
- Fold in the Cool Whip: Measure 2 cups of the thawed Cool Whip and gently fold it into the caramel cream cheese mixture until light and fluffy.
- Prepare the Oreo Layer: Pour the cooled coffee into a shallow bowl and dip 16 Oreo cookies briefly, then place them in an 8×8-inch pan.
- Add the First Cheesecake Layer: Spread half of the salted caramel cheesecake mixture over the Oreo layer.
- Repeat the Layers: Dip the remaining 16 Oreo cookies and arrange them over the first cheesecake layer, followed by the remaining cheesecake mixture.
- Add the Whipped Topping: Spread 1 cup of Cool Whip over the top layer of cheesecake.
- Refrigerate: Cover the pan and chill in the refrigerator until set.
- Decorate and Serve: Top with extra Cool Whip, drizzle with caramel and chocolate syrup, and sprinkle with sea salt. Cut into squares and serve chilled.
Notes
For the best results, make sure the cream cheese is softened, and dip Oreos quickly in coffee to avoid sogginess.
- Prep Time: 15 minutes
- Cook Time: 0 minutes
- Category: Dessert
- Method: No-Bake
- Cuisine: American
Nutrition
- Serving Size: 1 square
- Calories: 320
- Sugar: 25g
- Sodium: 300mg
- Fat: 19g
- Saturated Fat: 10g
- Unsaturated Fat: 7g
- Trans Fat: 0g
- Carbohydrates: 35g
- Fiber: 1g
- Protein: 3g
- Cholesterol: 30mg
Keywords: no-bake dessert, Oreo cake, salted caramel, icebox cake, sweet treats
1 thought on “Salted Caramel Oreo Icebox Cake”