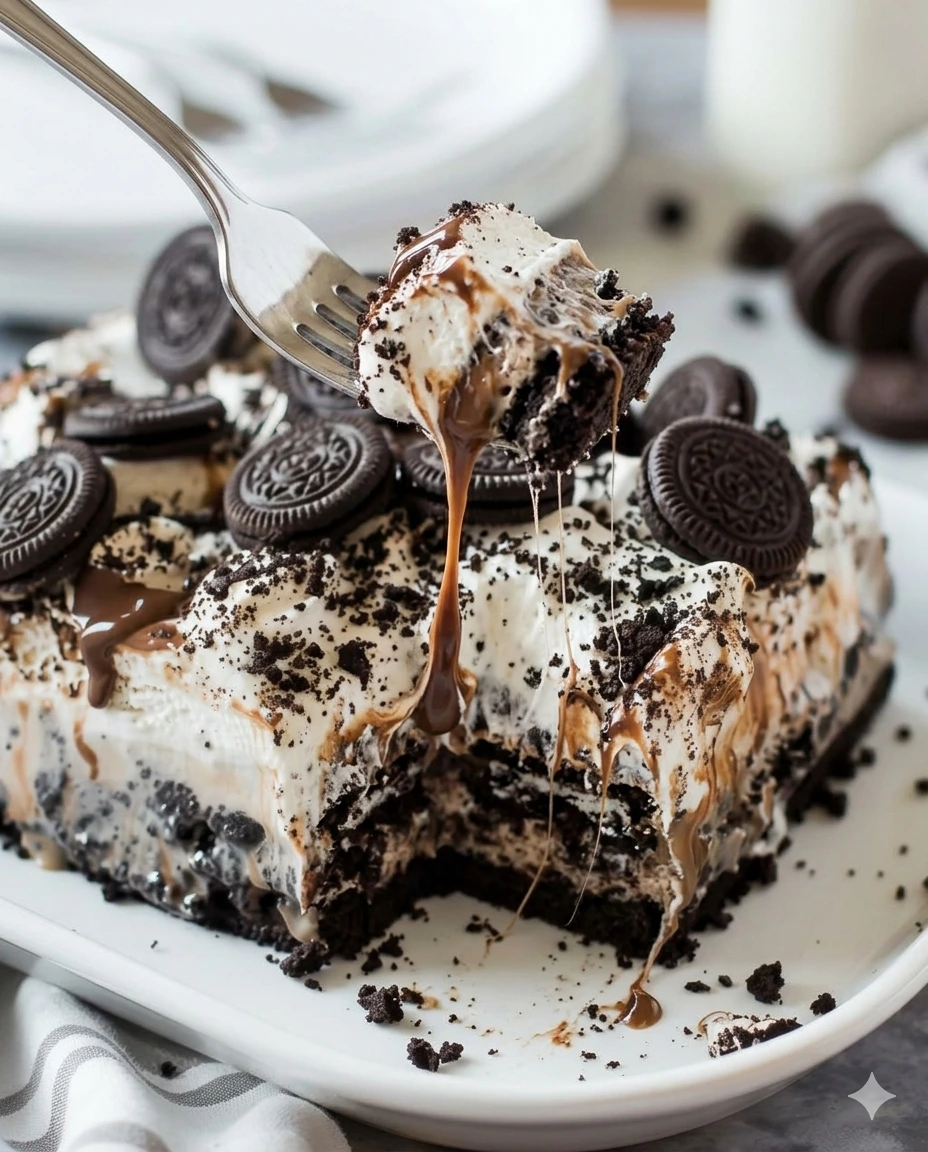
When it comes to crowd-pleasing, high-impact desserts, a layered ice cream cake stands in a league of its own. Combining the beloved crunch of classic chocolate sandwich cookies with the rich, comforting textures of a premium frozen confection, the Oreo Ice Cream Cake Delight is an absolute masterpiece of no-cook baking.
This magnificent dessert features four distinct, decadent layers: a dense and buttery Oreo cookie crust, a smooth and velvety vanilla ice cream center, a rich ribbon of chocolate hot fudge, and a cloud-like whipped topping canopy. It is the perfect, irresistible treat for birthday parties, summer barbecues, or family celebrations—offering a look that mimics an expensive bakery purchase while being surprisingly simple to assemble at home.
Recipe Specifications
-
Course Type: Frozen Dessert, Celebration Cake
-
Culinary Style: Modern American
-
Preparation Method: 100% No-Cook (No Oven Required)
-
Active Prep Time: 30 minutes
-
Total Freeze Time: 4 hours (minimum)
-
Yield: 12 to 16 generous servings
-
Skill Level: Easy (requires patience for freezing stages)
Comprehensive Ingredients Checklist
To ensure your cake sets up with perfect structural integrity, gather your ingredients and review the precise volume requirements below before beginning construction.
1. The Crunchy Oreo Crust Foundation
-
38 to 42 classic Oreo cookies (approximately one family-size package, minus a small handful)
-
½ cup unsalted butter, completely melted
2. The Velvety Ice Cream Layer
-
1.5 quarts (approx. 1.4 liters) premium vanilla ice cream (softened slightly at room temperature for spreadability)
-
Alternative Note: You can easily substitute vanilla with mint chocolate chip, cookies and cream, or chocolate ice cream to customize the flavor profile.
3. The Decadent Chocolate Fudge Ribbon
-
1 jar (12 to 14 ounces) high-quality hot fudge ice cream topping
-
1 cup heavy cream or half-and-half (optional; used strictly for thinning out the fudge if it is too stiff to spread smoothly)
-
Structure Pro-Tip: For an even firmer, more stable fudge layer, stir 2 tablespoons of melted butter directly into the hot fudge before spreading.
4. The Billowy Whipped Topping & Elegant Garishes
-
8 to 12 ounces whipped topping (either store-bought like Cool Whip or stabilized homemade whipped cream)
-
8 to 10 classic Oreo cookies, coarsely crushed or chopped (reserved for the final top garnish)
-
Optional Finishers: Chocolate dessert drizzle, mini chocolate chips, rainbow or chocolate sprinkles, or a dusting of premium cocoa powder
Step-by-Step Production & Layering Guide
The secret to a flawless, multi-layered ice cream cake lies entirely in the discipline of incremental freezing. Because ice cream melts quickly at room temperature, following these chronological phases precisely ensures clean, distinct, beautiful layers that won’t muddy together when sliced.
Phase 1: Milling and Packing the Crust
-
Pulverize the Cookies: Place your 38 to 42 whole Oreo cookies into the bowl of a food processor. Pulse continuously until the cookies—creme filling included—are transformed into fine, uniform crumbs. (If you do not own a food processor, transfer the cookies into a large, heavy-duty zip-top plastic bag, seal it tightly, and crush them thoroughly using a wooden rolling pin). Transfer the fine crumbs into a medium mixing bowl.
-
Hydrate with Butter: Drizzle your ½ cup of melted unsalted butter directly over the processed cookie crumbs. Using a fork or spatula, toss the mixture thoroughly until the butter is completely absorbed and the mixture takes on a uniform, damp, sand-like texture.
-
Compress the Base: Pour the wet crumb mixture directly into the bottom of an ungreased 9×13-inch baking pan. Using clean hands, or preferably the flat, heavy bottom of a dry measuring cup, press the crumb mixture firmly and evenly across the entire base of the pan. Pay close attention to the corners to ensure an even thickness throughout.
-
First Flash Freeze: Slide the pan directly into the coldest part of your freezer for 10 to 15 minutes to lock the butter matrix and firm up the crust foundation.
+-------------------------------------------------------------+
|         CRUNCHY GARNISH (Crushed Oreos & Optional Drizzle)  | <- Kept crisp
+-------------------------------------------------------------+
|               LIGHT WHIPPED TOPPING LAYER                  | <- Airy & billowy
+-------------------------------------------------------------+
|               CHOCOLATE FUDGE RIBBON LAYER                 | <- Rich & fudgy
+-------------------------------------------------------------+
|               SOFTENED VANILLA ICE CREAM                   | <- Thick & creamy
+-------------------------------------------------------------+
|               COMPACTED BUTTERY OREO CRUST                 | <- Solid foundation
+-------------------------------------------------------------+
Phase 2: Spreading the Ice Cream Core
-
Temper the Ice Cream: Remove your 1.5 quarts of vanilla ice cream from the freezer and let it sit on the kitchen counter for 10 to 15 minutes. You want it to soften just enough to become easily spreadable, but not so much that it turns into a liquid soup.
-
Layer Evenly: Retrieve your ice-cold cookie crust from the freezer. Spoon the tempered ice cream in large dollops over the top of the crust. Using an offset spatula or the back of a large spoon, gently smooth the ice cream out into a thick, uniform, and level layer, being careful not to disturb or lift up the cookie crumbs underneath.
-
The Deep Freeze: Return the pan immediately to the freezer and let it sit undisturbed for at least 1 hour until the ice cream layer has completely hardened back into a solid block.
Phase 3: Applying the Fudge Ribbon
-
Warm the Fudge: Open your jar of hot fudge topping. Warm it in the microwave for roughly 10 to 20 seconds. The goal is to make the fudge pourable and fluid, not hot. If the fudge becomes hot, it will instantly melt your frozen ice cream layer upon contact, ruining the clean separation of the layers.
-
Thin (Optional): If your fudge remains stubborn or overly sticky, stir in a splash of heavy cream or half-and-half to encourage a smooth, pourable consistency. If you want a firmer bite, stir in 2 tablespoons of butter here.
-
Pour and Smooth: Pour the warm, pourable fudge evenly over the frozen ice cream layer. Using very light, long strokes with your spatula, gently smooth the chocolate fudge across the surface to completely seal the ice cream.
-
Lock the Layer: Place the pan back into the freezer for 45 to 60 minutes to allow the chocolate fudge layer to completely set.
Phase 4: Topping and the Final Set
-
Spread the Canopy: Once the fudge layer is structurally set, spoon your 8 to 12 ounces of thawed whipped topping over the chocolate center. Use your spatula to spread it into a fluffy, beautiful, even layer. Press down very lightly to fill in any hidden air gaps along the sides of the pan, but avoid crushing the natural, airy volume of the topping. Smooth the top surface to your liking.
-
The Extended Freeze: Return the assembled cake to the freezer for at least 2 hours. This extended chill period allows the entire four-layer matrix to properly marry, solidify, and firm up to maximum structural integrity.
Phase 5: Garnish and Professional Service
-
Decorate Late for Crunch: Right before you are ready to slice and serve the cake, remove it from the freezer and scatter your 8 to 10 coarsely crushed Oreo cookies uniformly across the top. Waiting until the absolute last minute to add the topping keeps the cookie chunks completely crisp and prevents them from absorbing moisture and turning soft in the freezer. Feel free to add a decorative zig-zag drizzle of chocolate syrup, mini chocolate chips, or festive sprinkles at this stage.
-
Temper Before Slicing: For the absolute best results and effortless cutting, let the completed cake sit on the kitchen counter at room temperature for 5 to 10 minutes before slicing. This minor rest takes the edge off the frozen layers, making it significantly easier to cut through cleanly.
-
The Clean-Cut Technique: To achieve picture-perfect, restaurant-quality squares, run a long, sharp chef’s knife under hot tap water, wipe the blade completely dry with a clean kitchen towel, and make your first slice straight down through all four layers. Repeat the hot water dip and wipe process before every single cut to prevent the ice cream and fudge from dragging across the layers. Serve immediately.
Professional Storage Guidelines
Because this is a completely frozen dessert, proper storage is critical to preventing ice crystals and maintaining a premium flavor profile:
-
Short-Term Storage: If you have leftover cake after your gathering, cover the pan loosely but securely with a layer of plastic wrap followed by a layer of aluminum foil to seal out ambient air. Store it strictly in the deepest part of your freezer.
-
Maximum Shelf Life: When wrapped tightly to prevent freezer burn, this Oreo Ice Cream Cake Delight will remain fresh, delicious, and perfectly textured for up to 2 weeks.
-
Individual Slices: For ultra-convenient snacking later on, pre-slice the remaining cake into individual squares, wrap each square tightly in plastic wrap, and store them together inside a heavy-duty gallon-sized freezer bag.
Oreo Ice Cream Cake Delight
- Total Time: 240 minutes
- Yield: 12 to 16 servings 1x
- Diet: Vegetarian
Description
A layered dessert featuring a buttery Oreo crust, velvety vanilla ice cream, rich chocolate fudge, and fluffy whipped topping.
Ingredients
- 38 to 42 classic Oreo cookies (approx. one family-size package)
- ½ cup unsalted butter, completely melted
- 1.5 quarts premium vanilla ice cream (softened)
- 1 jar (12 to 14 ounces) hot fudge ice cream topping
- 1 cup heavy cream or half-and-half (optional)
- 8 to 12 ounces whipped topping (like Cool Whip)
- 8 to 10 classic Oreo cookies, coarsely crushed (for garnish)
- Optional: chocolate dessert drizzle, mini chocolate chips, sprinkles, cocoa powder
Instructions
- Pulverize the cookies in a food processor until fine crumbs form.
- Drizzle melted butter over cookie crumbs and mix until uniform.
- Pour the mixture into a 9×13-inch baking pan and press evenly to form the crust.
- Freeze the crust for 10 to 15 minutes.
- Soften the ice cream at room temperature for 10 to 15 minutes for easier spreading.
- Spoon the softened ice cream over the crust and smooth it into an even layer.
- Return to the freezer for at least 1 hour to solidify.
- Warm the hot fudge topping in the microwave for 10 to 20 seconds to make it pourable.
- Pour the fudge over the ice cream layer and smooth it out.
- Freeze again for 45 to 60 minutes until fudge is set.
- Spread whipped topping evenly over the fudge layer.
- Freeze the entire cake for at least 2 hours to allow it to firm up.
- Garnish with crushed Oreo cookies just before serving.
- Let sit at room temperature for 5 to 10 minutes before slicing.
Notes
For a firmer fudge layer, stir melted butter into the hot fudge if needed. Proper storage is key to maintaining texture.
- Prep Time: 30 minutes
- Cook Time: 0 minutes
- Category: Dessert
- Method: No-Cook
- Cuisine: Modern American
Nutrition
- Serving Size: 1 slice
- Calories: 350
- Sugar: 20g
- Sodium: 240mg
- Fat: 18g
- Saturated Fat: 10g
- Unsaturated Fat: 5g
- Trans Fat: 0g
- Carbohydrates: 42g
- Fiber: 1g
- Protein: 5g
- Cholesterol: 20mg
Keywords: Oreo, ice cream cake, dessert, no bake, frozen dessert