There’s something special about Old-Fashioned Chocolate Fudge. Before fancy flavors and complicated dessert recipes, there was simple homemade fudge: sugar, butter, evaporated milk, cocoa, vanilla, and a little salt cooked together until thick, creamy, and irresistibly chocolatey.
This classic chocolate fudge has the rich flavor and dense texture that make traditional homemade fudge so nostalgic. It’s smooth enough to melt in your mouth but firm enough to cut into beautiful squares.
The recipe is wonderfully simple, making it perfect for holidays, homemade gifts, dessert trays, family gatherings, or anytime you’re craving an old-fashioned chocolate treat.
Unlike recipes that depend on marshmallow cream or condensed milk, this version uses basic pantry ingredients and a traditional stovetop method. The result is a deeply chocolatey fudge with a buttery finish and just enough vanilla to round out the flavor.
Why You’ll Love This Old-Fashioned Chocolate Fudge
There are plenty of reasons to keep this recipe in your collection.
- Made completely from scratch
- Only a handful of ingredients
- Rich chocolate flavor
- Creamy, dense texture
- No chocolate chips required
- Perfect for holidays and gifting
- Easy to cut into individual squares
- Made with simple pantry staples
The combination of cocoa powder, butter, sugar, and evaporated milk creates a classic chocolate flavor that’s both nostalgic and satisfying.
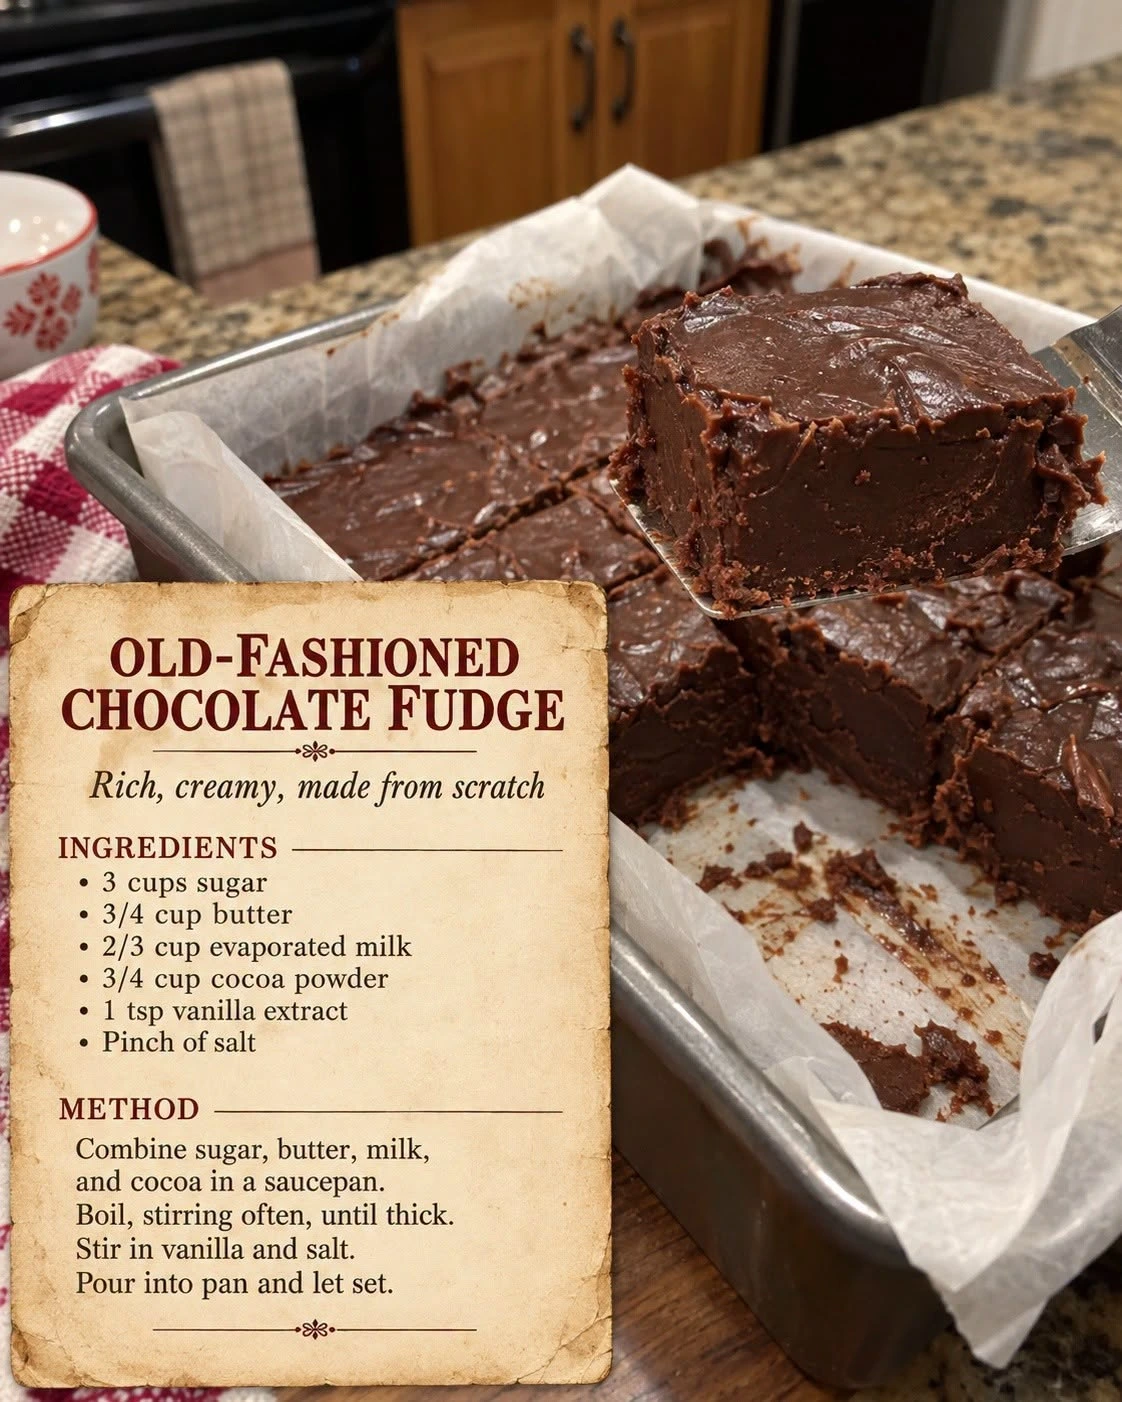
Ingredients You’ll Need
The ingredient list is short, but each ingredient plays an important role.
3 Cups Granulated Sugar
Sugar provides the sweetness and structure of the fudge. Because traditional fudge relies on cooked sugar crystallization, accurate measurement is important.
¾ Cup Butter
Butter contributes richness and gives the fudge its smooth, luxurious texture.
Using butter rather than margarine gives the fudge a more traditional homemade flavor.
⅔ Cup Evaporated Milk
Evaporated milk provides the creamy dairy component without adding as much water as regular milk.
It helps create the dense, smooth texture associated with old-fashioned fudge.
¾ Cup Unsweetened Cocoa Powder
Cocoa powder provides the chocolate flavor.
Use a good-quality unsweetened cocoa powder for the best results. Since chocolate is the main flavor of the recipe, the quality of your cocoa will make a noticeable difference.
1 Teaspoon Vanilla Extract
Vanilla enhances the chocolate flavor and adds a subtle aromatic sweetness.
Pinch of Salt
Even though only a small amount is used, salt helps balance the sweetness and makes the chocolate taste richer.
How to Make Old-Fashioned Chocolate Fudge
1. Prepare the Pan
Before you start cooking the fudge, prepare your pan.
Line a square baking pan with parchment paper, leaving some paper extending over the sides.
The parchment will make it much easier to lift the finished fudge from the pan once it has completely set.
You can lightly grease the parchment if desired.
Set the prepared pan aside.
2. Combine the Ingredients
Place the granulated sugar, butter, evaporated milk, and cocoa powder in a medium or large saucepan.
Stir everything together over medium heat.
The butter will gradually melt while the sugar and cocoa become incorporated into the milk.
Continue stirring until the mixture is smooth and evenly combined.
3. Bring the Mixture to a Boil
Once the ingredients are combined, increase the heat enough to bring the mixture to a steady boil.
Stir frequently.
As the mixture heats, the water in the evaporated milk begins to evaporate while the sugar concentration increases.
This is an important part of traditional fudge-making.
The mixture will become darker, thicker, and increasingly glossy as it cooks.
4. Cook Until Thick
Continue boiling and stirring until the mixture becomes noticeably thick.
This is the stage that determines the final texture of your fudge.
For a more precise traditional fudge method, you can use a candy thermometer and cook the mixture to approximately 234–238°F (112–114°C), the soft-ball stage.
If you don’t have a candy thermometer, follow the visual cues in the original recipe: the mixture should become thick and glossy rather than remaining thin and watery.
Be careful during this stage because the fudge mixture becomes extremely hot.
5. Remove From the Heat
Once the mixture has reached the proper consistency, remove the saucepan from the heat.
Immediately stir in the vanilla extract and a pinch of salt.
Mix thoroughly.
The vanilla adds a beautiful aroma, while the salt balances the sweetness and intensifies the chocolate flavor.
6. Pour Into the Pan
Carefully pour the hot chocolate fudge mixture into the prepared parchment-lined pan.
Use a spatula to gently spread it into an even layer.
Work relatively quickly because traditional fudge begins to thicken as it cools.
Don’t worry if the surface isn’t perfectly smooth. A slightly rustic appearance is part of the charm of homemade fudge.
7. Let the Fudge Set
Allow the fudge to cool completely at room temperature.
As it cools, it will become firmer and develop its characteristic dense, creamy texture.
Don’t try to cut it while it’s still warm.
For a firmer texture and cleaner cuts, you can refrigerate the fudge after it has cooled.
8. Cut Into Squares
Once the fudge is completely set, lift it out of the pan using the parchment paper.
Place it on a cutting board.
Use a sharp knife to cut the fudge into squares.
For neat cuts, wipe the knife clean between slices.
You can cut large squares for an indulgent dessert or smaller bite-sized pieces for holiday trays and parties.
The Secret to Great Old-Fashioned Fudge
Traditional fudge is essentially a combination of sugar chemistry and patience.
The mixture needs to reach the right temperature and consistency so that the sugar crystallizes properly as the fudge cools.
If the mixture isn’t cooked enough, the finished fudge may remain too soft.
If it’s cooked too far, the fudge can become dry, crumbly, or overly hard.
That’s why using a candy thermometer can be helpful if you’re new to making traditional fudge.
The traditional soft-ball stage is around 234–238°F, although the exact temperature can vary slightly depending on your altitude and recipe.
Tips for Perfect Chocolate Fudge
Use a Good Cocoa Powder
Cocoa powder is responsible for most of the chocolate flavor in this recipe.
Choose a quality unsweetened cocoa powder for a deeper and more satisfying chocolate taste.
Measure the Sugar Carefully
Sugar isn’t simply a sweetener in fudge—it is part of the structure.
Use the exact amount called for in the recipe.
Don’t Rush the Cooking Process
Allow the mixture to heat gradually.
Cooking too aggressively can cause uneven heating or make the mixture more difficult to control.
Stir Frequently
Stirring helps prevent the mixture from sticking to the bottom of the saucepan.
It also helps distribute the cocoa powder evenly.
Be Careful With Hot Fudge
The boiling mixture is extremely hot and can cause serious burns.
Use a sturdy saucepan with plenty of room and keep children away from the cooking area.
Let It Set Completely
This is one of the hardest parts because the chocolate smell will make you want to cut into the fudge immediately.
Be patient.
The fudge needs time to cool and firm.
Should You Use a Candy Thermometer?
You don’t absolutely need one, especially if you’re following the visual method provided with this recipe.
However, a candy thermometer can make traditional fudge more predictable.
The soft-ball stage is generally around 234–238°F (112–114°C).
At this stage, a small amount of the hot sugar mixture dropped into cold water should form a soft, pliable ball.
If you use a thermometer, make sure the bulb isn’t touching the bottom of the saucepan because that can give you an inaccurate reading.
How to Get Creamy Rather Than Grainy Fudge
One of the most common problems with traditional fudge is unwanted graininess.
Sugar crystals are essential to fudge, but they need to form in a controlled way.
A few practices can help:
- Make sure the sugar dissolves properly during cooking.
- Avoid splashing sugar crystals onto the sides of the pan.
- Don’t rush the cooking process.
- Cook the mixture to the correct temperature.
- Allow the fudge to cool properly.
Following the recipe carefully will give you the best chance of achieving a smooth, creamy texture.
Why Evaporated Milk Works So Well
Evaporated milk is concentrated milk from which some of the water has been removed.
It gives the fudge a creamy dairy flavor while providing less water than ordinary milk.
That makes it particularly useful for candy recipes where controlling moisture is important.
Combined with butter and sugar, it creates the rich texture that makes this old-fashioned fudge so satisfying.
Can You Add Nuts?
Absolutely.
The recipe pictured is a classic chocolate fudge without nuts, but chopped nuts can be added if you enjoy a little crunch.
Try:
- Pecans
- Walnuts
- Almonds
- Hazelnuts
If adding nuts, stir them into the fudge mixture after removing the saucepan from the heat and before transferring the fudge to the pan.
For a particularly delicious variation, lightly toast the nuts first.
Other Delicious Fudge Variations
Chocolate Walnut Fudge
Add chopped toasted walnuts to the finished fudge mixture before pouring it into the pan.
The slightly bitter nuttiness of walnuts works beautifully with chocolate.
Chocolate Pecan Fudge
Pecans add buttery richness and a satisfying crunch.
This is especially delicious during the holiday season.
Sea Salt Chocolate Fudge
Sprinkle a very small amount of flaky sea salt over the top while the fudge is still soft.
The salty-sweet combination creates a more sophisticated flavor.
Mint Chocolate Fudge
Add a small amount of peppermint or mint extract along with the vanilla.
This is particularly festive for Christmas.
Peanut Butter Chocolate Fudge
Swirl a small amount of creamy peanut butter over the top before the fudge completely sets.
Chocolate and peanut butter make a classic combination.
How to Store Old-Fashioned Chocolate Fudge
Once completely set, store the fudge in an airtight container.
Place parchment or wax paper between layers if you’re stacking pieces.
Keep the container in a cool, dry location.
If you prefer firmer fudge, refrigeration is also an option.
Allow refrigerated fudge to sit at room temperature for a few minutes before serving for the best texture.
Can You Freeze Chocolate Fudge?
Yes.
Traditional chocolate fudge generally freezes well when properly wrapped.
Cut the fudge into individual portions or leave it as one block.
Wrap it tightly in plastic wrap and then place it in a freezer-safe airtight container or freezer bag.
When you’re ready to enjoy it, thaw it while still wrapped to help prevent condensation from forming directly on the surface.
How to Serve Chocolate Fudge
There are so many ways to enjoy this classic treat.
Serve it:
- With coffee
- Alongside hot chocolate
- With tea
- On a holiday dessert tray
- As an edible gift
- After dinner
- At birthday parties
- During family movie nights
For an elegant dessert plate, place two small squares of fudge alongside fresh berries and a little whipped cream.
Perfect for Holiday Gift Giving
Homemade fudge makes an excellent edible gift.
Once the fudge has completely set, cut it into uniform squares and arrange the pieces in a decorative box or tin.
Separate the layers with parchment paper.
You can make several batches and create assorted gift boxes featuring different flavors such as chocolate walnut, peppermint chocolate, and classic chocolate fudge.
A homemade fudge box is a thoughtful gift for neighbors, friends, teachers, coworkers, and family members.
Frequently Asked Questions
Why didn’t my fudge set?
If the fudge remains very soft, the sugar mixture may not have reached the correct cooking temperature.
Traditional fudge needs to reach the soft-ball stage so enough moisture evaporates and the sugar can crystallize properly as it cools.
Why is my fudge crumbly?
Fudge can become dry or crumbly if it is cooked beyond the desired temperature.
Using a candy thermometer can help prevent overcooking.
Can I use regular milk instead of evaporated milk?
The recipe is specifically designed with evaporated milk. Substituting regular milk changes the moisture content and can affect the final texture.
For the most reliable result, use evaporated milk.
Can I use salted butter?
Yes. The recipe shown uses butter, and a small pinch of salt is also included. If your butter is heavily salted, you may want to reduce or omit the additional pinch of salt.
How long does fudge take to set?
It will begin firming as it cools, but allow it to cool completely before cutting. Refrigerating it can speed up the firming process.
Can I make this fudge without a thermometer?
Yes. The original recipe uses a visual cue—boiling until thick. However, a candy thermometer provides an easier way to monitor the traditional soft-ball stage.
Common Mistakes to Avoid
Don’t Cut It Too Soon
Warm fudge is soft and difficult to cut cleanly.
Don’t Use a Tiny Saucepan
The mixture bubbles during cooking. Use a saucepan with enough room to prevent overflow.
Don’t Rush the Boiling Stage
Allow the mixture to cook properly rather than simply turning the heat very high.
Don’t Ignore the Temperature
If using a candy thermometer, make sure you reach the proper soft-ball stage.
Don’t Add Too Much Liquid
Fudge depends on a specific sugar-to-liquid ratio. Avoid making substitutions without understanding how they will affect the candy.
A Classic Recipe Worth Keeping
Some recipes become favorites because they’re complicated and impressive. Others become favorites because they’re simple, dependable, and nostalgic.
This Old-Fashioned Chocolate Fudge belongs in the second category.
It uses ingredients that many people already have in their kitchens, yet the finished result feels special.
The rich cocoa flavor, buttery texture, and creamy finish make it the kind of homemade candy that reminds you of traditional holiday baking.
Whether you make it for Christmas, a family gathering, an edible gift, or simply because you’re craving chocolate, this recipe is worth saving.
Final Thoughts
The combination of 3 cups of sugar, buttery richness, creamy evaporated milk, cocoa powder, vanilla, and a pinch of salt creates a deeply chocolatey fudge with that classic old-fashioned texture.
The recipe doesn’t need complicated toppings or elaborate decorations. It’s all about the rich chocolate flavor and creamy consistency.
For the best results, take your time while cooking the mixture, use a candy thermometer if you want extra precision, and allow the finished fudge to cool completely before slicing.
Cut it into neat squares, arrange it on a plate, or package it in a pretty box for a homemade gift.
Rich, creamy, chocolatey, and wonderfully nostalgic—this is the kind of old-fashioned fudge that deserves a permanent place in your recipe collection.
Print
Old-Fashioned Chocolate Fudge
- Total Time: 45 minutes
- Yield: 16 servings 1x
- Diet: Vegetarian
Description
A simple yet classic chocolate fudge recipe made with pantry staples that results in a creamy, dense, and rich chocolate treat.
Ingredients
- 3 cups Granulated Sugar
- ¾ cup Butter
- ⅔ cup Evaporated Milk
- ¾ cup Unsweetened Cocoa Powder
- 1 teaspoon Vanilla Extract
- Pinch of Salt
Instructions
- Prepare the pan by lining a square baking pan with parchment paper.
- Combine the granulated sugar, butter, evaporated milk, and cocoa powder in a saucepan over medium heat.
- Bring the mixture to a steady boil, stirring frequently.
- Cook until the mixture becomes noticeably thick.
- Remove from heat and stir in the vanilla extract and a pinch of salt.
- Pour the hot mixture into the prepared pan and spread it into an even layer.
- Let the fudge cool completely at room temperature.
- Cut into squares once the fudge is set.
Notes
Use a good quality cocoa powder for better chocolate flavor. Be patient while allowing the fudge to cool for a perfect texture.
- Prep Time: 15 minutes
- Cook Time: 30 minutes
- Category: Dessert
- Method: Stovetop
- Cuisine: American
Nutrition
- Serving Size: 1 square
- Calories: 200
- Sugar: 28g
- Sodium: 50mg
- Fat: 9g
- Saturated Fat: 5g
- Unsaturated Fat: 4g
- Trans Fat: 0g
- Carbohydrates: 30g
- Fiber: 1g
- Protein: 1g
- Cholesterol: 20mg
Keywords: fudge, chocolate, dessert, homemade, holiday treats, gifts