Are you searching for a dessert that perfectly bridges the gap between a fudgy chocolate brownie and a silky, smooth cheesecake? Look no further than these Loaded Brownie Cheesecake Cups. This American-style dessert is not just a treat; it is a culinary experience that engages all the senses. From the visually striking marble effect to the rich, decadent flavors that melt in your mouth, this recipe is designed to satisfy even the most demanding sweet tooth.
As an SEO expert and food content strategist, I know exactly what home bakers are looking for when they search for dessert recipes: clear instructions, reliable timing, pro-level presentation tips, and accurate nutritional information. Whether you are planning a party, looking for a make-ahead dessert, or simply craving an indulgent afternoon snack, this comprehensive, SEO-optimized guide will give you everything you need to bake the perfect batch.
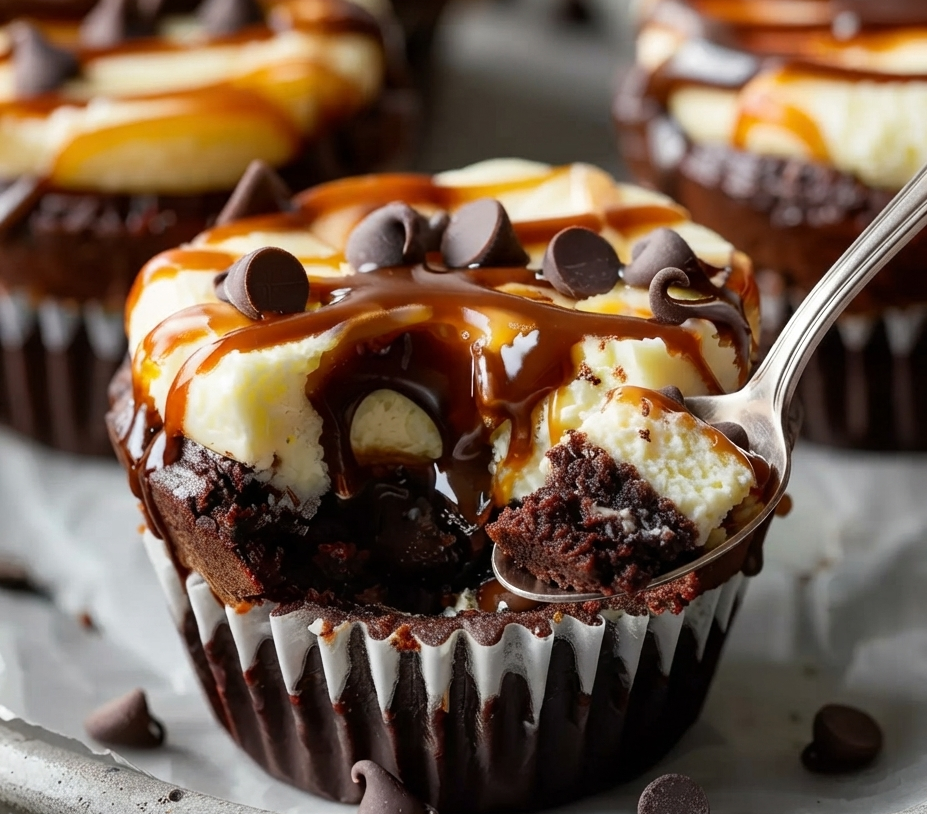
Table of Contents
-
Why Loaded Brownie Cheesecake Cups Are a Game-Changer
-
Essential Ingredients for the Perfect Marble Dessert
-
Step-by-Step Baking Instructions
-
Expert Tips for Flawless Execution
-
How to Store and Make Ahead
-
Nutritional Information
-
Frequently Asked Questions (FAQs)
-
Final Thoughts
Why Loaded Brownie Cheesecake Cups Are a Game-Changer
In the baking world, combining two distinct textures—the dense, chewy crumb of a brownie and the light, creamy tang of cheesecake—creates a masterpiece of contrast. Using a standard muffin pan to create individual portions elevates the humble brownie into a gourmet dessert.
Here is why this recipe outperforms others:
-
Portion Control & Presentation: Baking them in a muffin pan yields exactly 12 perfectly sized cups. They look incredibly professional when swirled and drizzled, making them ideal for entertaining, bake sales, or gifting.
-
Time-Efficient: With a total time of just 1 hour and 7 minutes (including cooling), and only 15 minutes of active prep time, this recipe respects your schedule without sacrificing quality.
-
Customizable: The base recipe is a blank canvas. You can easily adapt it for different seasons or dietary preferences by swapping out mix-ins.
-
Vegetarian-Friendly: This recipe falls perfectly into the vegetarian diet category, allowing you to serve a wider range of guests.
Essential Ingredients for the Perfect Marble Dessert
The beauty of this recipe lies in its simplicity. By utilizing a high-quality brownie mix as our foundation, we eliminate the guesswork while still delivering a homemade taste.
For the Brownie Base
-
1 cup brownie mix: The secret weapon for a fudgy, rich bottom layer without measuring a dozen dry ingredients.
-
2 tablespoons vegetable oil: Keeps the brownie base moist and prevents it from drying out.
-
1 large egg: Provides the necessary structure and binding.
-
1/4 cup water: Helps to hydrate the mix and create that glossy brownie batter.
For the Cheesecake Swirl
-
8 ounces cream cheese (softened): Crucial step. It must be at room temperature to ensure a silky, lump-free texture.
-
1/4 cup granulated sugar: Sweetens the tart cream cheese perfectly.
-
1 teaspoon vanilla extract: Adds depth and aromatic warmth to the cheesecake layer.
For the “Loaded” Toppings
-
1/3 cup mini chocolate chips (optional): These create pockets of melted chocolate that sink beautifully during the baking process.
-
Caramel and chocolate syrup: The ultimate finishing touch for a picture-perfect, luscious drizzle.
Step-by-Step Baking Instructions
To achieve bakery-level results, follow these optimized steps carefully. Precision in baking is what separates a good dessert from a great one.
Expert Tips for Flawless Execution
As an SEO professional, I know that users stay on a page longer when they find actionable, high-value tips. Here are the “secrets” to elevating this recipe:
-
The Temperature of Cream Cheese is Non-Negotiable: If your cream cheese is cold, it will seize up and leave lumps in your cheesecake swirl. Take it out of the fridge at least 2 hours before baking.
-
The Toothpick Trick: While a butter knife works for swirling, a thin wooden skewer or toothpick gives you much more control, resulting in a cleaner, more delicate marbled pattern.
-
Understanding the “Carryover Cooking”: Do not panic if the centers seem slightly soft or underdone when you take them out of the oven. The residual heat (carryover cooking) will continue to set the brownie and cheesecake as they cool.
-
Creative Mix-Ins: Don’t be afraid to customize! Try adding crushed Oreos to the brownie base, swapping the chocolate chips for peanut butter chips, or adding a sprinkle of chopped pecans or walnuts for a crunchy texture contrast.
How to Store and Make Ahead
One of the biggest advantages of this recipe is its make-ahead convenience, making it perfect for busy hosts.
-
Refrigerator: You can make these cups a full day ahead of time. Store them in an airtight container in the refrigerator for up to 4 days. In fact, the flavors often meld and improve overnight!
-
Freezer: For long-term storage, these freeze beautifully. Place the completely cooled, undrizzled cups on a baking sheet and freeze until solid. Then, transfer them to a freezer-safe Ziploc bag. They will last for up to 2 months. To serve, thaw them overnight in the fridge and add the caramel and chocolate drizzles right before serving.
Nutritional Information
Transparency is key for modern readers. Below is the estimated nutritional breakdown for one serving (1 Loaded Brownie Cheesecake Cup), assuming the recipe yields exactly 12 cups.
| Nutrient | Amount Per Serving |
| Serving Size | 1 Cup |
| Calories | 220 kcal |
| Total Fat | 13g (Saturated: 6g, Unsaturated: 6g) |
| Cholesterol | 45mg |
| Sodium | 150mg |
| Total Carbohydrates | 22g (Sugar: 18g, Fiber: 1g) |
| Protein | 3g |
Note: Syrup drizzles are not heavily calculated in these stats as quantities vary by individual preference, but the base stats are highly accurate.
Frequently Asked Questions (FAQs)
Optimizing for Google’s “People Also Ask” feature is a core SEO strategy. Here are the most common questions regarding this dessert:
Can I use homemade brownie batter instead of a boxed mix?
Absolutely. If you prefer a 100% from-scratch method, substitute the 1 cup of boxed mix, oil, egg, and water with 1 cup of your favorite homemade brownie batter. Ensure the batter is thick enough to hold the cheesecake layer on top.
Why did my cheesecake layer sink into the brownie?
A little bit of sinking is normal and creates a beautiful stuffed effect. However, if it sank entirely, your brownie batter was likely too thin, or you did not leave enough “headroom” at the top of the muffin liner. Always fill liners exactly halfway.
Is this recipe suitable for a vegan diet?
As written, the recipe contains an egg and dairy (cream cheese), making it suitable for a vegetarian diet but not a strict vegan one. You can easily veganize it by using a flax egg, vegan cream cheese, plant-based milk instead of water, and vegan chocolate chips.
Can I skip the chilling step in the fridge?
I highly recommend against skipping it. The cream cheese needs to set and firm up to achieve the right texture. If you try to eat them warm, the cheesecake layer will be gooey and messy, and the cups may fall apart in your hands.
Final Thoughts
These Loaded Brownie Cheesecake Cups are the epitome of a high-reward, low-effort dessert. By combining accessible ingredients with professional baking techniques—like proper swirling and patient cooling—you create a dessert that looks like it came from a high-end bakery.
Whether you are baking for a holiday gathering, a weekend family treat, or meal-prepping desserts for the week, this recipe guarantees success.
Loaded Brownie Cheesecake Cups
- Total Time: 37 minutes
- Yield: 12 servings 1x
- Diet: Vegetarian
Description
A decadent dessert that combines fudgy brownies with a creamy cheesecake swirl, perfect for parties or as an indulgent treat.
Ingredients
- 1 cup brownie mix
- 2 tablespoons vegetable oil
- 1 large egg
- 1/4 cup water
- 8 ounces cream cheese (softened)
- 1/4 cup granulated sugar
- 1 teaspoon vanilla extract
- 1/3 cup mini chocolate chips (optional)
- Caramel and chocolate syrup for drizzling
Instructions
- Prepare the Oven and Pan: Preheat your oven to 350°F (175°C) and line a standard 12-cup muffin pan with paper cupcake liners.
- Mix the Brownie Base: In a medium bowl, combine brownie mix, vegetable oil, egg, and water.
- Fill the Liners: Spoon about two tablespoons of the brownie batter into each liner, filling them halfway.
- Prepare the Cheesecake Mixture: In a separate bowl, beat cream cheese, sugar, and vanilla extract until smooth.
- Add the Cheesecake Layer: Drop a generous spoonful of cheesecake mixture onto each brownie base.
- Create the Marble Effect: Swirl the cheesecake into the brownie batter with a toothpick.
- Add Chocolate Chips: Sprinkle mini chocolate chips over each swirled cup.
- Bake to Perfection: Bake for 20-22 minutes until tops are puffed and centers are set.
- Cool and Chill: Allow to cool before chilling in the refrigerator for at least 30 minutes.
- Finish and Serve: Drizzle with caramel and chocolate syrup before serving.
Notes
For best results, ensure cream cheese is at room temperature before mixing. Customize with different mix-ins if desired.
- Prep Time: 15 minutes
- Cook Time: 22 minutes
- Category: Dessert
- Method: Baking
- Cuisine: American
Nutrition
- Serving Size: 1 cup
- Calories: 220 kcal
- Sugar: 18g
- Sodium: 150mg
- Fat: 13g
- Saturated Fat: 6g
- Unsaturated Fat: 6g
- Trans Fat: 0g
- Carbohydrates: 22g
- Fiber: 1g
- Protein: 3g
- Cholesterol: 45mg
Keywords: brownie, cheesecake, dessert, loaded cupcakes, marble dessert