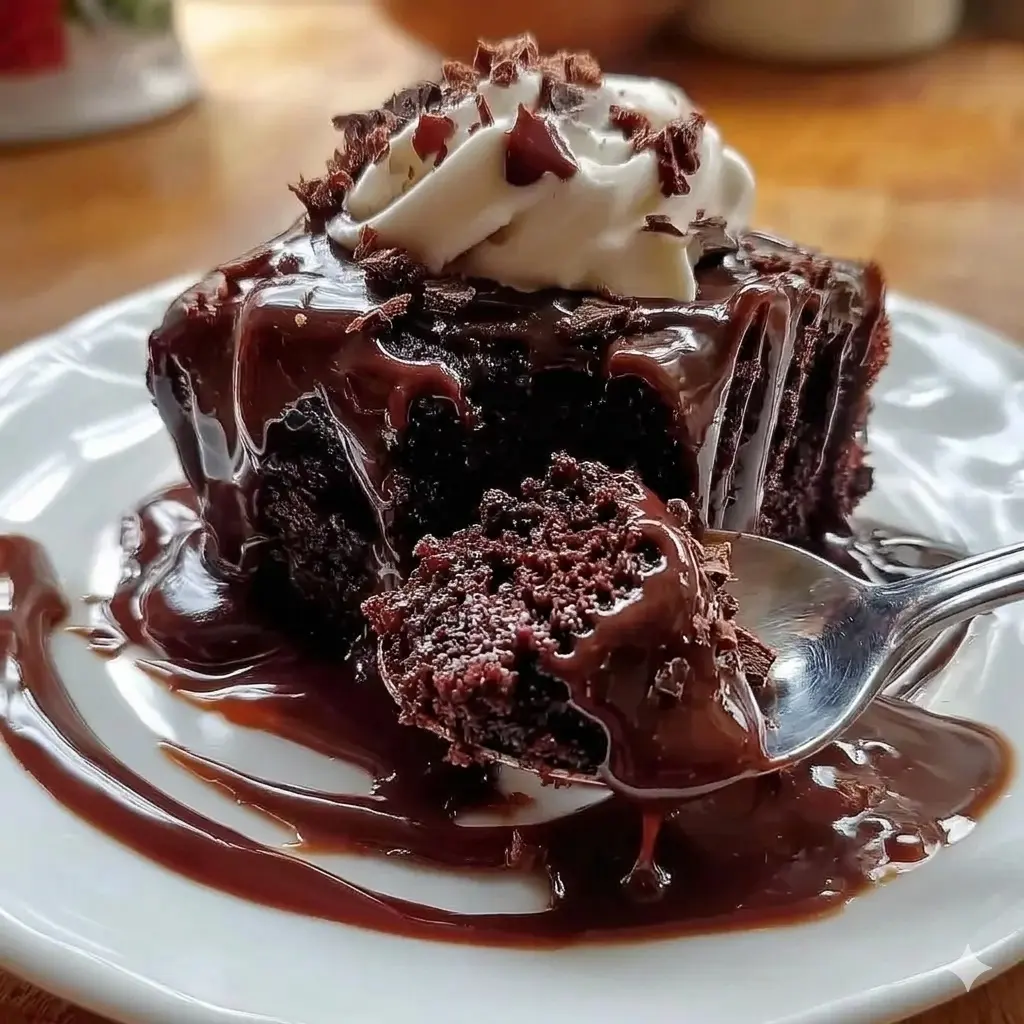
There is nothing quite as comforting as a dessert that performs its own magic in the oven. This Hot Fudge Chocolate Pudding Cake is a legendary, self-saucing American classic that transforms as it bakes. It creates a beautifully soft, airy chocolate sponge on top and a rich, bubbling reservoir of warm, velvety fudge sauce directly beneath it.
It is the ultimate cozy dessert for chilly evenings, casual family dinners, or any moment that demands an intense chocolate fix with minimal effort. Requiring just 10 minutes of active prep time, this recipe completely eliminates the need to make a separate frosting or glaze—the cake handles everything all by itself!
Why You Will Love This Magic Pudding Cake
-
Self-Saucing Magic: You pour hot water straight over the dry sugar-cocoa mixture, and through the science of density and heat, it sinks to the bottom to create a rich, glossy hot fudge sauce while the cake floats to the top.
-
Intense Texture Contrast: Every single scoop delivers a perfect pairing of light, fluffy chocolate cake crust and warm, molten fudge pudding.
-
Simple Pantry Staples: No fancy chocolate melts or heavy cream required—this recipe relies on simple, basic kitchen ingredients you likely already have in your cupboard.
-
The Ultimate Warm Comfort: Served fresh out of the oven, it is a deeply nostalgic, soul-warming treat that pairs spectacularly with cold dairy accents.
 Prep Time: 10 mins   |   Cook Time: 35-40 mins   |   Total Time: 50 mins
 Course: Dessert      |   Cuisine: American       |   Yield: 9 generous servings
Ingredients Checklist
This recipe is divided into a base batter layer and a distinct sugar-cocoa topping layer. Gathering these components ahead of time makes assembly completely effortless.
The Chocolate Cake Batter Base
-
1 cup All-Purpose Flour: Provides the necessary structural framework for the floating sponge cake layer.
-
⅔ cup Granulated Sugar: Sweetens the cake base and helps build a tender crumb structure.
-
¼ cup Unsweetened Cocoa Powder: Gives the top sponge layer its deep, authentic chocolate flavor.
-
2 teaspoons Baking Powder: The crucial leavening agent that allows the cake batter to puff up and rise above the liquid sauce.
-
¼ teaspoon Salt: Sharpens the cocoa notes and balances the rich sweetness perfectly.
-
½ cup Milk: Adds moisture and dairy richness to the batter base. (You can easily substitute this with your favorite non-dairy milk like almond or oat milk).
-
2 tablespoons Butter (Melted): Infuses the cake layer with a beautiful, buttery mouthfeel.
-
1 teaspoon Vanilla Extract: Adds a subtle warmth that enhances the overall chocolate profile.
-
½ cup Chopped Nuts (Optional): Adds a wonderful, rustic crunch to the tender cake layers. Pecans or walnuts work beautifully here!
The Magic Hot Fudge Topping
-
¾ cup Brown Sugar: Packed brown sugar is essential here—its natural molasses content melts into a deeply rich, caramel-tinged fudge sauce.
-
¼ cup Unsweetened Cocoa Powder: Combines with the brown sugar to create the dark chocolate foundation for the sauce below.
-
1 ¾ cups Hot Water: Must be very hot but not boiling. The hot water dissolves the topping sugars and pushes them through the batter to form the bottom pudding layer.
Step-by-Step Instructions
Follow these precise, chronological directions to ensure the magic separation of cake and sauce happens flawlessly in your oven.
1. Whisk the Batter Base
-
Preheat your conventional oven to 350°F (175°C). Lightly grease a 9×9-inch baking dish with butter or non-stick baking spray.
-
In a large mixing bowl, whisk together the dry cake ingredients: 1 cup of all-purpose flour, ⅔ cup of granulated sugar, the first ¼ cup of unsweetened cocoa powder, 2 teaspoons of baking powder, and ¼ teaspoon of salt until completely uniform.
-
Pour in the ½ cup of milk, 2 tablespoons of melted butter, and 1 teaspoon of vanilla extract. Stir the mixture thoroughly with a wooden spoon or spatula until a thick, smooth batter forms.
-
If you are using them, gently fold in the ½ cup of chopped nuts until they are evenly distributed.
2. Assemble the Magic Layers
-
Using a flexible spatula, spread the thick cake batter evenly into the bottom of your greased 9×9-inch baking dish, smoothing out the surface.
-
In a separate small bowl, toss together the ¾ cup of brown sugar and the remaining ¼ cup of cocoa powder until completely mixed. Sprinkle this sugar-cocoa mixture evenly across the entire surface of the cake batter.
-
The Crucial Step: Carefully and slowly pour the 1 ¾ cups of hot water over the top of the entire dish.
-
CRITICAL NOTE: Do not stir the dish! Leave it exactly as it is. It will look like a messy, watery pool on top of raw batter, but this is exactly how it is supposed to look. Stirring will ruin the layers and prevent the fudge sauce from forming at the bottom.
3. Bake and Serve Warm
-
Carefully transfer the baking dish to the center rack of your preheated oven. Bake at 350°F (175°C) for 35 to 40 minutes.
-
The cake is done when the top sponge layer is fully set, dry to the touch, and the edges begin to pull away slightly from the sides of the dish, while the hot fudge sauce bubbles up around the borders.
-
Remove the dish from the oven and let it cool on a wire rack for just a few minutes.
-
To serve, use a large spoon to plunge deep into the dish, scooping up a generous portion of the soft top cake along with an abundance of the rich, warm fudgy sauce that has formed underneath.
Pro Presentation & Baking Secrets
Avoid Boiling Water: Make sure your water is hot to the touch but not boiling aggressively. Water that is boiling hot can prematurely shock and cook the raw baking powder in the batter, which can cause the cake layer to turn out dense or gummy rather than light and airy.
The Melting Crown: Because this dessert is served warm and contains a built-in hot sauce, it cries out for a cold accompaniment. Serve each scoop immediately with a generous scoop of vanilla bean ice cream or a dollop of fresh whipped cream. The ice cream will melt into the warm fudge sauce, creating a truly luxurious restaurant-quality experience.
Storage and Reheating Guidelines
-
In the Refrigerator: If you have leftovers, allow the dish to cool completely, cover it tightly with plastic wrap or aluminum foil, and store it in the fridge for up to 3 days. The cake sponge will absorb some of the liquid sauce as it sits, turning into an incredibly dense, ultra-fudgy chocolate treat.
-
The Molten Reheat Trick: To bring this cake back to its original gooey glory, never eat it cold! Place an individual portion on a microwave-safe plate and heat it on high for 20 to 30 seconds. The heat will liquefy the settled cocoa fats, instantly restoring the warm, liquid fudge sauce at the bottom.
Nutritional Summary (Per Serving)
| Metric | Details |
| Calories | 320 kcal |
| Servings | 9 uniform portions |
| Texture | Soft, velvety sponge on top with a glossy, molten hot chocolate syrup below. |
Frequently Asked Questions (FAQs)
Can I make this in a different sized pan?
Yes, but you will need to adjust the baking time. If you scale this up to an 11×7-inch or a 9×13-inch pan, the layers will be much thinner, meaning the cake will bake significantly faster (around 25 to 30 minutes). Keep a close eye on the oven to ensure you don’t over-bake it and dry out the precious bottom sauce!
Why is my pudding cake dry with no sauce at the bottom?
This almost always happens due to over-baking. If the cake is left in the oven for even 5 minutes too long, the sponge layer will completely absorb the water and sugar from below, drying up the pudding layer entirely. Remove the cake the exact moment the top is stable and set!
Can I substitute the all-purpose flour with a gluten-free blend?
Absolutely. This style of cake is very forgiving because it doesn’t rely heavily on a complex gluten structure. You can easily swap the 1 cup of all-purpose flour for a high-quality 1:1 gluten-free baking flour blend containing xanthan gum for a delicious gluten-free alternative.
Final Thoughts
The Hot Fudge Chocolate Pudding Cake stands as a beautiful testament to simple kitchen chemistry. By letting heat and density do the heavy lifting in your oven, you unlock a magnificent dual-texture dessert that brings absolute comfort to any table.
Try Also: Irresistible Dessert Ideas from
-
What is Dubai Chocolate Bar Made Of? Key Ingredients Explained
-
Rose Milk Cake Recipe
-
Strawberry Cheesecake Dump Cake Recipe
Be sure to Print Recipe or Pin Recipe so you have this ultimate, self-saucing chocolate comfort guide safely saved for your next cozy night in or sweet dessert craving!
Hot Fudge Chocolate Pudding Cake
- Total Time: 50 minutes
- Yield: 9 servings 1x
- Diet: Vegetarian
Description
This legendary, self-saucing American classic creates a soft, airy chocolate sponge on top and a rich, bubbling fudge sauce directly beneath it.
Ingredients
- 1 cup All-Purpose Flour
- ⅔ cup Granulated Sugar
- ¼ cup Unsweetened Cocoa Powder
- 2 teaspoons Baking Powder
- ¼ teaspoon Salt
- ½ cup Milk
- 2 tablespoons Butter (Melted)
- 1 teaspoon Vanilla Extract
- ½ cup Chopped Nuts (Optional)
- ¾ cup Brown Sugar
- ¼ cup Unsweetened Cocoa Powder
- 1 ¾ cups Hot Water
Instructions
- Preheat your oven to 350°F (175°C). Lightly grease a 9×9-inch baking dish with butter or non-stick baking spray.
- Whisk together the dry cake ingredients in a large mixing bowl until uniform.
- Pour in the milk, melted butter, and vanilla extract. Stir until a thick batter forms.
- Fold in the chopped nuts if using.
- Spread the thick cake batter evenly into the greased baking dish.
- Toss together the brown sugar and remaining cocoa powder, then sprinkle it over the batter.
- Carefully pour the hot water over the top without stirring.
- Bake for 35 to 40 minutes until the top is set.
- Let cool for a few minutes, then serve warm by scooping portions with both cake and fudge sauce.
Notes
Serve with a scoop of vanilla ice cream or whipped cream for a delightful contrast.
- Prep Time: 10 minutes
- Cook Time: 40 minutes
- Category: Dessert
- Method: Baking
- Cuisine: American
Nutrition
- Serving Size: 1 serving
- Calories: 320
- Sugar: 30g
- Sodium: 200mg
- Fat: 10g
- Saturated Fat: 5g
- Unsaturated Fat: 3g
- Trans Fat: 0g
- Carbohydrates: 50g
- Fiber: 2g
- Protein: 5g
- Cholesterol: 20mg
Keywords: chocolate cake, dessert, pudding cake, self-saucing, American dessert