This recipe offers an incredible twist on traditional red velvet, fusing the deep, comforting undertones of chocolate with the bright, fruity punch of real strawberry puree. The buttermilk gives the crumb a beautifully tender, velvety texture, while the strawberry buttercream rounds out the cake with an intense berry aroma and an elegant pastel pink hue.

Recipe Specifications
-
Yield: 10–12 generous slices
-
Prep Time: 20 minutes
-
Baking Time: 25–30 minutes
-
Pan Size: Two 9-inch round cake pans
-
Flavor Profile: Balanced cocoa depth paired with vibrant, sweet-tart summer strawberries
Comprehensive Ingredients Checklist
1. The Velvet Cocoa-Strawberry Sponge
-
2 ½ cups all-purpose flour
-
1 ½ teaspoons baking powder
-
½ teaspoon baking soda
-
½ teaspoon salt
-
½ cup unsweetened cocoa powder
-
1 cup buttermilk (crucial for activating the baking soda and softening the gluten)
-
1 teaspoon pure vanilla extract
-
½ cup vegetable oil (keeps the crumb exceptionally moist)
-
2 large eggs
-
1 cup granulated sugar
-
½ cup strawberry puree (made by blending fresh or thawed frozen strawberries until smooth)
-
1 tablespoon red food coloring (optional; amplifies the “velvet” visual aesthetic)
2. The Fresh Strawberry Buttercream Frosting
-
1 cup (225g) unsalted butter, thoroughly softened to room temperature
-
4 cups powdered sugar (icing sugar)
-
½ cup strawberry puree
-
1 teaspoon pure vanilla extract
-
A pinch of fine salt (balances out the intense sweetness of the sugar)
-
1–2 tablespoons heavy cream (only if needed to loosen the consistency)
Step-by-Step Production & Assembly Guide
+-------------------------------------------------------------+
|    GARNISH: Halved Fresh Strawberries or Festive Sprinkles  |
+-------------------------------------------------------------+
|    COATING: Thick Layer of Fresh Strawberry Buttercream     |
+-------------------------------------------------------------+
|    SPONGE 2: Dark Velvet Chocolate-Strawberry Cake Layer    |
+-------------------------------------------------------------+
|    MIDDLE: Generous Layer of Strawberry Buttercream Fill    |
+-------------------------------------------------------------+
|    SPONGE 1: Dark Velvet Chocolate-Strawberry Cake Layer    |
+-------------------------------------------------------------+
|                     BUILT ON A SERVING PLATE                |
+-------------------------------------------------------------+
Phase 1: Baking the Velvet Sponges
-
Prep the Oven & Pans: Preheat your oven to 175°C (350°F). Grease the bottoms and sides of two 9-inch round cake pans and dust them lightly with flour, shaking off any excess. (Alternatively, line the bottoms with greaseproof paper rounds for guaranteed release).
-
Whisk Dry Ingredients: In a medium-sized bowl, sift and whisk together the 2 ½ cups of all-purpose flour, 1 ½ teaspoons of baking powder, ½ teaspoon of baking soda, ½ teaspoon of salt, and ½ cup of unsweetened cocoa powder. Set aside.
-
Blend Wet Ingredients: In a separate large mixing bowl, thoroughly combine the 1 cup of buttermilk, 1 teaspoon of vanilla extract, ½ cup of vegetable oil, 2 large eggs, 1 cup of granulated sugar, and ½ cup of strawberry puree. Whisk until the mixture is completely smooth and uniform.
-
Combine: Gradually pour the dry flour mixture into the wet ingredients bowl. Using a spatula or wooden spoon, fold gently until just combined and no large pockets of dry flour remain. Avoid overmixing here, as overworking the batter can result in a dense, tough cake.
-
Color Accent: If using the red food coloring, gently stir it into the batter now until it is evenly distributed and the batter boasts a rich, deep crimson-maroon color.
-
Bake: Divide the batter evenly between your two prepared 9-inch pans, leveling the tops with an offset spatula. Bake in the center of the oven for 25 to 30 minutes. Test for doneness by inserting a toothpick into the center of the cakes; it should come out clean or with a few moist crumbs attached.
-
Cool down: Let the cakes sit and cool inside their pans for 10 minutes. Then, carefully run a thin knife around the edges, invert the sponges onto a wire cooling rack, and leave them to cool down completely to room temperature before frosting.
Phase 2: Whipping the Strawberry Buttercream
-
Cream the Butter: Place your 1 cup of softened unsalted butter into a large bowl (or the bowl of a stand mixer fitted with the paddle attachment). Beat on medium-high speed for 2–3 minutes until the butter is light, pale, and exceptionally creamy.
-
Gradual Sugar Integration: Turn the mixer down to low speed. Add the 4 cups of powdered sugar one cup at a time, allowing each addition to fully blend into the butter before adding the next. This prevents a giant cloud of sugar from escaping the bowl.
-
Emulsify the Berries: Pour in the ½ cup of strawberry puree, 1 teaspoon of vanilla extract, and a pinch of salt. Turn the mixer back up to medium speed and beat until the puree is perfectly incorporated, turning the frosting a beautiful pastel pink.
-
Adjust Consistency: Inspect the texture. If the moisture from the fresh strawberry puree has made the frosting too soft, add a touch more powdered sugar. If it feels too stiff to spread effortlessly, beat in heavy cream, one tablespoon at a time, until it reaches a silky, spreadable consistency.
Phase 3: Assembly & Decoration
-
Base Layer: Ensure your cake layers are completely cold (warm cakes will melt the butter in your frosting instantly). Place your first velvet cake layer right-side up onto a serving plate or cake stand.
-
The Center Fill: Spread a generous, even layer of the strawberry buttercream over the top of the base cake, smoothing it right to the edges.
-
Stack: Carefully align and place the second cake layer directly on top of the frosting layer.
-
Coat and Frost: Use the remaining buttercream to frost the top and sides of the entire assembled cake. For a clean finish, apply a thin “crumb coat” first, chill the cake for 15 minutes, and then apply the final thick, gorgeous layer of pink frosting.
-
Garnish: Top the cake with beautiful fresh strawberry halves, whole berries, or chocolate curls right before serving.
Chef’s Professional Success Tips
-
Controlling Puree Moisture: Fresh strawberries have a high water content, which can sometimes make buttercream separate or turn runny. For an incredibly intense flavor and stable frosting, consider reducing your strawberry puree before using it. Simmer the 1 cup of blended strawberries in a small saucepan over medium-low heat until it reduces by half into a thick paste. Let it cool completely before adding it to your butter.
-
The Crimson Spectrum: Traditional red velvet gets its color from a chemical reaction between natural cocoa powder and acids (like buttermilk). Since modern cocoa powders are often alkalized (Dutch-processed), this reaction is suppressed. If you want that bright, glowing red hue, using a high-quality gel-based red food coloring is your best bet, as liquid coloring can throw off the liquid ratios of the cake batter.
Try Also: Irresistible Dessert Ideas from
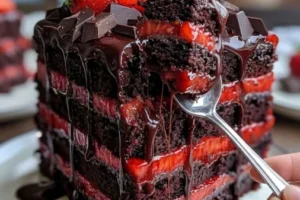
Dark Velvet Strawberry Cake
- Total Time: 50 minutes
- Yield: 10–12 slices 1x
- Diet: Vegetarian
Description
A luxurious chocolate-strawberry cake featuring a tender velvet sponge and a rich strawberry buttercream frosting, perfect for any occasion.
Ingredients
- 2 ½ cups all-purpose flour
- 1 ½ teaspoons baking powder
- ½ teaspoon baking soda
- ½ teaspoon salt
- ½ cup unsweetened cocoa powder
- 1 cup buttermilk
- 1 teaspoon pure vanilla extract
- ½ cup vegetable oil
- 2 large eggs
- 1 cup granulated sugar
- ½ cup strawberry puree
- 1 tablespoon red food coloring (optional)
- 1 cup unsalted butter, softened
- 4 cups powdered sugar
- ½ cup strawberry puree
- 1 teaspoon pure vanilla extract
- A pinch of fine salt
- 1–2 tablespoons heavy cream (if needed)
Instructions
- Preheat your oven to 175°C (350°F). Grease the bottoms and sides of two 9-inch round cake pans and dust them with flour.
- In a medium bowl, sift and whisk together the flour, baking powder, baking soda, salt, and cocoa powder.
- In a large mixing bowl, combine the buttermilk, vanilla extract, vegetable oil, eggs, sugar, and strawberry puree. Whisk until smooth.
- Gradually pour the dry mixture into the wet ingredients. Fold gently until combined.
- If using red food coloring, stir it into the batter until evenly distributed.
- Divide the batter between the two prepared pans and bake for 25 to 30 minutes. Test for doneness with a toothpick.
- Cool the cakes in the pans for 10 minutes before inverting onto a wire rack to cool completely.
- Beat the softened butter on medium-high speed until light and creamy.
- Add the powdered sugar gradually, mixing on low speed.
- Stir in the strawberry puree, vanilla extract, and salt until well blended.
- If too soft, adjust consistency with more powdered sugar or heavy cream.
- Once cakes are cool, spread buttercream between layers, coat the top and sides, and garnish with strawberries.
Notes
For a more intense flavor and stable frosting, consider reducing the strawberry puree by simmering it on low heat until thickened.
- Prep Time: 20 minutes
- Cook Time: 30 minutes
- Category: Dessert
- Method: Baking
- Cuisine: American
Nutrition
- Serving Size: 1 slice
- Calories: 365
- Sugar: 30g
- Sodium: 350mg
- Fat: 20g
- Saturated Fat: 10g
- Unsaturated Fat: 8g
- Trans Fat: 0g
- Carbohydrates: 45g
- Fiber: 2g
- Protein: 5g
- Cholesterol: 50mg
Keywords: cake, strawberry cake, chocolate cake, velvet cake, dessert