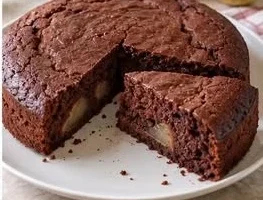
There is something incredibly comforting about the combination of rich chocolate and sweet, tender pears. This Chocolate Pear Cake brings both flavors together in one beautiful, moist dessert. The cake has a deep chocolate flavor, a soft crumb, and slices of delicate pear baked right into the center. As the cake bakes, the pears become tender and juicy while their natural sweetness balances the richness of the chocolate.
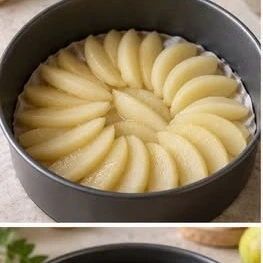
The best part is how impressive this cake looks without requiring complicated decorating. Arrange thin pear slices in a circular pattern over the bottom of the pan, pour the chocolate batter over them, and bake. Once sliced, you get beautiful pieces of pear surrounded by a rich chocolate cake.
This recipe is perfect for fall and winter baking, afternoon coffee, family gatherings, holidays, or simply when you want an easy homemade chocolate dessert. If you love classic chocolate cake but want something a little more special, this Chocolate Pear Cake is definitely worth trying.
Chocolate Pear Cake Recipe
What Is Chocolate Pear Cake?
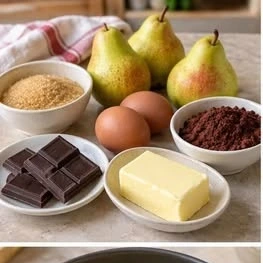
Chocolate Pear Cake is a simple European-inspired dessert made with ripe pears, cocoa powder, chocolate, butter, eggs, sugar, and flour. The pears are arranged in the cake pan before the chocolate batter is added, creating a beautiful pattern and giving every slice a delicious combination of fruit and chocolate.
The texture is soft and moist rather than dry or overly dense. The pears add moisture as they bake, while cocoa powder and melted chocolate create a wonderfully rich chocolate flavor.
This cake doesn’t need frosting. A light dusting of powdered sugar is enough, although you can also serve it with whipped cream, vanilla ice cream, or a drizzle of chocolate sauce.
Why You’ll Love This Chocolate Pear Cake
There are plenty of reasons to add this recipe to your baking list.
Rich chocolate flavor: Cocoa powder and melted dark chocolate give the cake a deep, satisfying chocolate taste.
Juicy pears: Fresh pears become soft and tender during baking, adding natural sweetness and moisture.
Easy preparation: You don’t need complicated pastry techniques or special decorating skills.
Beautiful presentation: The pear slices create an elegant pattern that makes the cake look bakery-worthy.
Perfect for fall: Pear and chocolate are especially delicious during the cooler months.
No frosting required: The cake is rich and flavorful enough to serve on its own.
Great for entertaining: You can prepare it ahead of time and serve it at room temperature.
Chocolate Pear Cake Recipe
Ingredients
For one 9-inch (23 cm) round cake, you’ll need:
For the Pear Layer
3 medium ripe but firm pears
1 tablespoon lemon juice
1 tablespoon brown sugar
1 tablespoon butter, for greasing the pan
For the Chocolate Cake
150 g all-purpose flour
40 g unsweetened cocoa powder
1 teaspoon baking powder
1/4 teaspoon salt
150 g granulated sugar
100 g unsalted butter
100 g dark chocolate, chopped
2 large eggs
1 teaspoon vanilla extract
120 ml milk
Optional for Serving
Powdered sugar
Whipped cream
Vanilla ice cream
Chocolate sauce
Fresh pear slices
Equipment You’ll Need
You don’t need much equipment for this recipe.
9-inch round cake pan
Large mixing bowl
Medium heatproof bowl
Whisk
Rubber spatula
Small saucepan or microwave-safe bowl
Sharp knife
Cutting board
Measuring cups and spoons
Parchment paper
Cooling rack
A springform pan can also be used, especially if you want to remove the cake easily after baking.
How to Make Chocolate Pear Cake
Step 1: Prepare the Oven and Cake Pan
Preheat your oven to 350°F (175°C).
Grease a 9-inch round cake pan with butter. Line the bottom with a circle of parchment paper. Greasing the pan is important because the pears contain natural sugars that can caramelize during baking and stick to the pan.
Set the prepared pan aside while you prepare the pears.
Step 2: Prepare the Pears
Wash and peel the pears. Cut them in half and remove the cores.
Slice the pears into thin, even slices.
Try not to slice them too thin because they can become overly soft during baking. Slices around 1/4 inch thick work beautifully.
Place the pear slices in a bowl and gently toss them with the lemon juice. The lemon juice helps prevent excessive browning and adds a subtle brightness that balances the chocolate.
Sprinkle the brown sugar over the pears and gently toss.
Chocolate Pear Cake Recipe
Step 3: Arrange the Pears
Arrange the pear slices in the bottom of the prepared cake pan.
For the beautiful appearance shown in the photo, place the slices in overlapping circles, starting around the outside and gradually working toward the center.
The slices should overlap slightly, creating a fan-like pattern.
Don’t worry if your pattern isn’t perfect. Once the cake is baked and sliced, the pears will still create a beautiful homemade appearance.
Set the pan aside.
Step 4: Melt the Chocolate and Butter
Place the butter and chopped dark chocolate into a heatproof bowl.
Melt them gently using a double boiler, or microwave them in short 20-second intervals, stirring between each interval.
Continue until the butter and chocolate are completely melted and smooth.
Allow the mixture to cool slightly.
You don’t want the chocolate mixture to be extremely hot when you add the eggs.
Step 5: Mix the Dry Ingredients
In a separate bowl, whisk together:
All-purpose flour
Cocoa powder
Baking powder
Salt
Mix well to distribute the cocoa powder and baking powder evenly.
This step helps prevent pockets of baking powder or cocoa from appearing in the finished cake.
Chocolate Pear Cake Recipe
Step 6: Combine the Eggs and Sugar
In a large mixing bowl, whisk the eggs and granulated sugar together.
Whisk for about 1–2 minutes, until the mixture becomes slightly lighter and smooth.
Add the vanilla extract and mix again.
Pour in the melted chocolate and butter mixture.
Whisk until everything is well combined.
Step 7: Add the Dry Ingredients
Gradually add the dry ingredients to the chocolate mixture.
Pour in the milk and gently stir.
Use a rubber spatula or whisk and mix only until the batter is smooth.
Avoid overmixing. Once the flour disappears, stop stirring.
The finished batter should be thick, smooth, and rich.
Step 8: Pour the Batter Over the Pears
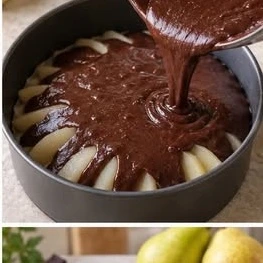
Slowly pour the chocolate batter over the arranged pears.
Use a spatula to spread the batter gently and evenly across the pan.
Try not to disturb the pear arrangement underneath.
Tap the pan lightly against the counter once or twice to remove any large air bubbles.
The pears should be completely covered with chocolate batter.
Step 9: Bake the Cake
Place the pan in the preheated oven.
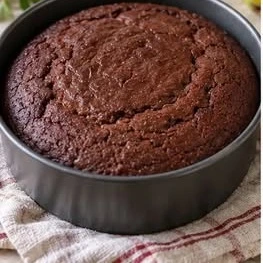
Bake for approximately 40–50 minutes.
The exact baking time can vary depending on your oven, the size of your pan, and the amount of moisture in the pears.
Begin checking the cake around 40 minutes.
Insert a toothpick into the chocolate cake portion. It should come out with a few moist crumbs but not wet batter.
Don’t insert the toothpick directly into a pear slice because the fruit will naturally remain moist.
Step 10: Cool the Cake
Remove the cake from the oven and place it on a cooling rack.
Let it cool in the pan for approximately 15–20 minutes.
Run a thin knife around the edges of the cake to loosen it from the pan.
Place a serving plate over the cake pan and carefully invert the cake.
Remove the pan and gently peel away the parchment paper.
The beautiful pear pattern should now be visible on top of the cake.
Allow the cake to cool further before slicing.
How to Serve Chocolate Pear Cake
This cake is delicious by itself, but there are several ways to make it even more special.
With Powdered Sugar
The easiest option is a light dusting of powdered sugar. The white sugar contrasts beautifully with the dark chocolate cake.
With Whipped Cream
Add a spoonful of lightly sweetened whipped cream beside each slice.
With Vanilla Ice Cream
Warm a slice of cake slightly and serve it with vanilla ice cream. The combination of warm chocolate cake, tender pears, and cold creamy ice cream is irresistible.
With Chocolate Sauce
For an extra-indulgent dessert, drizzle melted chocolate or chocolate ganache over each slice.
With Coffee
The rich chocolate flavor pairs wonderfully with freshly brewed coffee or espresso.
Chocolate Pear Cake Recipe
Tips for Making the Best Chocolate Pear Cake
Choose the Right Pears
Use pears that are ripe enough to be sweet but still firm enough to hold their shape.
Very soft pears can release too much liquid during baking and may become mushy.
Bosc and Anjou pears are excellent choices.
Don’t Overmix the Batter
Once you add the flour, mix just until combined.
Overmixing can develop too much gluten, which may result in a tougher cake.
Use Good-Quality Chocolate
Because chocolate is one of the main flavors, using good-quality dark chocolate makes a noticeable difference.
Choose chocolate that you enjoy eating on its own.
Don’t Overbake
Chocolate cakes can be difficult to judge because their dark color makes it harder to see when they’re finished.
Start checking around the 40-minute mark.
The toothpick should have a few moist crumbs attached.
Let the Cake Cool Before Inverting
Give the cake enough time to cool slightly before turning it out of the pan.
If you invert it while it is extremely hot, the cake can be fragile and may break.
Can I Make This Cake Ahead of Time?
Yes!
Chocolate Pear Cake is actually a wonderful make-ahead dessert.
You can bake it one day before serving and keep it covered at room temperature if your kitchen is cool.
For longer storage, place it in an airtight container and refrigerate it.
Before serving, allow refrigerated cake to sit at room temperature for about 20–30 minutes.
You can also gently warm individual slices before serving.
How to Store Chocolate Pear Cake
Store leftover cake in an airtight container.
At room temperature, it is best enjoyed within about 2 days.
In the refrigerator, it can keep for approximately 4 days.
Because the cake contains fresh pears, refrigeration is recommended for longer storage.
If refrigerated, bring it toward room temperature before serving for the best texture.
Can You Freeze Chocolate Pear Cake?
Yes, this cake can be frozen.
Allow it to cool completely before freezing.
Wrap individual slices tightly in plastic wrap and place them inside a freezer-safe container or bag.
Freeze for up to approximately 2 months.
To thaw, place a slice in the refrigerator overnight or let it thaw at room temperature.
For a freshly baked texture, warm the thawed slice gently in the microwave or oven.
Chocolate Pear Cake Variations
Once you’ve made the basic recipe, you can easily customize it.
Chocolate Pear and Almond Cake
Add 1/2 teaspoon almond extract and replace about 30 g of the flour with finely ground almond flour.
The almond flavor works beautifully with both pears and chocolate.
Dark Chocolate Pear Cake
Use a high-cocoa dark chocolate for a more intense chocolate flavor.
Chocolate Pear Cake With Cinnamon
Add 1 teaspoon ground cinnamon to the dry ingredients.
Cinnamon gives the cake a warm flavor that’s especially suitable for autumn.
Chocolate Pear and Hazelnut Cake
Add 50 g chopped toasted hazelnuts to the batter.
The crunchy nuts provide a wonderful contrast to the soft pears.
Extra Chocolate Version
For serious chocolate lovers, add a handful of chocolate chips to the batter before pouring it over the pears.
Common Mistakes to Avoid
Using Overripe Pears
Very soft pears can release excessive moisture. Choose pears that are ripe but firm.
Cutting Uneven Pear Slices
Try to keep the slices approximately the same thickness so they cook evenly.
Overbaking the Cake
A few moist crumbs are fine. Waiting until the toothpick is completely dry can result in a dry cake.
Removing It Too Quickly
Allow the cake to cool for 15–20 minutes before attempting to invert it.
Overmixing
Mix the batter only until the ingredients are incorporated.
Frequently Asked Questions
Can I use canned pears?
Yes. Drain canned pears extremely well and pat them dry with paper towels before using them.
Fresh pears are preferable for the texture shown in the photo, but canned pears can work when fresh pears aren’t available.
Can I use milk chocolate?
You can, although the finished cake will be sweeter and less intense.
Dark chocolate is recommended because its slight bitterness balances the natural sweetness of the pears.
Can I make this cake without chocolate bars?
Yes. You can make the cake using cocoa powder alone, but the melted chocolate adds richness and a smoother chocolate flavor.
Can I use a different pan?
A 9-inch springform pan works well. You can also use a slightly smaller or larger round pan, but the baking time will need to be adjusted.
Why did my cake sink slightly?
A small amount of sinking can happen because of the moisture from the pears. It can also happen if the cake is underbaked or the oven door is opened too early.
Avoid opening the oven during the first 30 minutes of baking.
Arrange pear slices in overlapping circles in the bottom of the pan.
Melt butter and dark chocolate together and allow to cool slightly.
Whisk flour, cocoa powder, baking powder, and salt in a bowl.
Whisk eggs, sugar, and vanilla in another bowl.
Add the melted chocolate and butter.
Gradually add the dry ingredients and milk.
Mix just until smooth.
Pour the chocolate batter over the pears.
Bake for 40–50 minutes, or until a toothpick inserted into the cake comes out with a few moist crumbs.
Cool for 15–20 minutes.
Carefully invert onto a serving plate.
Dust with powdered sugar if desired.
Slice and serve.
Final Thoughts
This Chocolate Pear Cake is proof that an elegant dessert doesn’t have to be complicated. With a handful of simple ingredients, you can create a rich chocolate cake with beautifully tender pears baked into every slice.
The contrast between the intense chocolate flavor and naturally sweet pears makes this dessert especially delicious. The pears also add moisture to the cake, giving it a soft texture that stays enjoyable even the next day.
Whether you’re baking for a weekend dessert, an afternoon coffee, a holiday gathering, or simply craving something homemade, this cake is a wonderful choice. Arrange the pears carefully for a beautiful presentation, let the chocolate batter bake around them, and finish with a simple dusting of powdered sugar.
Save this Chocolate Pear Cake recipe for your next baking day—you’ll love how easy it is to turn fresh pears and chocolate into such a beautiful homemade dessert.