Chocolate Hazelnut Cake Recipe
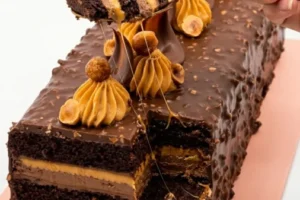
If you are searching for a dessert that perfectly balances a rich, velvety texture with an irresistible nutty crunch, this Chocolate Hazelnut Cake (Gâteau Chocolat Noisette) is the ultimate showstopper. Inspired by high-end patisserie flavors but engineered for effortless home baking, this layered masterpiece combines a dense chocolate sponge, a silky hazelnut cream filling, and a stunning Rocher-style crackling glaze.
Whether you are preparing a centerpiece for a festive gathering or looking to level up your weekend baking, this step-by-step guide delivers a premium, bakery-quality dessert that will leave everyone asking for the recipe.

Why You Will Love This Chocolate Hazelnut Cake
-
The Ultimate Texture Contrast: Every bite offers a journey through an ultra-soft chocolate biscuit base, a cloud-like hazelnut mousse, and a satisfyingly crisp chocolate-hazelnut shell.
-
No Complex Pastry Skills Required: While it looks like it belongs in a luxury boutique window, it relies on straightforward techniques that any home baker can master.
-
Perfect Balance of Flavors: By utilizing a mix of dark chocolate, milk chocolate, and roasted hazelnuts, this cake cuts through excess sweetness to highlight rich, deep cacao and nutty undertones.
Comprehensive Ingredients Checklist
To achieve the perfect texture and stability, ensure your ingredients—especially your eggs and dairy—are at room temperature before you begin.
1. The Deep Chocolate Biscuit Base
-
150 g high-quality dark chocolate (60–70% cacao)
-
100 g unsalted butter
-
100 g granulated white sugar
-
4 large eggs, room temperature
-
80 g all-purpose flour, sifted
-
1 pinch fine sea salt
2. The Silky Hazelnut Cream Filling
-
300 ml heavy liquid whipping cream (minimum 30–35% fat content, thoroughly chilled)
-
150 g hazelnut spread or premium hazelnut praliné paste
-
100 g high-quality milk chocolate
3. The Rocher Crackling Glaze
-
200 g premium dark chocolate, chopped
-
100 g raw hazelnuts, toasted and coarsely crushed
-
50 g unsalted butter
4. Premium Garnishes
-
Whole roasted hazelnuts, skinned
-
50 g dark chocolate, melted (for elegant decorative piping)
Step-by-Step Production & Assembly Guide
+-------------------------------------------------------------+
|   GARNISH: Whole Roasted Hazelnuts & Delicate Cocoa Volutes  |
+-------------------------------------------------------------+
|   GLAZE: Crunchy Rocher Shell (Dark Chocolate & Hazelnuts)  |
+-------------------------------------------------------------+
|   LAYER 4: Silky Hazelnut & Milk Chocolate Cream            |
+-------------------------------------------------------------+
|   LAYER 3: Dense, Rich Chocolate Biscuit Sponge             |
+-------------------------------------------------------------+
|   LAYER 2: Silky Hazelnut & Milk Chocolate Cream            |
+-------------------------------------------------------------+
|   LAYER 1: Dense, Rich Chocolate Biscuit Sponge             |
+-------------------------------------------------------------+
|                  BUILT IN A RECTANGULAR MOLD                |
+-------------------------------------------------------------+
Phase 1: Fabricating the Chocolate Biscuit
-
Oven Setup: Preheat your oven to 180°C (350°F). Line a rectangular baking mold with parchment paper, allowing the edges to overhang for easy removal.
-
Melt the Base: Coarsely chop the 150 g of dark chocolate and 100 g of butter. Place them in a heatproof bowl set over a pot of gently simmering water (bain-marie), stirring occasionally until completely smooth. Remove from the heat and let cool slightly.
-
Emulsify: Whisk the 100 g of sugar into the melted chocolate mixture. Add the 4 eggs one at a time, beating vigorously after each addition until the batter looks glossy and completely unified.
-
Fold the Dry Elements: Gently fold in the 80 g of sifted flour and a pinch of salt using a silicone spatula just until the flour disappears. Do not overmix, or the sponge will lose its tender bite.
-
The First Bake: Pour the batter into your prepared rectangular mold, smoothing the top with an offset spatula. Bake for exactly 20 minutes. The top should be set but tender. Let it cool completely on a wire rack.
-
Slice the Layers: Once entirely cold, use a long serrated bread knife to carefully slice the cake horizontally into two equal, thin rectangular sheets.
Phase 2: Whipping the Velvet Hazelnut Cream
-
Infuse the Chocolates: Melt the 100 g of milk chocolate along with the 150 g of hazelnut spread or praliné paste in a heatproof bowl over simmering water. Stir until perfectly smooth and uniform, then set aside to cool down to room temperature. Note: If this mixture is too hot, it will deflate your whipped cream.
-
The Chantilly Phase: Pour the 300 ml of chilled heavy cream into a cold mixing bowl. Using a stand mixer or hand mixer fitted with the whisk attachment, whip on medium-high speed until you achieve stiff peaks.
-
Fold and Set: Gently fold a third of your whipped cream into the cooled hazelnut-chocolate paste to lighten it. Then, carefully fold in the remaining cream in two batches, using a slow figure-eight motion until you have a uniform, light brown mousse.
Phase 3: Architectural Assembly & Chilling
-
The First Assembly Layer: Place the bottom sheet of your chocolate biscuit back into the base of your clean rectangular mold (or an adjustable pastry frame).
-
Spread the Core: Spread exactly half of your hazelnut cream evenly over the biscuit base.
-
The Second Layer: Carefully lay the second sheet of chocolate biscuit directly over the cream layer, pressing down very gently to secure it. Top with the remaining hazelnut cream, creating a smooth, level surface.
-
The Deep Chill: Place the assembled cake into the refrigerator for at least 3 hours to allow the gelatin-free cream to set firmly.
Phase 4: Enrobing with the Crackling Glaze
-
Toast the Nuts: If your hazelnuts aren’t toasted, roast them in a dry pan over medium heat for 3–5 minutes until fragrant, then crush them coarsely.
-
Prepare the Glaze: Melt the 200 g of dark chocolate and 50 g of butter together until glossy. Remove from heat and stir in the 100 g of crushed hazelnuts. Let the glaze cool down until it feels just slightly warm to the touch—if it’s too hot, it will instantly melt your hazelnut cream layers.
-
Enrobe: Carefully unmold your chilled cake and place it onto a wire rack set over a baking sheet to catch any drips. Pour the crunchy glaze smoothly over the top, letting it cascade elegantly down the sides. Use an offset spatula to ensure the sides are fully coated.
-
Final Presentation: Immediately decorate the top surface with whole roasted hazelnuts and pipe delicate volutes of melted dark chocolate across the glaze before it sets.
-
The Final Setting: Place the cake back into the refrigerator for 1 hour before serving to lock in the glaze texture.
Chef’s Professional Success Tips
-
Achieving the Perfect Chantilly: The secret to a stable hazelnut cream lies in temperature control. Ensure your heavy cream has at least 30% fat content, and chill both the bowl and the whisk attachment in the freezer for 10 minutes before whipping.
-
Glaze Temperature Management: The Rocher-style glaze should be poured when it drops to roughly 30°C–35°C (86°F–95°F). It needs to be fluid enough to run easily down the cake, but cool enough that it won’t break down the underlying delicate mousse structure.
-
How to Cut Clean Patisserie Slices: To get razor-sharp, restaurant-style vertical slices that show off the clean cream and sponge layers, dip a long, sharp chef’s knife into a pitcher of boiling water, wipe it completely dry with a clean kitchen towel, and execute your slice in one single, fluid motion. Wipe the blade clean and re-warm it before every single cut.
Frequently Asked Questions (FAQs)
Can I substitute the dark chocolate in the biscuit with milk chocolate?
It is not recommended for the biscuit base. Dark chocolate contains a higher percentage of cocoa solids, which provides the necessary structural stability and deep flavor profile required to balance out the sweet hazelnut filling.
How long can I store this Chocolate Hazelnut Cake?
You can store leftovers in an airtight container inside the refrigerator for up to 4 to 5 days. Due to the delicate nature of the whipped heavy cream, keep the cake refrigerated until about 10–15 minutes before you intend to slice and serve it.
What can I use if I don’t have a rectangular pastry mold?
You can easily adapt this recipe into a round dessert by using an 8-inch (20 cm) springform pan. Simply bake the biscuit base in the round pan, slice it into two round discs, and assemble the layers within the springform ring.
Try Also: Irresistible Dessert Ideas from
-
What is Dubai Chocolate Bar Made Of? Key Ingredients Explained
-
Rose Milk Cake Recipe
-
Strawberry Cheesecake Dump Cake Recipe
Chocolate Hazelnut Cake
- Total Time: 3 hours 50 minutes
- Yield: 12 servings 1x
- Diet: Vegetarian
Description
A luxurious dessert featuring a dense chocolate sponge, a silky hazelnut cream filling, and a stunning Rocher-style glaze.
Ingredients
- 150 g high-quality dark chocolate (60–70% cacao)
- 100 g unsalted butter
- 100 g granulated white sugar
- 4 large eggs, room temperature
- 80 g all-purpose flour, sifted
- 1 pinch fine sea salt
- 300 ml heavy liquid whipping cream (minimum 30–35% fat content, thoroughly chilled)
- 150 g hazelnut spread or premium hazelnut praliné paste
- 100 g high-quality milk chocolate
- 200 g premium dark chocolate, chopped
- 100 g raw hazelnuts, toasted and coarsely crushed
- 50 g unsalted butter
- Whole roasted hazelnuts, skinned
- 50 g dark chocolate, melted (for decorative piping)
Instructions
- Preheat your oven to 180°C (350°F) and line a rectangular baking mold with parchment paper.
- Melt the dark chocolate and butter in a heatproof bowl over simmering water, stirring until smooth.
- Whisk in the sugar and then add the eggs one by one, beating until glossy.
- Fold in the flour and salt gently until just combined.
- Pour the batter into the prepared mold and bake for 20 minutes, then let it cool completely.
- Slice the cooled cake into two equal sheets.
- Melt the milk chocolate and hazelnut spread, then cool it to room temperature.
- Whip the heavy cream until stiff peaks form.
- Fold a third of the whipped cream into the cooled chocolate-hazelnut mixture and then fold in the remaining cream.
- Layer the bottom sheet of cake in the mold, spread half the hazelnut cream, then top with the second sheet of cake and the remaining cream.
- Chill the assembled cake in the refrigerator for at least 3 hours.
- Toast hazelnuts in a dry pan until fragrant, then crush coarsely.
- Melt dark chocolate with butter for the glaze, mix in the crushed hazelnuts, and let cool slightly.
- Unmold the cake and pour the glaze over it.
- Decorate with whole roasted hazelnuts and melted dark chocolate designs.
- Refrigerate again for 1 hour before serving to set the glaze.
Notes
Ensure to use high-quality chocolate for the best flavor. Chill all ingredients appropriately to achieve the desired texture.
- Prep Time: 30 minutes
- Cook Time: 20 minutes
- Category: Dessert
- Method: Baking
- Cuisine: French
Nutrition
- Serving Size: 1 slice
- Calories: 450
- Sugar: 30g
- Sodium: 150mg
- Fat: 27g
- Saturated Fat: 12g
- Unsaturated Fat: 10g
- Trans Fat: 0g
- Carbohydrates: 45g
- Fiber: 4g
- Protein: 7g
- Cholesterol: 80mg
Keywords: cake, chocolate, hazelnut, dessert, baking, gourmet