Grandma Doris’s 4-Ingredient Caramel Pretzel Bars
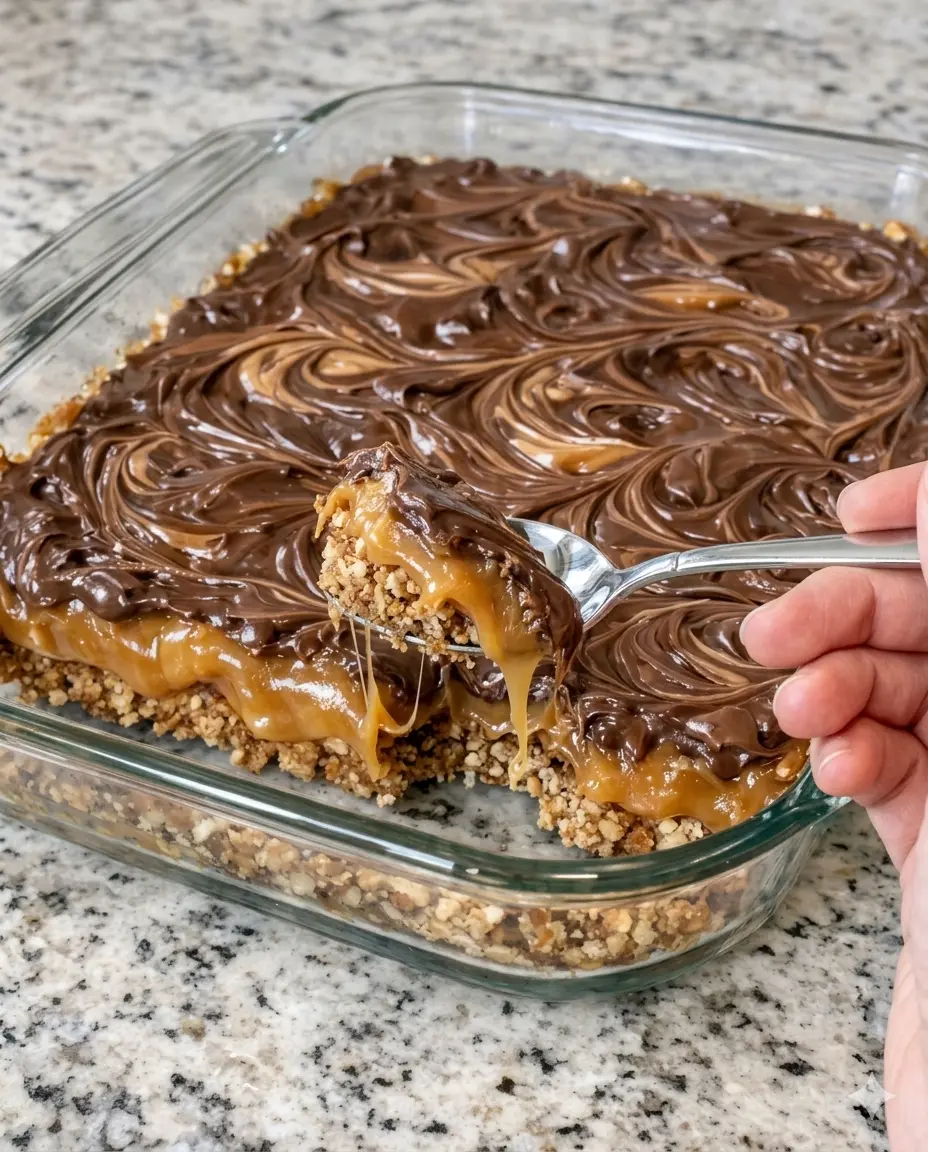
Steeped in Midwestern potluck tradition, Grandma Doris’s signature bars are the ultimate masterclass in sweet-and-salty simplicity. By combining crunchy, buttery crushed pretzels with a gooey layer of baked caramel and an elegant blanket of swirled chocolate, this recipe delivers an addictive dessert with zero fuss—no candy thermometers required. Baked in a simple glass casserole dish, it is a timeless crowd-pleaser that cuts beautifully and vanishes within minutes.
Recipe Specifications
-
Yield: 16 generous squares (or up to 24 bite-sized potluck bars)
-
Prep Time: 15 minutes
-
Baking Time: 22 minutes (combined crust and caramel bakes)
-
Total Time: 37 minutes (plus 2 hours chilling)
-
Baking Vessel: 9×13-inch glass casserole dish
-
Flavor Profile: Intense sweet-and-salty harmony with a crisp, buttery crunch and a soft, chewy pull.
Comprehensive Ingredients Checklist
1. The Crunchy Salty Base
-
3 cups (approx. 6 ounces) salted pretzels, crushed into coarse pieces
-
1 cup (2 sticks) unsalted butter, melted (plus a tablespoon extra to grease the casserole dish)
2. The Gooey Core & Swirled Topping
-
1 ¼ cups thick caramel sauce (store-bought or homemade, kept at room temperature)
-
1 cup semi-sweet chocolate chips (or dark chocolate chips for a less sweet profile)
Step-by-Step Production & Assembly Guide
+-------------------------------------------------------------+
|    TOPPING: Glossy, Elegant Waves of Melted Chocolate       |
+-------------------------------------------------------------+
|    CORE: Thick, Chewy Bubble-Baked Amber Caramel Layer      |
+-------------------------------------------------------------+
|    BASE: Golden, Compressed Buttery Crushed Pretzel Crust   |
+-------------------------------------------------------------+
|               BAKED IN A 9x13-INCH GLASS DISH               |
+-------------------------------------------------------------+
Phase 1: Prepping and Fabricating the Pretzel Crust
-
Oven Prep: Preheat your oven to 175°C (350°F). Thoroughly grease your 9×13-inch glass casserole dish with a pat of butter, paying extra attention to the sharp corners so the bars release cleanly later.
-
The Perfect Crush: Place the 3 cups of salted pretzels into a large zip-top plastic bag. Seal it tightly, leaving a tiny air gap, and crush them using a rolling pin or the flat bottom of a heavy skillet. Aim for coarse crumbs with some larger bits left intact for structural crunch—avoid processing them into a fine, dusty powder.
-
Hydrate the Crumbs: Transfer the pretzel shards to a medium mixing bowl. Pour the 1 cup of melted butter over the top and stir thoroughly with a spatula until every crumb is evenly coated, dark, and glossy.
-
Pack It Flat: Pour the buttery pretzel mixture into your greased glass dish. Using your hands or the clean, flat base of a dry measuring cup, press the mixture firmly down to form a highly compressed, even crust. Ensure the borders and corners are packed just as deeply as the center to prevent crumbly edges.
-
The First Bake: Slide the dish onto the middle rack of your oven and bake for 8 to 10 minutes until the crust becomes fragrant and just begins to set. Remove the dish carefully and set it on a heatproof surface, leaving the oven on.
Phase 2: Applying the Caramel & The Second Bake
-
Layer the Caramel: While the pretzel base is screaming hot, pour the 1 ¼ cups of room-temperature caramel sauce evenly over the top. Using an offset spatula or the back of a spoon, gently glide the caramel into the corners to form a uniform layer. Work delicately so you do not lift or disrupt the vulnerable pretzel crust beneath.
-
The Fuse Bake: Return the glass dish to the oven and bake for another 10 to 12 minutes. Watch for the caramel to bubble gently around the perimeter and take on a slightly thicker appearance. This crucial step chemically bonds the caramel to the pretzel base so the bars don’t separate when sliced.
Phase 3: The Chocolate Swirl and Chill Phase
-
Scatter the Chocolate: Carefully pull the bubbling pan from the oven. Immediately scatter the 1 cup of semi-sweet chocolate chips evenly over the molten caramel. Let the pan sit undisturbed for 3 to 5 minutes; the residual heat from the caramel will effortlessly melt the chocolate from underneath.
-
Create the Waves: Once the chocolate chips look beautifully glossy and soft, take a small offset spatula, butter knife, or spoon and gently run it through the chocolate, spreading and swirling it into elegant waves across the caramel surface.
-
The Room Temp Cool: Leave the dish on a heatproof cooling rack at room temperature until the glass is no longer hot to the touch. Safety warning: Never place a hot glass dish directly into a cold refrigerator, as thermal shock can cause the glass to shatter.
-
The Deep Chill: Once cooled to room temperature, place the dish into the refrigerator for at least 1 to 2 hours until both the caramel and chocolate layers are completely set firm.
Phase 4: Slicing and Plating Logistics
-
The Short Rest: Remove the set bars from the fridge and let the dish sit on the counter for 10–15 minutes before cutting. This takes the chill off the caramel, ensuring it stays soft and chewable rather than rock-hard.
-
Execute Clean Slices: Run a thin knife around the inner perimeter of the dish to release the sides. Using a large chef’s knife, cut the slab into 16 uniform squares.
Chef’s Professional Success Tips
-
The Warm Knife Technique: To get beautifully clean, distinct cuts that show off the pristine chocolate and golden caramel layers without smearing, dip your chef’s knife into a tall container of hot water, wipe it completely dry on a clean kitchen towel, and make your cut. Repeat this hot-and-dry wipe between every single slice.
-
Managing Caramel Viscosity: If you are using a store-bought caramel sauce that feels thin or runny at room temperature, simmer it in a small saucepan on the stovetop for 3–5 minutes to drive off excess moisture before pouring it over your crust. A thicker caramel ensures your bars maintain their shape at room temperature rather than oozing onto the platter.
-
Storage and Serving Elevators: Store leftover bars in a single layer inside an airtight container in the fridge for up to 5 days. For a luxurious dessert transition, serve a slightly warmed bar at the bottom of a bowl, top it with a heavy scoop of vanilla bean ice cream, and watch the caramel edges melt gloriously into the cream.
Try Also: Irresistible Dessert Ideas from
Grandma Doris’s 4-Ingredient Caramel Pretzel Bars
- Total Time: 37 minutes (plus 120 minutes chilling)
- Yield: 16 servings 1x
- Diet: Vegetarian
Description
A delightful combination of crunchy pretzels, gooey caramel, and swirled chocolate, these caramel pretzel bars are perfectly sweet and salty.
Ingredients
- 3 cups (approx. 6 ounces) salted pretzels, crushed
- 1 cup (2 sticks) unsalted butter, melted
- 1 ¼ cups thick caramel sauce
- 1 cup semi-sweet chocolate chips
Instructions
- Preheat your oven to 175°C (350°F) and grease a 9×13-inch glass casserole dish.
- Crush the pretzels in a zip-top bag into coarse pieces.
- Transfer the pretzel crumbs to a bowl and mix with melted butter until well coated.
- Press the pretzel mixture into the greased dish to form a crust and bake for 8 to 10 minutes.
- Pour the caramel sauce over the hot pretzel crust.
- Bake for another 10 to 12 minutes until the caramel bubbles slightly.
- Scatter chocolate chips over the caramel and let sit to melt.
- Swirl the chocolate into elegant patterns and let cool to room temperature.
- Refrigerate for at least 1 to 2 hours until set.
- Cut into bars and serve.
Notes
For clean cuts, dip your knife in hot water before slicing. Store in an airtight container for up to 5 days.
- Prep Time: 15 minutes
- Cook Time: 22 minutes
- Category: Dessert
- Method: Baking
- Cuisine: American
Nutrition
- Serving Size: 1 square
- Calories: 250
- Sugar: 18g
- Sodium: 300mg
- Fat: 15g
- Saturated Fat: 8g
- Unsaturated Fat: 5g
- Trans Fat: 0g
- Carbohydrates: 30g
- Fiber: 1g
- Protein: 2g
- Cholesterol: 30mg
Keywords: caramel, pretzel, dessert, sweet, salty, bars