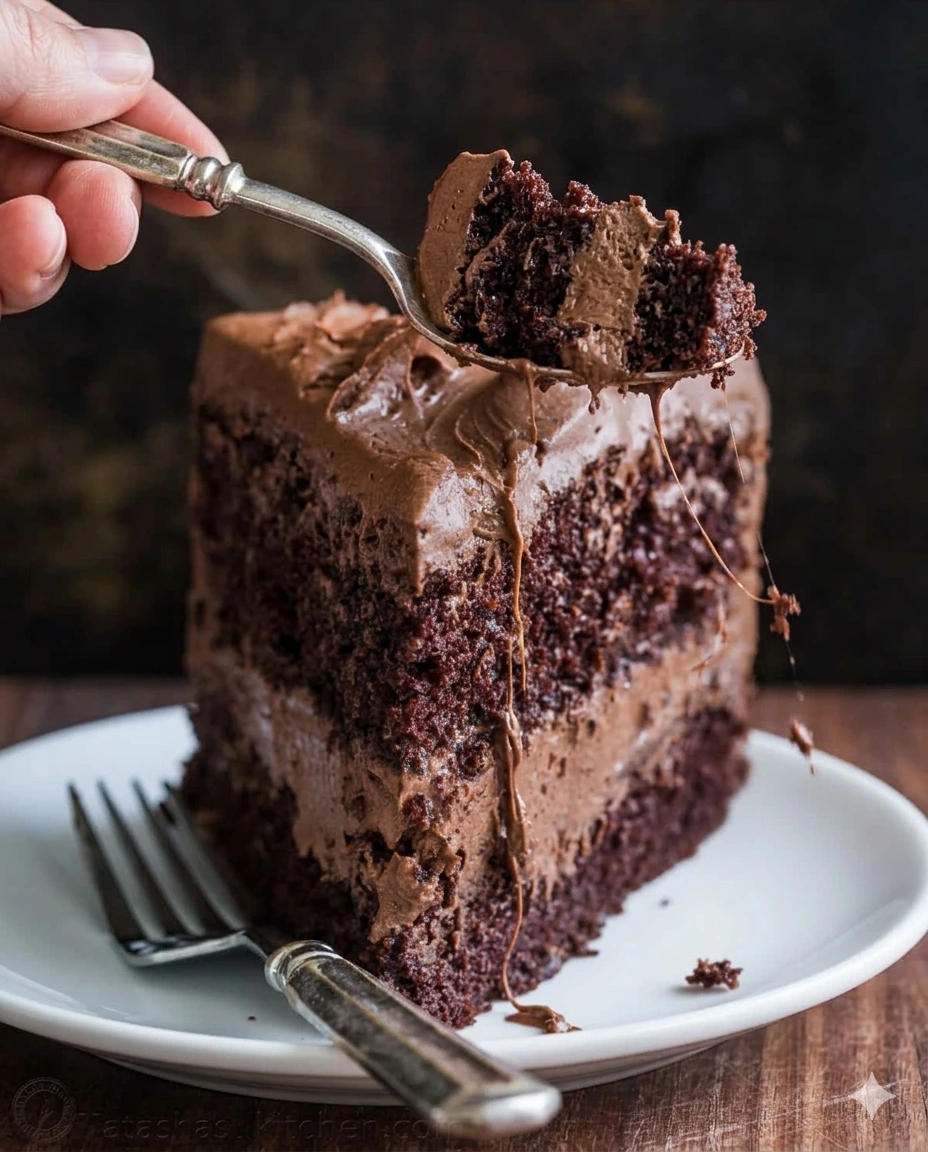
A truly exceptional chocolate cake is the crowning jewel of home baking. Whether you are celebrating a milestone birthday, hosting an elegant dinner party, or simply satisfying a deep craving for cacao, a reliable, bakery-quality recipe is an essential tool for any home cook.
This professional guide details the steps to creating a remarkably decadent, moist, and tender double-layer chocolate cake. Paired with a silky, ultra-fluffy chocolate cream cheese buttercream, this dessert strikes the perfect balance of deep cocoa flavors and smooth, velvety textures. Designed for bakers of all skill levels, this straightforward method guarantees a stunning, crowd-pleasing centerpiece.
The Secret to an Ultra-Moist Crumb: The Science of Coffee and Vinegar
Before gathering your tools, it is worth looking at the unique food science that gives this specific cake its world-class texture:
-
The Power of Coffee: You might notice this recipe calls for warm coffee instead of water or milk. Don’t worry—your cake will not taste like a coffee cup. Instead, hot or warm coffee blooms the cocoa powder, drawing out its deepest chocolate notes while intensifying the overall flavor profile.
-
The Vinegar Reaction: This recipe relies on a classic chemical reaction between white vinegar and baking soda. When mixed, they produce carbon dioxide bubbles that lift the batter as it bakes. This reaction creates an incredibly light, airy crumb structure without needing eggs.
Recipe Specifications
-
Skill Level: Easy
-
Course: Dessert
-
Cuisine: American
-
Prep Time: 25 minutes
-
Cook Time: 35 minutes
-
Cake Cooling Time: 45 minutes
-
Total Time: 1 hour (plus assembly)
-
Servings: 14 slices
-
Estimated Cost: Low to Medium ($$)
Ingredients Checklist
1. For the Chocolate Cake Base
-
3 cups all-purpose flour
-
1/2 cup natural unsweetened cocoa powder (sifting before use is highly recommended)
-
2 cups granulated white sugar
-
2 tsp baking soda
-
1 tsp salt
-
2 cups warm coffee (decaf works perfectly fine; ensure it is warm but not boiling hot)
-
2 Tbsp white vinegar
-
1 Tbsp pure vanilla extract
-
2/3 cup light olive oil (do not use extra virgin, as its strong flavor will alter the cake) or canola oil
2. For the Fluffy Chocolate Frosting
-
12 oz cream cheese, brought completely to room temperature
-
1 cup (16 Tbsp) unsalted butter, brought completely to room temperature
-
5 cups powdered sugar
-
1 cup natural unsweetened cocoa powder
-
1/2 tsp salt
-
2 tsp pure vanilla extract
Step-by-Step Baking & Assembly Instructions
Phase 1: Baking the Cake Layers
-
Oven and Pan Prep: Preheat your oven to 350˚F (175°C). Butter the sides of two 9-inch round cake pans and line the bottom bases with a custom-cut ring of parchment paper to prevent sticking.
-
Whisk the Dry Ingredients: In a large mixing bowl, combine the 3 cups of flour, 1/2 cup of sifted cocoa powder, 2 cups of sugar, 2 tsp of baking soda, and 1 tsp of salt. Whisk thoroughly until the mixture is uniform and free of large cocoa lumps.
-
Mix the Wet Ingredients: In a separate medium bowl, stir together the 2 cups of warm coffee, 2 Tbsp of white vinegar, 1 Tbsp of vanilla extract, and 2/3 cup of your chosen oil.
-
Combine and Pour: Pour the liquid mixture directly into the bowl of dry ingredients. Whisk gently just until the components come together. Note: Do not overmix; your batter will still look slightly lumpy, which is completely normal. Divide the batter evenly between your two prepared 9-inch pans. (Using a kitchen scale ensures a perfectly even split).
-
Bake and Cool: Bake at 350˚F for 35 minutes, or until a toothpick inserted into the center of the layers comes out clean. Let the cakes rest inside their pans for 15 minutes, then carefully flip them onto a wire rack to cool completely for at least 45 minutes before frosting.
+-------------------------------------------------------------+
|                 FLUFFY CHOCOLATE FROSTING                   |
+-------------------------------------------------------------+
|          CHOCOLATE CAKE LAYER 2 (Top-Side Down)             |
+-------------------------------------------------------------+
|                 MIDDLE FROSTING FILLING (1/3)               |
+-------------------------------------------------------------+
|                  CHOCOLATE CAKE LAYER 1                     |
+-------------------------------------------------------------+
|                     SERVING PLATTER                         |
+-------------------------------------------------------------+
Phase 2: Whipping the Velvet Frosting
-
Cream the Fats: Place your room-temperature cream cheese (12 oz) and room-temperature unsalted butter (1 cup) into the bowl of an electric stand mixer fitted with the paddle attachment. Beat on medium-high speed for 3 minutes until the mixture is perfectly light, pale, and creamy. Scrape down the sides of the bowl halfway through.
-
Add Sugar and Cocoa: Sift your 5 cups of powdered sugar and 1 cup of cocoa powder together in batches to guarantee a lump-free texture. Add the 1/2 tsp of salt. Turn the mixer to low speed and mix until the dry elements are fully incorporated into the butter mixture without causing a sugar cloud.
-
Whip to Volume: Scrape down the bowl completely, then crank the mixer up to medium-high speed and beat for 1 minute until the frosting becomes smooth and whipped.
-
Final Flavoring: Add the 2 tsp of vanilla extract and beat on medium-high for one final minute until glossy and uniform. Your frosting is now ready to spread or pipe.
Phase 3: Assembly and Frosting Technique
-
First Layer: Place your first cooled cake layer onto your chosen serving plate or cake stand.
-
Fill: Spread exactly one-third (1/3) of your prepared chocolate frosting smoothly over the top surface of this first layer.
-
Second Layer: Place the second cake layer directly on top of the frosting filling. Pro-Tip: Place the second layer top-side-down (flat bottom facing up) to guarantee a perfectly level, professional surface.
-
Finish: Use your remaining frosting to generously coat the top and sides of the cake. Use an offset spatula to smooth the edges or create decorative swirls. Slice and enjoy!
Professional Storage and Handling Guidelines
Because a premium homemade cake contains no artificial preservatives, storing it correctly is essential to preserve its moisture:
-
Short-Term Room Temperature: If you plan to serve the cake within 24 hours, you can safely leave it covered at room temperature. Cover it by flipping a large, clean bowl or pot over the cake stand to shield it from air currents.
-
Handling Slices: Once a cake is cut open, the exposed crumb will dry out quickly. Press a piece of plastic wrap directly against the cut edges of the cake before storing.
-
Refrigeration: For longer storage, cover the cake and keep it in the refrigerator for up to one week.
-
Freezing Unfrosted Layers: Wrap individual cooled cake layers tightly in a layer of plastic wrap followed by heavy-duty aluminum foil. Freeze for up to 3 months. Thaw completely at room temperature while still wrapped.
-
Freezing a Fully Frosted Cake: Place the finished cake uncovered into the freezer for 1 hour to flash-freeze and harden the frosting details. Once solid, wrap it securely in plastic wrap and aluminum foil, and store it for up to 3 months. To serve, thaw overnight inside the refrigerator, then let it sit on the counter for at least 30 minutes to bring it to room temperature. Use a spatula to touch up any smudged frosting.
Nutritional Profile
(Approximate values per serving, based on a 14-slice breakdown)
-
Calories: 691 kcal
-
Carbohydrates: 98 g
-
Fat: 33 g
-
Protein: 6 g
Try Also: Irresistible Dessert Ideas from
Decadent Double-Layer Chocolate Cake
- Total Time: 105 minutes
- Yield: 14 slices 1x
- Diet: Vegetarian
Description
A professional guide to creating a remarkably moist and tender double-layer chocolate cake, paired with fluffy chocolate cream cheese buttercream.
Ingredients
- 3 cups all-purpose flour
- 1/2 cup natural unsweetened cocoa powder
- 2 cups granulated white sugar
- 2 tsp baking soda
- 1 tsp salt
- 2 cups warm coffee
- 2 Tbsp white vinegar
- 1 Tbsp pure vanilla extract
- 2/3 cup light olive oil or canola oil
- 12 oz cream cheese, at room temperature
- 1 cup (16 Tbsp) unsalted butter, at room temperature
- 5 cups powdered sugar
- 1 cup natural unsweetened cocoa powder
- 1/2 tsp salt
- 2 tsp pure vanilla extract
Instructions
- Preheat your oven to 350˚F (175°C) and butter the sides of two 9-inch round cake pans.
- Whisk together the flour, cocoa powder, sugar, baking soda, and salt in a large mixing bowl.
- Mix the warm coffee, vinegar, vanilla, and oil in a separate bowl.
- Combine the wet ingredients into the dry ingredients, whisking gently until just combined.
- Divide the batter evenly between the prepared pans and bake for 35 minutes.
- Let the cakes rest for 15 minutes in the pans, then cool completely on a wire rack.
- Cream the cream cheese and butter in an electric mixer until light and creamy.
- Add the sifted powdered sugar and cocoa powder, mixing until smooth.
- Spread one-third of the frosting on the first cake layer, then place the second layer on top, frosting the top and sides of the cake.
- Serve and enjoy!
Notes
For optimal moistness, store covered at room temperature if serving within 24 hours or refrigerate for longer storage.
- Prep Time: 25 minutes
- Cook Time: 35 minutes
- Category: Dessert
- Method: Baking
- Cuisine: American
Nutrition
- Serving Size: 1 slice
- Calories: 691
- Sugar: 58g
- Sodium: 400mg
- Fat: 33g
- Saturated Fat: 15g
- Unsaturated Fat: 18g
- Trans Fat: 0g
- Carbohydrates: 98g
- Fiber: 4g
- Protein: 6g
- Cholesterol: 60mg
Keywords: chocolate cake, dessert, baking, cream cheese frosting, celebratory cake