If you are hunting for a showstopping, no-bake confection that packs an intense textural punch, these Butterfinger Chocolate Caramel Crunch Truffles are an absolute dream come true. This recipe masterfully combines the iconic, shatteringly crisp, peanut-buttery crunch of Butterfinger candy bars with a rich, velvety cream cheese and peanut butter filling.
By dipping these decadent centers into a smooth, high-gloss chocolate shell and finishing them with an elegant caramel drizzle, you create a bakery-quality truffle that balances sweet, salty, creamy, and crunchy in every single bite. Because they require zero oven time, they are a fantastic, stress-free option for holiday gift baskets, party platters, or an indulgent weekend kitchen project.
Why You Will Love This Recipe
-
No-Bake Gourmet Elegance: Skips the oven entirely, delivering a sophisticated candy-shop truffle with minimal effort.
-
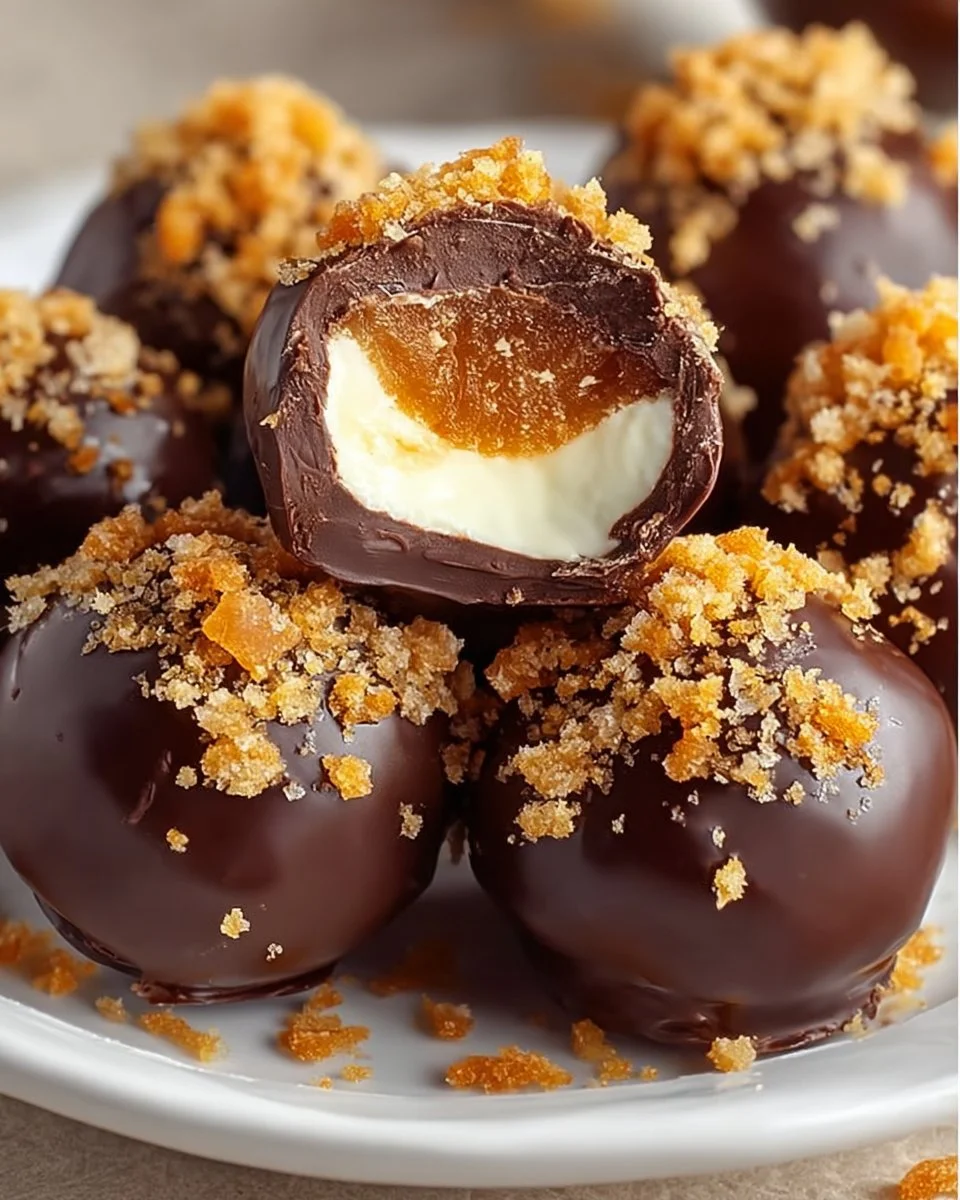
Shatteringly Crunchy Core: Incorporating a full two cups of crushed candy bars preserves that signature flaky, crisp Butterfinger texture inside a smooth filling.
-
The Sweet & Salty Balance: The tang of the cream cheese and the saltiness of the creamy peanut butter effortlessly cut through the sweetness of the chocolate and caramel.
-
Perfect for Gifting: These hold up beautifully when chilled, making them an excellent homemade gift for the chocolate and peanut butter lovers in your life.
Ingredients Checklist
For a completely seamless filling free of stubborn lumps, ensure your cream cheese block has softened fully to room temperature before mixing.
For the Crunchy Peanut Butter Center
-
2 cups Butterfinger Candy Bars: Crushed finely (roughly 8 fun-size or 4 full-size bars); establishes the star flavor and distinct crunch.
-
6 oz Cream Cheese: Completely softened to room temperature; provides a rich, smooth, and tangy binder that holds the truffles together.
-
½ cup Creamy Peanut Butter: Use a traditional smooth variety to amplify the nutty notes and add luxurious creaminess.
For the Shell & Elegant Toppings
-
Chocolate Coating: Your choice of high-quality chocolate chips, baking blocks, or melting wafers (semi-sweet, dark, or milk chocolate all work beautifully).
-
Caramel Sauce (Optional): Kept warm or at room temperature for creating an elegant, professional drizzle across the finished tops.
-
Chopped Nuts or Extra Butterfinger (Optional): For a beautiful final dusting that adds a hint of visual texture and color.
Step-by-Step Candy Making Instructions
1. Bind and Blend the Filling
-
In a medium-sized mixing bowl, combine the 2 cups of finely crushed Butterfinger candy bars, 6 oz of thoroughly softened cream cheese, and ½ cup of creamy peanut butter.
-
Using a sturdy silicone spatula or an electric hand mixer on medium speed, blend the ingredients together vigorously until they form a cohesive, thick, and uniformly distributed dough.
-
Slide the bowl into the refrigerator and let the mixture chill undisturbed for 30 minutes. This initial rest allows the fats in the peanut butter and cream cheese to firm up, making the dough clean and easy to handle without sticking to your palms.
2. Scoop, Shape, and Snap-Freeze
-
Line a large baking sheet cleanly with a sheet of parchment paper or a silicone baking mat to ensure a non-stick release.
-
Retrieve the chilled mixture. Using a small cookie scoop or a tablespoon, portion out the dough and roll it gently between your palms to form neat, uniform balls (about 1 inch in diameter). Arrange them on your prepared baking sheet.
-
Transfer the baking sheet directly into the freezer for 15 to 20 minutes. Do not skip this step! Freezing the truffle centers ensures they remain perfectly rigid and cold when dipped into the warm melted chocolate, preventing them from dissolving or losing their shape.
3. Melt and Dip Like a Pro
-
While the truffle balls are snap-freezing, place your chocolate coating into a heatproof, microwave-safe glass bowl.
-
Microwave the chocolate in 30-second bursts, stirring thoroughly with a dry spoon after each interval. Stop heating the moment the chocolate is completely smooth and liquid. (Alternatively, melt it over a double boiler on low heat, ensuring absolutely no water splashes into the chocolate).
-
Remove the frozen truffle balls from the freezer. Drop one ball cleanly into the melted chocolate. Use a fork to submerge it fully, ensuring it is completely coated.
-
Lift the truffle out with the fork, tapping the handle gently against the edge of the bowl for a few seconds to let any excess chocolate drip away. Slide the coated truffle smoothly back onto the parchment-lined baking sheet. Repeat the process for all the balls.
4. Drizzle, Garnish, and Set
-
While the chocolate shells are still slightly wet, customize your presentation. Generously drizzle your caramel sauce in elegant zigzags across the crowns of the truffles.
-
Immediately scatter a handful of chopped nuts or an extra dusting of crushed Butterfinger over the sticky caramel to lock them in place.
-
Allow the chocolate to set completely at room temperature, or accelerate the process by popping the baking sheet back into the refrigerator until the outer shells have hardened into a crisp, satisfying snap. Serve cold or at room temperature and enjoy!
Pro Pastry Secrets for Flawless Confections
The Professional Fork-Dip Trick: To prevent your truffles from developing a messy pool of excess chocolate at their base (known as a “foot”), use a standard dinner fork to do your dipping. When lifting the truffle out of the melted chocolate, scrape the bottom prongs of the fork gently across the rim of your bowl before sliding it onto the parchment paper. If you notice the chocolate in your bowl starting to thicken or cooling down mid-dip, simply pop it back into the microwave for 10 to 15 seconds to restore its silky, ultra-fluid consistency.
Storage and Freshness Guidelines
-
In the Refrigerator: Because these confections feature fresh cream cheese, they should always be stored in a cold environment. Keep them arranged in an airtight container—separating any stacked layers with a sheet of parchment paper—in the refrigerator for up to 1 week.
-
In the Freezer: These truffles freeze phenomenally well! Store them in a heavy-duty freezer bag for up to 2 months. You can enjoy them straight from the freezer for an ice-cream-truffle texture, or let them thaw in the fridge for 20 minutes before serving.
Structural & Texture Summary
Frequently Asked Questions (FAQs)
Why is my truffle mixture turning too soft or melting while I dip it?
This usually happens if the truffle balls weren’t left in the freezer long enough, or if the melted chocolate coating is too hot. If your kitchen is warm and the balls start softening as you work, simply return half of them to the freezer while you dip the first batch. Working in small, cold intervals keeps the process completely neat and effortless!
Can I use natural peanut butter for the filling?
For the absolute best structural success, it is highly recommended to stick to standard commercial creamy peanut butter (like Skippy or Jif). Natural varieties that require stirring tend to separate and release ambient oils, which can make your truffle dough too soft to hold a ball shape and prevent the chocolate shell from adhering cleanly.
Try Also: Irresistible Dessert Ideas from

Butterfinger Chocolate Caramel Crunch Truffles
- Total Time: 45 minutes
- Yield: 24 truffles 1x
- Diet: Vegetarian
Description
Indulge in these no-bake truffles that combine Butterfinger candy bars with creamy peanut butter and rich chocolate, all drizzled with caramel.
Ingredients
- 2 cups Butterfinger Candy Bars, crushed finely
- 6 oz Cream Cheese, softened
- ½ cup Creamy Peanut Butter
- Chocolate Coating (high-quality chocolate chips or melting wafers)
- Caramel Sauce (optional)
- Chopped Nuts or Extra Butterfinger (optional)
Instructions
- Combine the crushed Butterfinger candy bars, cream cheese, and peanut butter in a bowl.
- Blend the ingredients until they form a thick dough, then chill for 30 minutes.
- Line a baking sheet with parchment paper and scoop out balls of dough.
- Freeze the balls for 15-20 minutes until firm.
- Melt the chocolate in a microwave-safe bowl until smooth.
- Dip each truffle into the melted chocolate and place them back on the baking sheet.
- Drizzle caramel sauce over the truffles and add optional toppings.
- Allow to set until the chocolate hardens, then serve.
Notes
Store truffles in the refrigerator for up to 1 week or freeze for up to 2 months.
- Prep Time: 15 minutes
- Cook Time: 30 minutes
- Category: Dessert
- Method: No-Bake
- Cuisine: American
Nutrition
- Serving Size: 1 truffle
- Calories: 180
- Sugar: 15g
- Sodium: 150mg
- Fat: 10g
- Saturated Fat: 3g
- Unsaturated Fat: 5g
- Trans Fat: 0g
- Carbohydrates: 20g
- Fiber: 1g
- Protein: 3g
- Cholesterol: 10mg
Keywords: truffles, no-bake dessert, chocolate, Butterfinger, peanut butter