There is something incredibly sophisticated about a classic dessert that delivers an ultra-creamy, melt-in-your-mouth experience without ever requiring you to turn on the oven. This Velvety No-Bake Cheesecake is the ultimate crowd-pleaser for warm weather gatherings, dinner parties, or weekend celebrations when you want a rich, decadent treat with minimal stress.
By avoiding the baking process entirely, the cream cheese retains a beautifully bright, clean flavor. When masterfully lightened with structured, fresh whipped cream and a hint of tangy sour cream, the filling sets up into a silky, cloud-like slice that holds its shape perfectly on a crunchy graham cracker crust.
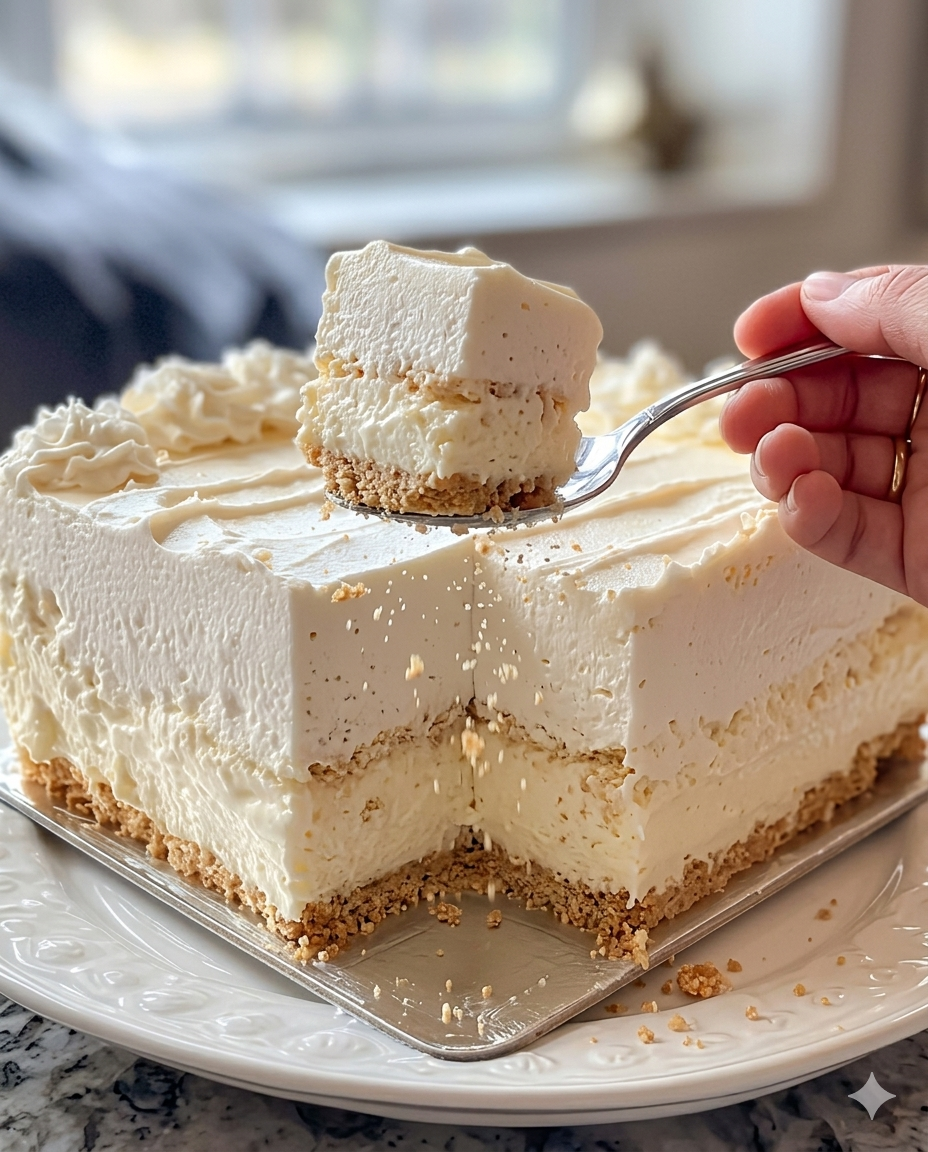
Why You Will Love This Easy Recipe
-
True No-Bake Convenience: Keep your kitchen completely cool—both the buttery biscuit crust and the velvet filling set up entirely in the chill of your refrigerator.
-
Incredibly Silky Mouthfeel: Using a combination of full-fat cream cheese, powdered sugar, and folded heavy cream yields a luxurious, airy texture that melts instantly on the tongue.
-
The Perfect Flavor Balance: A splash of fresh lemon juice and a scoop of sour cream cut through the rich dairy fats, providing a subtle, refreshing tang that keeps the dessert from tasting overly sweet.
-
An Endless Canvas for Toppings: Whether you crave vibrant fresh summer fruits, rich chocolate ribbons, or a glossy berry swirl, this versatile base pairs beautifully with everything.
 Prep Time: 30 mins   |   Bake Time: 0 mins   |   Total Time: 6 hrs minimum
 Course: Dessert      |   Cuisine: American   |   Yield: 8 generous servings
Ingredients Checklist
To guarantee a perfectly seamless filling free of unappealing tiny lumps, ensure your cream cheese is completely softened and your whipping cream is ice-cold before you begin mixing.
For the Crunchy Graham Cracker Crust
-
1.5 cups Graham Cracker Crumbs: Crushed into a fine sand to form a tight, sturdy foundation.
-
¼ cup Brown Sugar: Adds a subtle caramel depth that beautifully complements the buttery biscuit notes.
-
½ cup Unsalted Butter (Melted): Binds the crumbs together so they compress cleanly into the pan.
For the Velvet No-Bake Filling
-
16 oz (450 g) Full-Fat Cream Cheese: Must be fully softened to room temperature. Cold cream cheese will stubbornly retain tiny lumps that ruin the velvety mouthfeel.
-
1 cup Powdered Sugar: Dissolves effortlessly into the cheese paste to guarantee a perfectly smooth, grit-free finish.
-
2 teaspoons Vanilla Extract: Infuses the custard base with a warm, elegant aroma.
-
1 teaspoon Lemon Juice (Optional): Highly recommended; acts as a flavor enhancer that brightens the entire filling profile.
-
¾ cup Sour Cream: Adds a wonderful, authentic New York-style tang and deepens the silky texture.
-
1.5 cups Heavy Whipping Cream (Cold): Must be deeply chilled straight from the fridge so it can trap enough air to build rigid, stable peaks.
Inspiring Topping Options (Choose Your Adventure!)
-
1 cup Fresh Fruit: Sliced strawberries, whole blueberries, raspberries, mango, or kiwi for a vibrant pop of color.
-
1 cup Fruit Coulis: A glossy raspberry or passion fruit jam swirl across the top layer.
-
½ cup Decadence: Dark chocolate shavings or a rich caramel sauce drizzle.
-
½ cup Crunch: Toasted chopped pecans, almonds, or walnuts for a rustic texture contrast.
Step-by-Step Instructions
Follow these clear, chronological directions to press your crust, whip your filling, and perfectly set your no-bake masterpiece.
1. Construct and Chill the Crust
-
In a medium-sized mixing bowl, combine the 1.5 cups of graham cracker crumbs, ¼ cup of brown sugar, and ½ cup of melted unsalted butter. Stir with a fork until the crumbs are evenly coated, moistened, and resemble wet sand.
-
Pour the buttery mixture into a standard 9-inch springform pan. Using the flat bottom of a glass or a measuring cup, press the crumbs firmly and evenly across the bottom to create a highly compact, solid base.
-
Transfer the pan to the refrigerator to chill for at least 15 minutes to let the butter solidify before you add the heavy filling.
2. Whip the Velvet Filling Layers
-
In a large mixing bowl, combine your room-temperature 16 oz (450 g) of softened cream cheese, 1 cup of powdered sugar, and 2 teaspoons of vanilla extract. Beat with an electric hand mixer or a stand mixer on medium-high speed until the mixture is completely smooth, uniform, and creamy.
-
Add the 1 teaspoon of optional lemon juice and the ¾ cup of sour cream to the bowl. Continue mixing for another minute until the base looks incredibly silky and smooth.
-
In a separate, deeply chilled mixing bowl, pour your 1.5 cups of cold heavy whipping cream. Using clean beaters, whip vigorously on high speed until the cream expands and holds stiff peaks firmly in the air when the beaters are lifted.
3. Fold, Assemble, and Rest
-
Using a flexible rubber spatula, add about a third of your stiff whipped cream directly into the cream cheese paste. Stir it in to loosen up the thick base.
-
Add the remaining whipped cream to the bowl. Switch to an ultra-gentle hand, folding the cream using an under-and-over motion just until completely incorporated and no white streaks remain. Be exceptionally gentle here; over-mixing will pop the microscopic air bubbles inside the whipped cream, causing your cake to turn loose and runny rather than fluffy and sliceable.
-
Pour the luxurious filling directly over your chilled graham cracker crust, using an offset spatula to smooth the top surface into a flat sheet.
-
Cover the springform pan securely with plastic wrap and refrigerate for a minimum of 4 to 6 hours (overnight is highly recommended) to allow the dairy fats to set up firmly.
4. Garnish and Serve
-
Once the cheesecake is completely set, gently release the outer collar of your springform pan.
-
Arrange your desired toppings—such as a mountain of fresh berries or a delicate web of chocolate shavings—generously across the top surface.
-
The Immaculate Slice Hack: To capture flawless vertical cuts that showcase the beautiful boundary between the crisp crust and the white filling, dip a long, sharp chef’s knife into a tall glass of hot water. Wipe it completely dry with a clean towel, and make one swift cut downward. Wipe the blade entirely clean and re-warm it in hot water before making your next cut. Serve cold!
Pro Presentation Secrets
The Perfect Unmolding Trick: To ensure the sides of your no-bake cheesecake look perfectly smooth and commercial-grade when you pull away the springform collar, wrap a hot, damp kitchen towel around the exterior metal ring of the pan for 30 seconds before opening the latch. The subtle warmth will gently loosen the edge fats just enough to release the collar flawlessly without tearing into your beautiful cake border.
Storage and Freshness Guidelines
-
In the Refrigerator: Because this cake relies entirely on raw, aerated dairy structures, it must always remain chilled. Store any leftover slices inside an airtight container or a fitted cake dome in the fridge for up to 4 to 5 days.
-
Topping Placement Tip: If you are preparing this dessert a day in advance for a major party, hold off on adding fresh fruit or syrupy coulis until right before serving. This prevents the fruit juices from bleeding into the pristine white cream cheese surface while it rests overnight.
Nutritional Summary (Per Portion)
| Metric | Details |
| Calories | 450 kcal |
| Yield | 8 generous, rich dessert servings |
| Pan Size | Standard 9-inch Springform Pan |
| Texture Profile | Crisp, buttery biscuit crunch holding a feather-light, velvet custard crown. |
Frequently Asked Questions (FAQs)
Can I use low-fat or tub cream cheese for this recipe?
It is highly recommended to stick strictly to brick-style, full-fat cream cheese. Low-fat alternatives and spreadable cream cheeses sold in plastic tubs contain a much higher water-to-fat content and frequently include added stabilizers. Without the structure of a baked egg matrix or gelatin, a no-bake cheesecake relies entirely on the natural firming properties of full-fat cocoa or milk fats when chilled. Using low-fat varieties will likely result in a sloppy, loose filling that refuses to slice cleanly.
My filling didn’t set up and is still soft after 6 hours. What happened?
This usually stems from one of two common mixing mishaps. First, the heavy whipping cream may not have been whipped to true, rigid stiff peaks before being added, meaning there wasn’t enough structural air trapped to hold up the heavy cheese. Second, the whipped cream may have been folded too aggressively into the cream cheese paste, which deflates those crucial air pockets and turns the mixture liquidy. Luckily, if this happens, you can pop the entire pan into the freezer for 2 hours to create an incredible, refreshing frozen cheesecake cake!
Final Thoughts
This Velvety No-Bake Cheesecake represents the peak of effortless, high-reward hosting. By respecting the room-temperature rule for your cream cheese blending and protecting your whipped cream with a gentle, patient folding hand, you guarantee a breathtaking, restaurant-quality center layer that beautifully honors the classic spirit of summer baking.
Try Also: Irresistible Dessert Ideas from
-
What is Dubai Chocolate Bar Made Of? Key Ingredients Explained
-
Rose Milk Cake Recipe
-
Strawberry Cheesecake Dump Cake Recipe
Be sure to Print Recipe or Pin Recipe so you have these essential air-folding and hot-knife slicing techniques completely handy for your next backyard gathering or weekend baking emergency!
Velvety No-Bake Cheesecake
- Total Time: 360 minutes
- Yield: 8 servings 1x
- Diet: Vegetarian
Description
A classic dessert that delivers an ultra-creamy, melt-in-your-mouth experience without the need for baking, perfect for warm weather gatherings.
Ingredients
- 1.5 cups Graham Cracker Crumbs
- ¼ cup Brown Sugar
- ½ cup Unsalted Butter (Melted)
- 16 oz Full-Fat Cream Cheese (softened)
- 1 cup Powdered Sugar
- 2 teaspoons Vanilla Extract
- 1 teaspoon Lemon Juice (Optional)
- ¾ cup Sour Cream
- 1.5 cups Heavy Whipping Cream (Cold)
- 1 cup Fresh Fruit (for topping)
- 1 cup Fruit Coulis (for topping)
- ½ cup Dark Chocolate Shavings (for topping)
- ½ cup Toasted Chopped Nuts (for topping)
Instructions
- Construct and Chill the Crust: In a medium bowl, combine graham cracker crumbs, brown sugar, and melted butter; mix until moistened. Pour into a 9-inch springform pan and press down. Chill for at least 15 minutes.
- Whip the Velvet Filling Layers: In a large bowl, beat cream cheese, powdered sugar, and vanilla extract until smooth. Add lemon juice and sour cream, mix until silky. In a separate bowl, whip heavy cream until stiff peaks form.
- Fold, Assemble, and Rest: Fold whipped cream into the cream cheese mixture gently. Pour onto the chilled crust and smooth the top. Cover with plastic wrap and refrigerate for 4 to 6 hours or overnight.
- Garnish and Serve: Release the springform pan and add toppings. To slice perfectly, use a knife dipped in hot water, wiping between cuts.
Notes
Store leftovers in an airtight container in the fridge for up to 4-5 days. Add fresh fruits only before serving.
- Prep Time: 30 minutes
- Cook Time: 0 minutes
- Category: Dessert
- Method: Refrigeration
- Cuisine: American
Nutrition
- Serving Size: 1 slice
- Calories: 450
- Sugar: 25g
- Sodium: 200mg
- Fat: 30g
- Saturated Fat: 15g
- Unsaturated Fat: 10g
- Trans Fat: 0g
- Carbohydrates: 50g
- Fiber: 2g
- Protein: 6g
- Cholesterol: 70mg
Keywords: cheesecake, no-bake dessert, summer treat