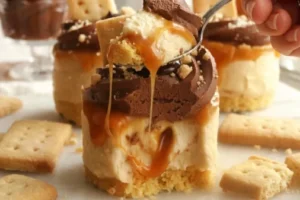
If you love the iconic combination of crunchy shortbread, gooey caramel, and smooth milk chocolate found in a classic candy bar, these Vegan No-Bake Mini Twix Cheesecakes are destined to become your new favorite dessert. This recipe captures all the nostalgic, indulgent layers of a Twix bar and reimagines them into elegant, single-serving cheesecakes.
By combining plant-based cream cheese, coconut cream, and soaked raw cashews, these mini treats achieve a velvety, authentic cheesecake texture entirely free from dairy, eggs, and baking. Layered with a rich caramel filling, a glossy chocolate ganache, and a beautifully piped chocolate cream, these individual masterpieces are perfect for dinner parties, summer gatherings, or a weekend baking project.

Recipe Specifications
-
Course Type: Individual Mini Desserts
-
Culinary Style: Modern Plant-Based Pastry
-
Preparation Method: 100% No-Bake / Icebox Style
-
Setting Duration: Refrigerated overnight (essential for a clean release)
-
Yield: 6 individual mini cheesecakes
-
Dietary Designation: 100% Vegan, Plant-Based, Dairy-Free, Egg-Free
Comprehensive Ingredients Checklist
1. The Crunchy Biscuit Base
-
100g golden Oreo cookies (Alternatively, use vegan shortbread cookies or plain digestive biscuits)
-
40g dairy-free butter (such as Flora Plant Block), melted
2. The Caramel Cheesecake Core
-
125g raw cashew nuts (must be soaked in water overnight and thoroughly drained)
-
250g high-quality vegan cream cheese
-
75g icing sugar (powdered sugar ensures a perfectly smooth finish)
-
50g coconut cream
-
1 teaspoon pure vanilla extract or vanilla bean paste
-
3 tablespoons prepared vegan caramel sauce
-
Extra caramel sauce & biscuit crumbs (optional, for creating interior layers)
3. The Glossy Chocolate Ganache
-
100g dairy-free dark chocolate
-
90ml dairy-free cream (such as heavy coconut cream, vegan whipping cream, or double cream)
4. The Chocolate Cream & Presentation Garnish
-
220ml dairy-free whipping cream (such as The Coconut Collaborative Double Cream)
-
50g dairy-free dark chocolate, melted
-
3 tablespoons unsweetened cocoa powder
-
Vegan shortbread biscuits (half the batch made into little squares for the top)
Step-by-Step Production & Assembly Guide
Phase 1: Constructing the Biscuit Foundations
-
Pan Setup: Grease a 6-hole loose-base or push-up cookie cup tin with a small amount of dairy-free butter. Set aside.
-
Melt the Butter: Melt the 40g of dairy-free butter in a small saucepan over low heat on the hob. Remove it from the heat and pour it into a medium, heatproof mixing bowl.
-
Pulverize the Cookies: Place your 100g of cookies into a blender or food processor and blend until they form fine crumbs. Pour the crumbs into the bowl with the melted butter and stir thoroughly with a wooden spoon or spatula.
-
Test the Texture: The mixture should look like wet sand and hold its shape tightly when pinched between your fingers. Note: If it feels too wet, add a few more cookie crumbs; if it feels too dry, stir in a tiny splash of extra melted butter.
-
Pack the Cups: Press approximately 1½ tablespoons of the damp crumb mixture into the bottom of each of the 6 holes. Use clean hands or the back of a spoon to pack the crumbs down as firmly and compactly as possible to prevent them from crumbling. Set the tin aside while you make the caramel filling.
+-------------------------------------------------------------+
|    GARNISH (Vegan Shortbread Squares & Ganache Drizzle)     | <- Texture & contrast
+-------------------------------------------------------------+
|    PIPED CHOCOLATE CREAM CANOPY                             | <- Light & airy finish
+-------------------------------------------------------------+
|    CARAMEL CHEESECKAE LAYER (Optional Biscuit/Caramel Swirl)| <- Smooth, sweet core
+-------------------------------------------------------------+
|    COMPACTED GOLDEN OREO CRUST                              | <- Crunchy biscuit base
+-------------------------------------------------------------+
|               BUILT IN A 6-HOLE LOOSE-BASE TIN              |
+-------------------------------------------------------------+
Phase 2: Emulsifying the Caramel Cheesecake
-
Prep the Cashews: Drain your raw cashews (which must be soaked in water overnight to soften them) completely.
-
The High-Speed Blend: Place the drained cashews into a food processor or blender. Add the 250g of vegan cream cheese, 75g of icing sugar, 50g of coconut cream, 1 teaspoon of vanilla, and 3 tablespoons of vegan caramel sauce.
-
Process Until Silky: Blend on high speed for around 5 minutes until completely smooth. Because plant-based cheesecake batter is quite thick, stop the machine a few times to scrape down the sides with a spatula to ensure everything is incorporated smoothly. If needed, add an extra splash of coconut cream to help it loosen.
-
Layer and De-Aerate: Divide the mixture evenly among the 6 holes, pouring it directly over the biscuit bases. Optional Pro-Tip: For a true candy-bar experience, drop small swirls of extra caramel sauce and crumbled biscuits in between the layers of cheesecake batter as you fill the cups. Firmly tap the filled tin onto your worktop to force any trapped air bubbles to rise and pop.
-
The Overnight Set: Place the tin into the refrigerator and leave it overnight to set completely.
Phase 3: Crafting the Ganache & Chocolate Cream
-
Unmold the Cakes: Once fully set, remove the cheesecakes from the fridge. Chef’s Secret Trick: Place the tin into the freezer for exactly 15 minutes before unmolding to help firm up the cheesecakes. Then, slide a knife around the edges of the cheesecakes to help loosen them and push the loose bases upward. Making them firmer will help push them out without damaging their shape.
-
Emulsify the Ganache: Combine 100g of dairy-free dark chocolate and 90ml of dairy-free cream in a heatproof bowl. Melt them together smoothly, either over a saucepan of simmering water (the bain-marie method) or inside a microwave heated in careful 20-second intervals. Stir until glossy and smooth, then set aside while you whip up the cream.
-
Whip the Chocolate Cream: In a clean bowl, combine the 220ml of dairy-free whipping cream, 50g of melted dark chocolate, and 3 tablespoons of cocoa powder. Using a stand mixer with a balloon whisk attachment or an electric hand whisk, whip the mixture until it holds stiff peaks.
-
Pipe and Decorate: Transfer the whipped chocolate cream into a pastry bag equipped with a medium star tip nozzle. Pipe a beautiful canopy over the mini cheesecakes. Drizzle some of the prepared chocolate ganache directly into the middle of the cream, and finish by scattering a few homemade vegan shortbread crumbs and mini shortbread squares across the top. Serve and enjoy!
Chef’s Professional Success Tips
-
Soaking is Essential: Never skip soaking the cashews. If you are short on time and forgot to soak them overnight, you can submerge them in boiling water for 30 to 45 minutes before draining. While an overnight soak is best, the quick-boil method will soften them enough to avoid a grainy cheesecake texture.
-
Maintain Temperature Control: When making the chocolate cream, ensure your 50g of melted dark chocolate has cooled down close to room temperature before adding it to the cold whipping cream. If the chocolate is too hot, it can instantly freeze or deflate the cold cream, creating hard chocolate flecks instead of a smooth, uniform texture.
Frequently Asked Questions (FAQs)
What type of vegan caramel sauce should I use?
You can use any thick, high-quality store-bought vegan caramel sauce, or a quick homemade batch using canned full-fat coconut milk, brown sugar, and a pinch of sea salt simmered until reduced and thickened. Just ensure the caramel has cooled completely before folding it into the cheesecake filling.
How long do these mini cheesecakes last?
Stored inside an airtight container in the refrigerator, these mini cheesecakes will stay perfectly fresh, rich, and delicious for up to 3 to 4 days. Because they rely on cold plant-based fats to maintain their shape, keep them refrigerated right up until the moment you intend to serve them.
Try Also: Irresistible Dessert Ideas from
Vegan No-Bake Mini Twix Cheesecakes
- Total Time: 870 minutes
- Yield: 6 servings 1x
- Diet: Vegan
Description
Delicious vegan cheesecakes layered with a crunchy biscuit base, gooey caramel, and smooth chocolate ganache.
Ingredients
- 100g golden Oreo cookies (or vegan shortbread cookies)
- 40g dairy-free butter, melted
- 125g raw cashew nuts (soaked overnight)
- 250g vegan cream cheese
- 75g icing sugar
- 50g coconut cream
- 1 teaspoon pure vanilla extract
- 3 tablespoons vegan caramel sauce
- 100g dairy-free dark chocolate
- 90ml dairy-free cream
- 220ml dairy-free whipping cream
- 50g melted dairy-free dark chocolate
- 3 tablespoons unsweetened cocoa powder
- Vegan shortbread biscuits (for garnish)
Instructions
- Grease a 6-hole loose-base tin with dairy-free butter.
- Melt 40g of dairy-free butter in a saucepan.
- Pulse 100g of cookies in a food processor until fine crumbs.
- Mix crumbs with melted butter until the texture resembles wet sand.
- Pack mixture into the bottoms of each hole in the tin.
- Drain soaked cashews and blend with cream cheese, icing sugar, coconut cream, vanilla, and caramel sauce until smooth.
- Divide cheesecake mixture among the holes, adding layers of caramel if desired.
- Refrigerate overnight to set.
- Unmold cheesecakes and prepare ganache by melting dark chocolate with dairy-free cream.
- Whip dairy-free cream with melted chocolate and cocoa powder until stiff peaks form.
- Pipe whipped chocolate cream on top and drizzle with ganache.
Notes
For best results, soak cashews overnight and ensure chocolates are at room temperature when mixing.
- Prep Time: 30 minutes
- Cook Time: 0 minutes
- Category: Dessert
- Method: No-Bake
- Cuisine: Modern Plant-Based Pastry
Nutrition
- Serving Size: 1 cheesecake
- Calories: 250
- Sugar: 15g
- Sodium: 100mg
- Fat: 15g
- Saturated Fat: 8g
- Unsaturated Fat: 7g
- Trans Fat: 0g
- Carbohydrates: 30g
- Fiber: 2g
- Protein: 4g
- Cholesterol: 0mg
Keywords: vegan dessert, mini cheesecake, no-bake cheesecake, Twix cheesecake, plant-based dessert