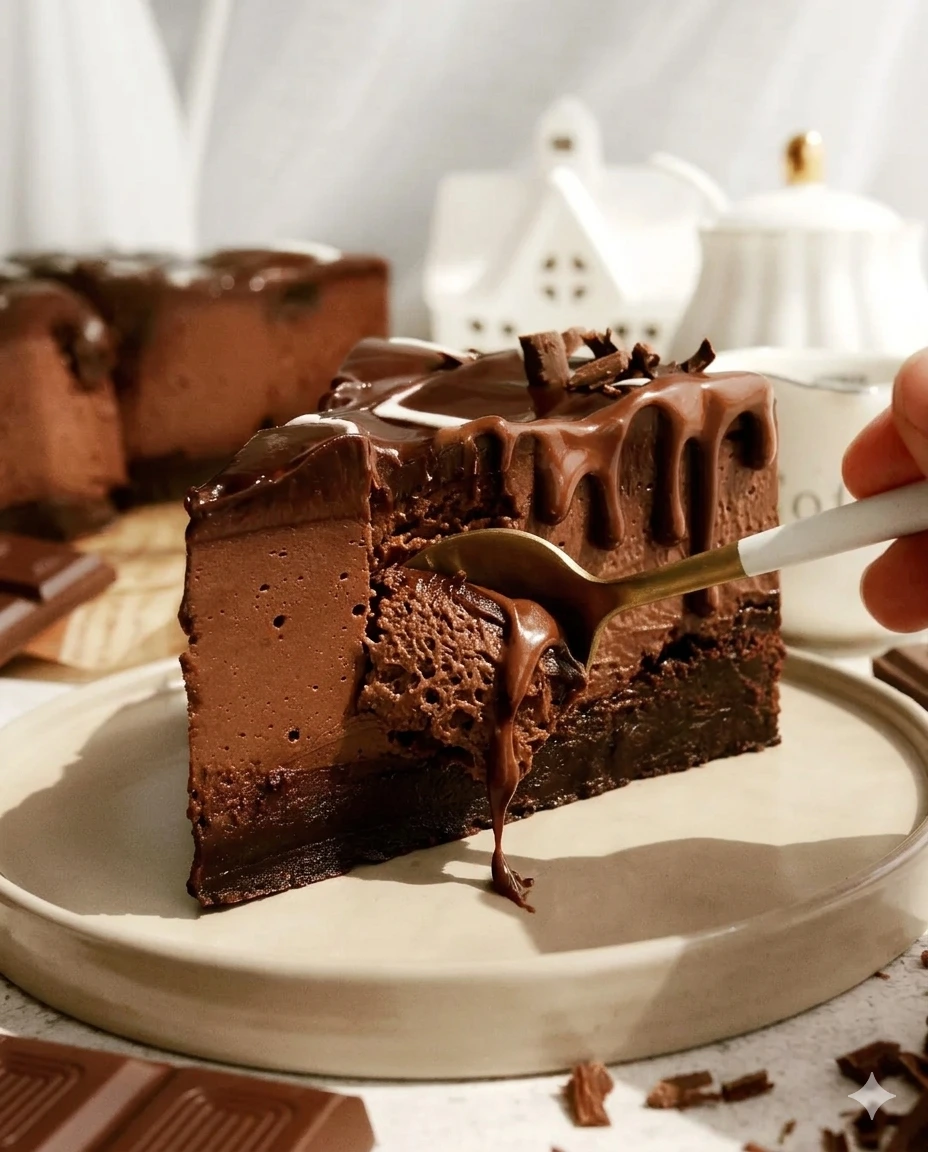
This dessert is the absolute pinnacle of plant-based decadence. It features a rich, intensely chewy, fudgy brownie base topped with a silky, melted dark chocolate cheesecake layer and finished with a feathered dual-chocolate ganache.
By leveraging aquafaba (chickpea brine) to give the brownie its classic shiny crinkle top and soaked cashews to achieve a velvety creaminess in the filling, this recipe rivals any traditional dairy-and-egg cheesecake.
Recipe Specifications
-
Yield: 10–12 rich slices
-
Setting Time: Chilled overnight, plus a few hours for the ganache
-
Baking Vessel: 8-inch loose-base or springform cake tin
-
Dietary Profile: 100% Vegan, Plant-Based, Dairy-Free, Egg-Free
Comprehensive Ingredients Checklist
1. The Fudgy Brownie Base
-
60g unsweetened cocoa powder
-
180g all-purpose plain flour
-
170g dairy-free dark chocolate
-
110g dairy-free block butter (such as Flora Plant Block)
-
120ml aquafaba (the translucent liquid from a tin of chickpeas)
-
280g caster sugar
2. The Chocolate Cheesecake Filling
-
200g raw cashew nuts (must be soaked in water overnight and thoroughly drained)
-
150g dairy-free dark chocolate, melted
-
500g dairy-free cream cheese (Violife works wonderfully here)
-
2 teaspoons pure vanilla extract
-
60g coconut cream (the thick, solid white cream from the top of a chilled can of full-fat coconut milk)
-
100g icing sugar (powdered sugar)
-
4 tablespoons unsweetened cocoa powder
3. The Dual-Chocolate Feathered Ganache
-
100g dairy-free dark chocolate
-
80g coconut cream (thick white cream)
-
50g dairy-free white chocolate (for the decorative feathering)
Step-by-Step Production & Assembly Guide
+-------------------------------------------------------------+
|    TOPPING: Glossy Dark & White Chocolate Feathered Ganache |
+-------------------------------------------------------------+
|    MIDDLE: Velvety No-Bake Dark Chocolate Cheesecake        |
+-------------------------------------------------------------+
|    BASE: Ultra-Fudgy Baked Aquafaba Chocolate Brownie       |
+-------------------------------------------------------------+
|                 ASSEMBLED IN AN 8-INCH TIN                  |
+-------------------------------------------------------------+
Phase 1: Baking the Fudgy Brownie Base
-
Oven & Tin Setup: Preheat your oven to 180°C (fan-assisted). Line both the bottom and sides of an 8-inch springform or loose-base cake tin with greaseproof paper.
-
Dry Whisk: Sift together the 60g of cocoa powder and 180g of plain flour into a medium bowl. Set aside.
-
The Bain-Marie Melt: Set a heatproof bowl over a small saucepan filled a quarter of the way with simmering water (ensuring the bottom of the bowl doesn’t touch the water). Add the 170g of dark chocolate and 110g of dairy-free block butter. Stir gently with a heatproof spatula until completely melted and smooth. Remove from the heat and let it cool slightly.
-
Whip the Aquafaba: In a clean, oil-free bowl, combine the 120ml of aquafaba and 280g of caster sugar. Using a stand mixer fitted with a balloon whisk (or an electric hand mixer), whip on high speed for about 5 minutes. It is ready when it becomes thick, glossy, and leaves thick “ribbons” or trails when the whisk is lifted.
-
Fold the Batter: Pour the melted chocolate and butter mixture directly over the whipped aquafaba. Gently fold them together with a spatula, using broad strokes to keep as much air in the mixture as possible.
-
Incorporate Dry Ingredients: Sift in the flour and cocoa mixture. Fold gently just until a rich, thick brownie batter forms and no dry flour streaks remain.
-
Bake: Spread the batter evenly into your lined tin, smoothing the surface with an offset spatula. Bake in the center of the oven for 30 minutes. Chef’s Trick: If you prefer an ultra-fudgy, gooey brownie center, pull it out 5 minutes early at the 25-minute mark.
-
Cool in the Tin: Place the tin on a wire rack and let the brownie cool completely inside the tin. Leaving it in the pan locks in the moisture, keeping the texture wonderfully chewy.
Phase 2: Processing the No-Bake Cheesecake Core
-
Melt the Chocolate: Melt the 150g of dark chocolate in the microwave in careful 20-second bursts, or over a double boiler. Let it cool slightly so it isn’t scorching hot.
-
The High-Speed Blend: Thoroughly drain your soaked cashews. Place them into a high-speed blender or powerful food processor along with the 500g of dairy-free cream cheese, 2 teaspoons of vanilla, 60g of coconut cream, 100g of icing sugar, 4 tablespoons of cocoa powder, and the melted dark chocolate.
-
Blend Until Satin: Process on high speed for at least 5 minutes until completely smooth and free of grit. Stop a few times to scrape down the sides of the jar to make sure everything blends evenly. If your blender is struggling with the thickness, add a small extra splash of coconut cream to help loosen it.
-
Pour and Tap: Pour the smooth chocolate cheesecake filling directly on top of the cooled brownie base still inside the tin. Give the tin a few firm taps flat against your counter to release any trapped air bubbles and level out the top.
-
The Deep Chill: Place the tin into the refrigerator and leave it overnight to set completely solid.
Phase 3: Pouring the Dual-Chocolate Ganache
-
Melt the Dark Ganache: In a small saucepan over low heat, combine the 100g of dark chocolate and 80g of coconut cream. Heat gently while stirring constantly until it turns into a smooth, glossy sauce. Remove from heat and let it cool for a few minutes.
-
Prep the White Chocolate: In a separate small microwave-safe bowl, melt the 50g of dairy-free white chocolate until smooth. Transfer it into a small piping bag or a ziplock bag with a tiny corner snipped off.
-
Pour and Spread: Pour the warm dark chocolate ganache over the chilled cheesecake layer, tilting the tin to coat it evenly.
-
The Feathered Effect: Immediately pipe parallel lines of melted white chocolate across the wet dark ganache. Take a toothpick or a clean skewer and gently drag it through the lines in alternating opposite directions (upwards, then downwards) to create a beautiful chevron or feathered pattern.
-
Final Set & Serve: Return the cheesecake to the fridge for a couple of hours to let the ganache firm up. Once set, push the loose base up out of the outer tin ring, slice with a hot knife, and serve!
Chef’s Professional Success Tips
-
Achieving the Perfect Cut: Because this cake combines a dense, chewy brownie with a soft cheesecake, slicing can be messy if not done carefully. For flawless restaurant-quality slices, dip a long, sharp chef’s knife into a jug of hot water, wipe it completely dry with kitchen paper, and make a clean slice. Wipe the blade completely clean and re-warm it between every single cut.
-
Cashew Quick-Fix: Forgot to soak your cashews overnight? Don’t panic. Bring a small pot of water to a rolling boil, turn off the heat, drop the cashews in, and cover with a lid. Let them steep for 30–45 minutes, drain thoroughly, and they’ll be perfectly soft enough for your high-speed blender.
-
Try Also: Irresistible Dessert Ideas from
Vegan Brownie Bottom Cheesecake
- Total Time: 1080 minutes
- Yield: 10 servings 1x
- Diet: Vegan
Description
A rich, fudgy brownie layered with a silky, dark chocolate cheesecake and finished with a dual-chocolate ganache.
Ingredients
- 60g unsweetened cocoa powder
- 180g all-purpose plain flour
- 170g dairy-free dark chocolate
- 110g dairy-free block butter
- 120ml aquafaba
- 280g caster sugar
- 200g raw cashew nuts (soaked)
- 150g dairy-free dark chocolate (melted)
- 500g dairy-free cream cheese
- 2 teaspoons pure vanilla extract
- 60g coconut cream
- 100g icing sugar
- 4 tablespoons unsweetened cocoa powder
- 100g dairy-free dark chocolate (for ganache)
- 80g coconut cream (for ganache)
- 50g dairy-free white chocolate (for feathering)
Instructions
- Preheat your oven to 180°C (fan-assisted). Line an 8-inch springform cake tin with greaseproof paper.
- Sift together the cocoa powder and plain flour in a bowl. Set aside.
- Set a heatproof bowl over simmering water and melt dark chocolate with dairy-free butter, stirring until smooth.
- Whip aquafaba and caster sugar in a clean bowl until thick and glossy.
- Pour the melted chocolate mixture over the whipped aquafaba and fold gently to combine.
- Sift in the dry ingredients and fold until a thick batter forms.
- Spread the batter into the prepared tin and bake for 30 minutes.
- Cool the brownie in the tin on a wire rack.
- Melt dark chocolate and blend with soaked cashews, cream cheese, vanilla, coconut cream, icing sugar, and cocoa powder until smooth.
- Pour the cheesecake filling over the cooled brownie and refrigerate overnight.
- Melt dark chocolate and coconut cream for ganache and pour over the cheesecake layer.
- Pipe melted white chocolate and create a feathered pattern using a toothpick.
- Chill for a few hours to set before slicing and serving.
Notes
For cleaner slices, dip a knife in hot water before cutting.
- Prep Time: 30 minutes
- Cook Time: 30 minutes
- Category: Dessert
- Method: Baking
- Cuisine: Vegan
Nutrition
- Serving Size: 1 slice
- Calories: 400
- Sugar: 25g
- Sodium: 150mg
- Fat: 22g
- Saturated Fat: 10g
- Unsaturated Fat: 12g
- Trans Fat: 0g
- Carbohydrates: 45g
- Fiber: 5g
- Protein: 6g
- Cholesterol: 0mg
Keywords: vegan cheesecake, brownie cheesecake, plant-based dessert