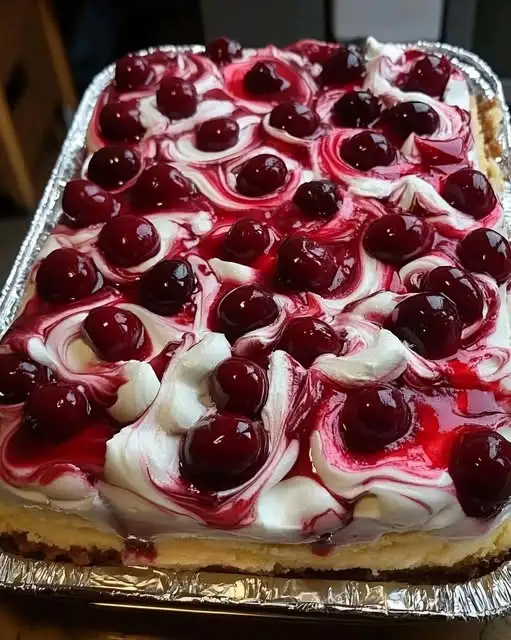
If you are looking for a dessert that is rich, incredibly airy, and visually stunning without requiring any actual baking time, the Heaven on Earth Cake delivers precisely that experience. This classic American layered creation perfectly balances the delicate, cloud-like sponginess of angel food cake with a velvety, stabilized vanilla cream pudding and the bright, ruby-red tang of premium cherry fruit layers.
It is an absolute showstopper of a dessert that feels like it came straight out of a professional bakery display casing, yet it relies on accessible kitchen staples and takes mere minutes of hands-on labor. Whether you are assembling this for a summer family gathering, a backyard holiday potluck, or looking to optimize an article for search engine performance, this comprehensive 1,000+ word deep-dive blueprint breaks down the exact science, structural mechanics, step-by-step assembly, and variation strategies to master this immaculate treat.
 Prep Time: 20 minutes      |   Bake Time: 0 minutes (No-Bake)
 Chill Time: 4 hours minimum |   Vessel: 9×13-inch Glass Baking Dish
 Yield: 12 generous portions |   Caloric Estimate: 250 kcal per serving
The Anatomy of the Flavor Profile
The primary reason this cake earned its evocative name is its careful internal contrast of textures and flavor notes. Many layered cold desserts suffer from becoming either overly sweet or completely soggy after resting in a refrigerator. The structural mechanics of the Heaven on Earth Cake completely avoid these issues through intelligent food pairings:
-
The Absorption Sponge: Angel food cake is uniquely fat-free and has a highly aerated, web-like crumb structure. When cut into precise cubes and layered, it acts like a series of tiny culinary sponges. Instead of collapsing under the moisture of the pudding, it absorbs the vanilla infusion while retaining its distinctive, springy chew.
-
The Sour Cream Counterweight: Instant pudding mix by itself can occasionally lean flatly sweet. By folding a dense, high-fat, tangy acid like sour cream directly into the set pudding, you cut right through the sugar barrier. This adds an unexpected gourmet depth that balances the intense, fruity sweetness of the cherries.
-
The Viscosity of the Fruit: Utilizing a thick cherry pie filling introduces a structural fruit layer that stays exactly where you spoon it, providing high-gloss visual contrasts and an explosion of jammy fruit and whole cherries in every bite.
Ingredients Checklist & Technical Selection
To guarantee a pristine set and ensure your cake slices hold their shape cleanly when cut, each ingredient must be selected and treated with precise intent.
For the Structural Cake Base
-
1 Whole Loaf of Angel Food Cake: You can purchase a pre-made loaf from your local bakery section or bake one yourself from a box mix. Ensure the cake is completely cool before slicing. It must be cut into clean, uniform 1-inch cubes. Avoid tearing the cake; a sharp serrated bread knife is crucial here to prevent flattening the internal air pockets.
For the Velvety Cream Infusion
-
1.5 cups Cold Whole Milk: Ensure your milk is ice-cold straight from the back of the refrigerator. The lower the temperature of the liquid, the faster and more securely the structural starches inside the instant pudding mix will activate and bond.
-
1 box (Approx. 3.4 oz) Instant Vanilla Pudding Mix: This is a non-negotiable ingredient for no-bake efficiency. Cook-and-serve styles or homemade custards require stovetop heat and prolonged cooling cycles, whereas instant pudding sets rapidly to lock in the required moisture balance.
-
1 cup Sour Cream: Full-fat sour cream is highly recommended. It adds the vital lactic acid tang that elevates the dessert’s flavor profile and lends structural density to ensure the pudding doesn’t bleed into the neighboring cake layers.
For the Crown & Marbled Finish
-
1 can (21 oz) Cherry Pie Filling: Look specifically for cans designated as “More Fruit” or premium varieties. Standard pie fillings occasionally consist mostly of translucent, sugary gelatinous syrup; a higher ratio of whole, solid cherries dramatically improves the textual profile and structural stability of the internal fruit layer.
-
1 container (8 oz) Thawed Whipped Topping (such as Cool Whip): The whipped topping must be entirely thawed in the refrigerator before assembly. Do not microwave it to speed up the process, as this collapses the delicate air bubbles.
Chef’s Customization Note: While fresh, homemade whipped cream can be used, it must be properly stabilized using unflavored gelatin, cornstarch, or heavy cream stabilizers. Natural whipped cream naturally weeps and liquefies over time, which will cause your pristine marbling to melt and look muddy by day two.
Step-by-Step Culinary Instructions
1. Build the Creamy Infusion
-
In a large, deep glass or stainless steel mixing bowl, pour in your 1.5 cups of cold whole milk and empty the contents of the 1 box of instant vanilla pudding mix.
-
Using a wire whisk or an electric hand mixer on medium speed, whisk the mixture vigorously for exactly 2 minutes. You will notice the liquid rapidly transformation from a thin milk into a heavy, smooth custard state. Let it sit undisturbed on the counter for 3 minutes to achieve its full, foundational thickening capacity.
-
Gently drop the 1 cup of sour cream into the bowl. Using a flexible rubber spatula, flip and fold the sour cream into the vanilla pudding using a sweeping, circular, under-and-over motion. Mix patiently just until the white streaks disappear, resulting in a rich, uniform, glossy golden cream matrix.
2. Establish the Structural Foundation
-
Place a clean 9×13-inch glass baking dish on your counter. A transparent glass or acrylic dish is highly recommended for this recipe, as the side views showcase the alternating, contrasting colors of the white cake, golden pudding, and ruby-red cherries.
-
Take exactly half of your prepared 1-inch angel food cake cubes and distribute them evenly across the bottom floor of the baking dish. Gently arrange them so they form a continuous, solid block base.
-
Open your can of cherry pie filling. Measure out approximately 2/3 of the can, and spoon it smoothly over the top of the cake cubes, spreading it out into a beautiful, even fruit blanket. Keep the remaining 1/3 of the can off to the side; this will be used later to engineer your top decorative layer.
-
Scatter the remaining half of the angel food cake cubes directly on top of the cherry layer, pressing them down very lightly so they settle evenly into place.
3. Final Assembly & Layering
-
Pour the completed, stabilized vanilla pudding mixture uniformly across the top layer of the angel food cake cubes.
-
The Crevice Injection Hack: Take a small offset spatula or the back of a spoon and gently press downward on the cake blocks. Guide the pudding cream into the gaps, channels, and deep crevices between the cubes. This ensures that the cake is completely locked into the cream matrix, leaving no dry air pockets inside the dish.
-
Using your spatula, spread the thawed whipped topping in a thick, luxurious, and perfectly flat sheet across the entire pudding layer, sealing it completely out to the glass borders of the dish.
4. Create the Elegant Marbling Effect
-
Take the remaining 1/3 can of cherry pie filling that you set aside earlier. Drop it in small, decorative spoonfuls or artistic dollops across the snowy white surface of the whipped topping layer.
-
Take a butter knife, a wooden skewer, or an artistic toothpick and lightly drag the tip through the cherry dollops, pulling the red syrup through the white cream in sweeping figure-eight or zigzag patterns.
-
Work with a light touch—you want to create a clean, distinct marbled ribbon effect. Avoid over-swirling, which will blend the two components completely and turn your beautiful topping into a uniform pink pastel.
5. The Critical Curing Window
-
Cover the baking dish tightly with a sheet of plastic wrap or a fitted lid. Place the dessert into the refrigerator to chill and cure for a minimum of 4 hours.
-
The Overnight Recommendation: If your schedule permits, letting the Heaven on Earth Cake rest in the refrigerator overnight yields an exponentially superior result. This prolonged window gives the angel food cake cubes ample time to pull moisture from the surrounding pudding, softening the entire dessert into a seamless, cohesive sliceable unit while allowing the vanilla and cherry flavors to meld beautifully.
Strategic Customization Matrix
While the traditional cherry-and-vanilla profile represents the gold standard of this American classic, the underlying structural blueprint can easily adapt to showcase a vast array of seasonal fruit profiles:
| Flavor Variation | Pudding Base Swap | Fruit Layer Alternative | Accent Toppings |
| The Tropical Bliss | Instant Coconut Mousse | Drained Crushed Pineapple & Mango | Toasted Coconut Flakes |
| The Summer Berry Patch | Instant White Chocolate | Wild Strawberry or Raspberry Pie Filling | Fresh Mint Leaves & Blueberries |
| The Autumn Orchard | Instant French Vanilla | Spiced Apple Cinnamon Compote | A Dusting of Nutmeg & Graham Crumbs |
| The Lemon Meringue | Instant Lemon Curd Mix | Bright Lemon Filling & Fresh Raspberries | Candied Lemon Zest |
Pro Presentation & Cutting Secrets
To transition this comforting home style dessert into an upscale, restaurant-quality presentation, follow these advanced slicing mechanics:
-
The Thermal Slicing Method: Because the internal layers consist of soft pudding and airy whipped topping, a dry knife will drag the layers downward, muddying your borders. To avoid this, fill a tall glass with hot tap water. Dip a long, sharp chef’s knife into the hot water for 10 seconds, wipe the blade completely bone-dry with a clean kitchen towel, and commit to one smooth, vertical slice straight down to the base of the glass dish.
-
The Clean Slide Out: Do not pull the knife back up vertically through the cake, as this will drag the pudding into the topping layer. Instead, wipe the knife blade completely clean and repeat the hot-water dipping process before making your cross-cuts.
-
Use a thin, flexible metal offset spatula to slide completely beneath the graham or cake base, lifting each square out in one pristine, multi-tiered block that proudly showcases your colorful, distinct internal layering.
Storage and Freshness Preservation
-
Refrigeration Blueprint: Because this dessert relies entirely on fresh dairy starches (milk and sour cream) along with delicate whipped structures, it must never be left sitting out at room temperature for longer than 30 minutes. Always store any leftovers covered tightly in the refrigerator, where it will hold its optimal texture and freshness for up to 3 days.
-
Freezing Restrictions: It is highly advised not to freeze the fully assembled cake. When frozen and subsequently thawed, the cellular walls of the instant pudding and sour cream break down, causing the dairy elements to separate and release water. This leads to a watery, compromised base that will turn your fluffy angel food cake soggy. Keep it fresh, keep it cold, and enjoy it within its prime 3-day window!
Try Also: Irresistible Dessert Ideas from
Heaven on Earth Cake
- Total Time: 240 minutes
- Yield: 12 servings 1x
- Diet: Vegetarian
Description
A stunning no-bake layered dessert combining angel food cake, vanilla cream pudding, and cherry pie filling, perfect for summer gatherings.
Ingredients
- 1 Whole Loaf of Angel Food Cake, cut into 1-inch cubes
- 1.5 cups Cold Whole Milk
- 1 box (Approx. 3.4 oz) Instant Vanilla Pudding Mix
- 1 cup Sour Cream
- 1 can (21 oz) Cherry Pie Filling
- 1 container (8 oz) Thawed Whipped Topping
Instructions
- Build the creamy infusion by whisking cold milk and pudding mix in a bowl for 2 minutes, then fold in sour cream.
- Establish the structural foundation by layering half of the angel food cake cubes in a glass dish.
- Spoon cherry pie filling over the cake cubes, then add the remaining cake cubes on top.
- Pour the cream mixture over the top layer, ensuring it settles into crevices.
- Spread thawed whipped topping over the pudding layer and create a marbled effect with remaining cherry pie filling.
- Cover the cake and refrigerate for a minimum of 4 hours to set.
Notes
For best results, let the cake chill overnight. Store any leftovers tightly covered in the refrigerator for up to 3 days.
- Prep Time: 20 minutes
- Cook Time: 0 minutes
- Category: Dessert
- Method: No-Bake
- Cuisine: American
Nutrition
- Serving Size: 1 serving
- Calories: 250
- Sugar: 20g
- Sodium: 200mg
- Fat: 8g
- Saturated Fat: 4g
- Unsaturated Fat: 4g
- Trans Fat: 0g
- Carbohydrates: 35g
- Fiber: 1g
- Protein: 5g
- Cholesterol: 25mg
Keywords: cake, dessert, no-bake cake, cherry dessert, summer dessert