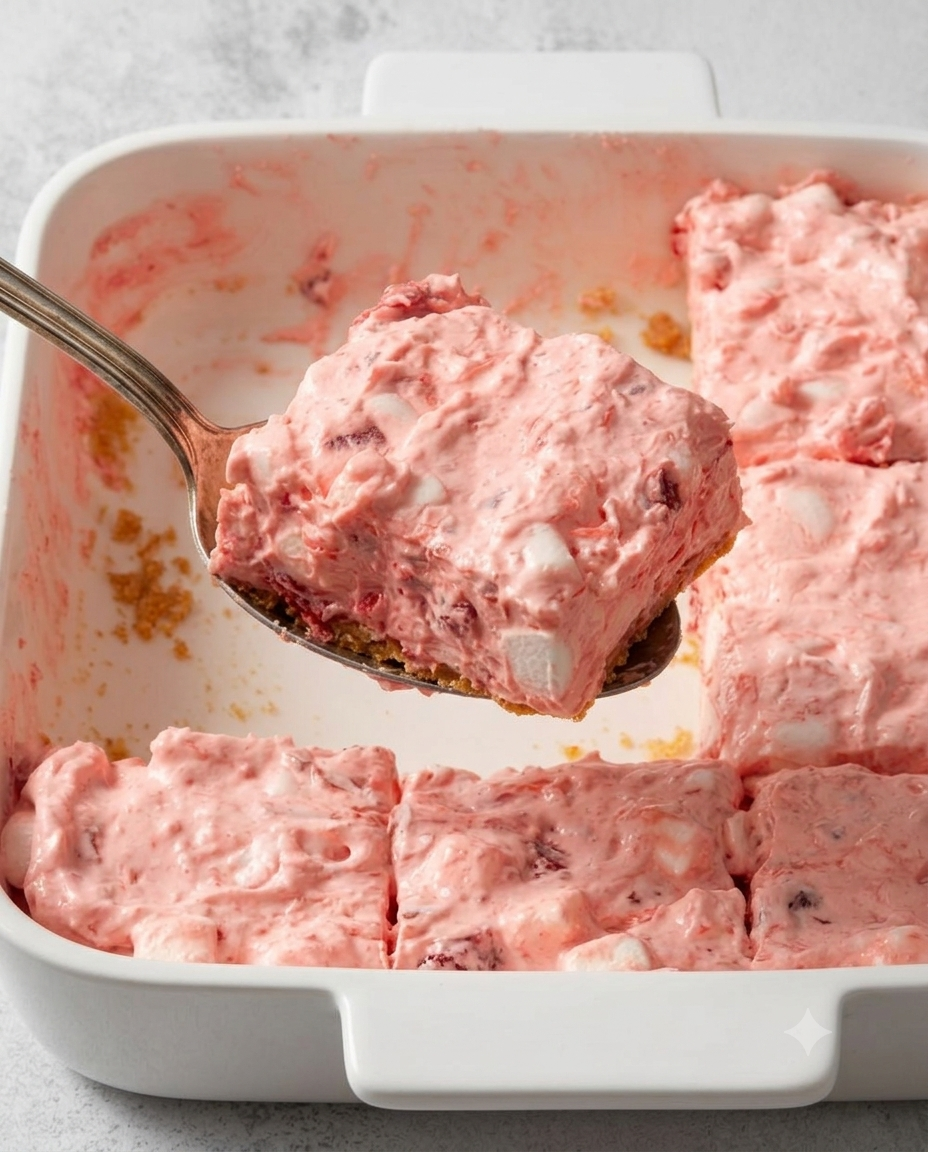
A refreshing, crowd-pleasing dessert that perfectly balances textures and bright fruit profiles, this Strawberry Delight is a phenomenal no-bake sheet treat. Featuring a thick, buttery graham cracker foundation, it is layered with a voluminous, pillowy fluff loaded with tropical crushed pineapple, sweet strawberry pie filling, juicy bits of real thawed strawberries, and pillowy mini marshmallows.
By skipping the oven entirely and utilizing cold stabilization, this vibrant dessert develops a sliceable, mousse-like consistency that is light, airy, and bursting with berry brightness—making it an exceptional center stage centerpiece for spring and summer gatherings.
Recipe Specifications
-
Yield: 12 generous dessert portions
-
Prep Time: 1 hour 10 minutes (includes initial crust-chilling time)
-
Setting Time: 1 hour minimum (deep refrigeration)
-
Total Time: 2 hours 10 minutes
-
Presentation Vessel: A standard 9×13-inch rectangular glass or ceramic baking dish, lightly greased.
-
Nutritional Estimate: 416 calories per piece (~16g fat, 63g carbohydrates, 2g protein)
-
Flavor Profile: A harmonious fusion of rich, toasted honey biscuit crumbs, bright tropical pineapple, sweet summer strawberry jam, and soft vanilla-dairy cloud cream.
Comprehensive Ingredients Checklist
1. The Compacted No-Bake Graham Crust
-
18 whole graham crackers (processed into fine, sandy crumbs)
-
½ cup unsalted butter, melted
2. The Strawberry-Pineapple Fluff Filling
-
1 can (20 ounces) unsweetened crushed pineapple, thoroughly drained of excess juice
-
1 can (21 ounces) premium strawberry pie filling
-
2 cups frozen unsweetened strawberries, completely thawed and finely chopped
-
4 cups fresh miniature marshmallows
-
1 carton (16 ounces) frozen whipped topping (such as Cool Whip), completely thawed in the refrigerator
3. Optional Presentation Finishers
-
Extra thawed whipped topping for structured piping or spreading
-
Fresh strawberries, halved, for a vibrant visual garnish
Step-by-Step Production & Assembly Guide
+-------------------------------------------------------------+
|    GARNISH: Optional Fresh Strawberry Halves & Cream Swirls |
+-------------------------------------------------------------+
|    FILLING: Volumetric Berry-Pineapple Whipped Fluff Matrix |
|             Packed with Mini Marshmallows & Fruit Bits      |
+-------------------------------------------------------------+
|    BASE: Firm, Chilled Buttery Graham Cracker Shell         |
+-------------------------------------------------------------+
|               NO-BAKE REFRIGERATION STABILIZED              |
+-------------------------------------------------------------+
Phase 1: Structuring the Sandy Base
-
The Crumb Grind: Place the 18 whole graham crackers into the bowl of a food processor. Pulse continuously until they are reduced to completely fine, uniform crumbs with no large fragments remaining.
-
The Butter Bond: With the processor motor running on low, slowly stream in the ½ cup of melted butter. Process until the mixture resembles damp, cohesive sand that holds its shape when squeezed.
-
The Compression Protocol: Turn the buttery crumbs into the bottom of your lightly greased 9×13-inch baking dish. Use the flat bottom of a metal measuring cup or a straight-sided drinking glass to press the crumbs firmly and evenly into a flat, tightly compacted foundation sheet.
-
The Cold Lock: Place the baking dish into the refrigerator to chill until firmly set while you compound the filling.
Phase 2: Compounding the Fruit Fluff Matrix
-
Draining the Tropics: Crucial Step: Ensure your 20-ounce can of crushed pineapple is drained extensively in a fine-mesh sieve, pressing down lightly with a spoon to express excess moisture. Leaving too much juice will liquefy the whipped cream structure.
-
The Fruit Fusion: In an oversized mixing bowl, combine the thoroughly drained crushed pineapple, the 21-ounce can of strawberry pie filling, and the 2 cups of thawed, chopped strawberries. Toss gently with a rubber spatula until completely integrated.
-
The Airy Fold: Gently scatter the 4 cups of miniature marshmallows over the fruit blend. Add the 16 ounces of thawed whipped topping into the bowl. Using a circular, sweeping motion, gently fold the whipped topping and marshmallows into the fruit base just until uniform streaks form and no pockets of unmixed cream remain.
Phase 3: Layering, Sealing, and the Deep Chill
-
The Smooth Spread: Retrieve your chilled graham cracker base from the refrigerator. Pour the voluminous strawberry fluff mixture directly over the crust, using an offset spatula to smooth the surface into a flat, uniform layer, easing it cleanly into the corners.
-
The Setting Rest: Place the uncovered dish into the refrigerator for at least 1 hour (or up to 4 hours) to allow the gelatin starches in the pie filling and the fats in the whipped topping to chill-stabilize into a sliceable matrix.
-
The Final Flourish: Right before carving and serving, spread or pipe an optional layer of additional whipped topping across the surface if desired. Artfully arrange fresh halved strawberries across the top to give the dessert a polished, bakery-fresh aesthetic. Run a sharp knife under warm water and wipe dry between cuts to serve pristine, beautiful dessert squares.
Pastry Chef Success Tips
The Frozen Strawberry Trick: When chopping your thawed frozen strawberries, make sure to discard or drain any watery liquid they release onto the cutting board. Incorporating that extra un-emulsified water into the whipped topping filling can cause the mixture to separate or weep over time, compromising your crisp graham cracker base.
Achieving Cleanly Defined Squares: Because this dessert relies entirely on cold stabilization rather than baked proteins to hold its shape, it remains incredibly soft and creamy. To get perfectly sharp, clean edges when slicing, place the entire dish into the freezer for 20 minutes right before cutting. This firms up the fats just enough to allow your blade to slice through the marshmallow-cream matrix cleanly without smudging.
Storage & Preservation Parameters
Refrigerator Logistics
Because this dessert features dairy analogues and raw fruit components, it must be stored cold. Keep the 9×13-inch pan tightly wrapped in plastic wrap or sealed with a fitted lid and return it to the refrigerator immediately after serving. It will maintain its structural integrity and airy texture beautifully for up to 3 days.
Freezing Potential (Optional Icebox Style)
This recipe transforms beautifully into a frozen “icebox cake.” Wrap the fully assembled, un-garnished dish tightly in a double layer of plastic wrap followed by aluminum foil and freeze for up to 1 month. Thaw on the kitchen counter for 20 to 30 minutes prior to serving; this yields a dense, semi-frozen texture reminiscent of gourmet strawberry gelato bars.
Try Also: Irresistible Dessert Ideas from
Strawberry Delight
- Total Time: 130 minutes
- Yield: 12 servings 1x
- Diet: Vegetarian
Description
A refreshing no-bake dessert with a buttery graham cracker crust, layered with tropical crushed pineapple, strawberry pie filling, chopped strawberries, and marshmallows.
Ingredients
- 18 whole graham crackers, processed into fine crumbs
- ½ cup unsalted butter, melted
- 1 can (20 ounces) unsweetened crushed pineapple, drained
- 1 can (21 ounces) premium strawberry pie filling
- 2 cups frozen unsweetened strawberries, thawed and finely chopped
- 4 cups fresh miniature marshmallows
- 1 carton (16 ounces) frozen whipped topping, thawed
- Extra thawed whipped topping (optional)
- Fresh strawberries, halved (optional)
Instructions
- Place the graham crackers in a food processor and pulse until fine crumbs form.
- Stream in melted butter while processing until the mixture resembles damp sand.
- Turn the mixture into a greased 9×13-inch baking dish and press firmly to form a crust.
- Chill in the refrigerator until set, approximately 1 hour.
- Drain the crushed pineapple well using a fine-mesh sieve.
- Combine drained pineapple, strawberry pie filling, and chopped strawberries in a mixing bowl.
- Gently fold in marshmallows and whipped topping until fully blended.
- Pour the mixture over the chilled crust and smooth the top.
- Refrigerate for at least 1 hour before serving.
- Optional: Add whipped topping and halved strawberries for garnish before serving.
Notes
For clean slices, freeze the dessert for 20 minutes before cutting.
- Prep Time: 70 minutes
- Cook Time: 0 minutes
- Category: Dessert
- Method: No-Bake
- Cuisine: American
Nutrition
- Serving Size: 1 serving
- Calories: 416
- Sugar: 31g
- Sodium: 150mg
- Fat: 16g
- Saturated Fat: 8g
- Unsaturated Fat: 8g
- Trans Fat: 0g
- Carbohydrates: 63g
- Fiber: 1g
- Protein: 2g
- Cholesterol: 30mg
Keywords: strawberry dessert, no-bake dessert, summer dessert, cream dessert