If you love apple crisp, creamy cheesecake, and homemade salted caramel, you’re going to fall head over heels for these Salted Caramel Apple Crisp Cheesecake Bars! They’re everything you could want in a homemade dessert: buttery, crunchy, creamy, sweet, slightly tangy, and packed with cozy cinnamon apple flavor.
Imagine biting into a buttery graham cracker crust, followed by a smooth layer of vanilla cheesecake, tender cinnamon-spiced apples, and a golden brown oat crisp topping. Now picture all those delicious layers finished with a generous drizzle of rich salted caramel sauce and a little sprinkle of flaky sea salt. Sounds pretty amazing, right?
These apple crisp cheesecake bars bring together three classic desserts in one easy-to-share treat. You get the creamy texture of cheesecake, the warm fruit filling of an apple crisp, and the sweet buttery crunch of a crumb topping. The salted caramel takes everything to another level without making the dessert overly complicated.
One of the best things about this recipe is that you don’t need to make a traditional cheesecake in a springform pan or worry about preparing an elaborate water bath. Everything comes together in a simple 9-by-13-inch baking pan, making these bars much easier to prepare, chill, slice, and serve.
They’re perfect for fall gatherings, Thanksgiving dessert tables, holiday parties, family dinners, potlucks, or a cozy weekend baking project. And since the recipe makes 16 bars, there’s plenty to share with friends and family.
Even better, these Salted Caramel Apple Crisp Cheesecake Bars can be made ahead of time. Simply bake them, let them cool completely, refrigerate until firm, and finish with salted caramel and flaky sea salt before serving.
If you’re looking for an impressive apple dessert that combines familiar flavors with a delicious cheesecake twist, this recipe deserves a spot on your baking list!
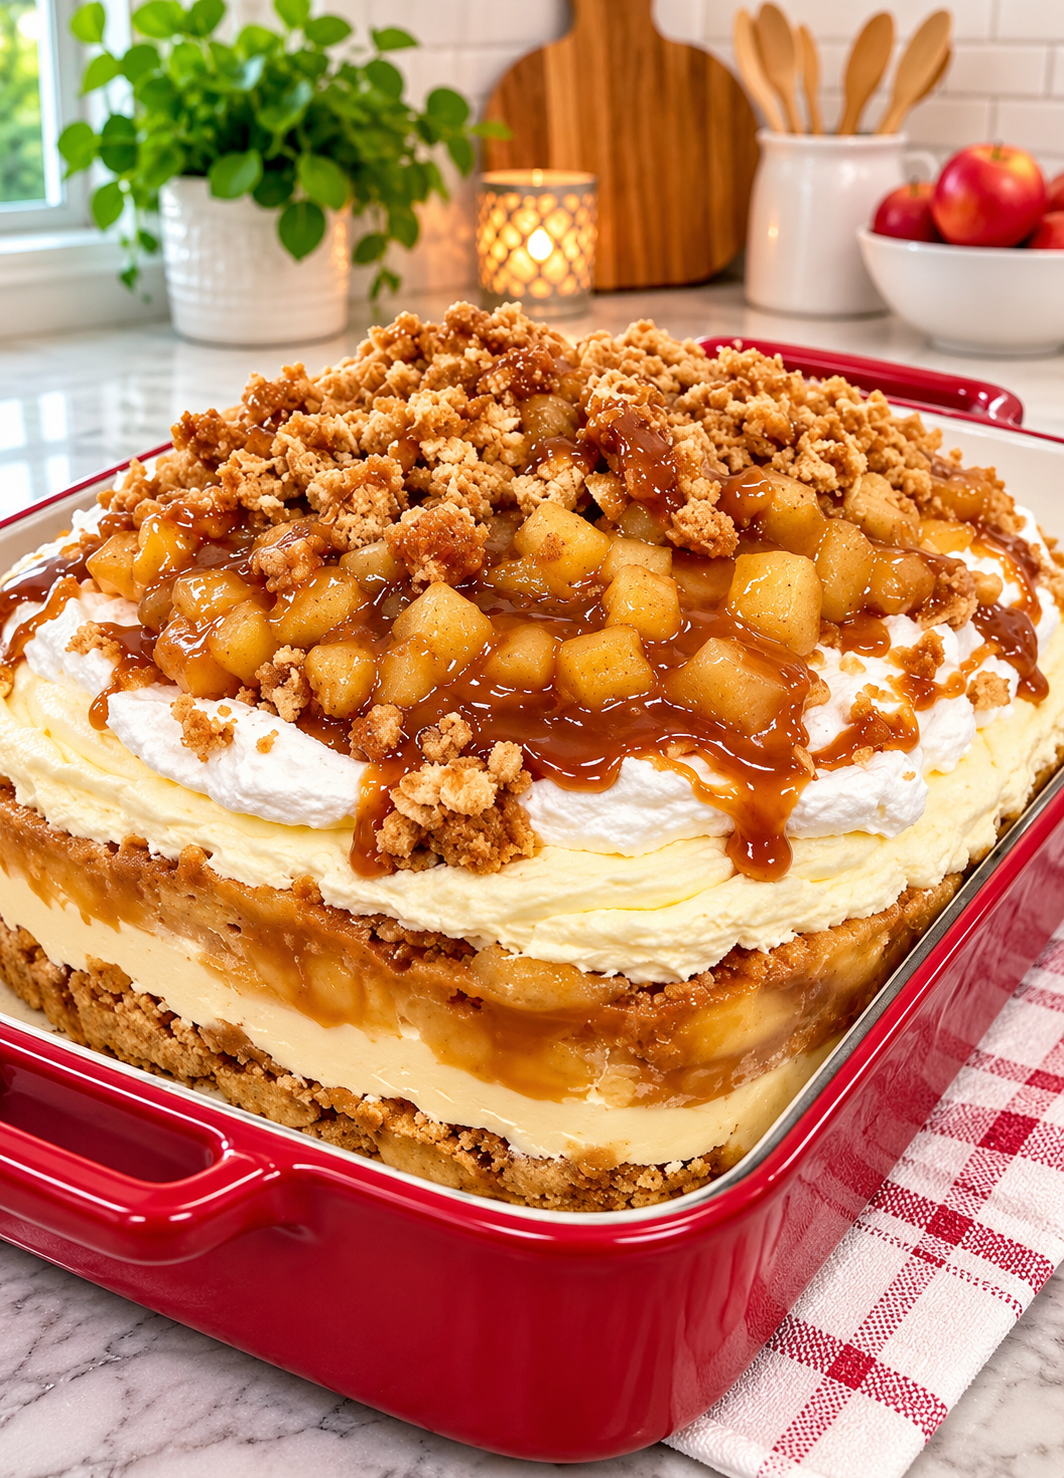
What Are Salted Caramel Apple Crisp Cheesecake Bars?
Salted Caramel Apple Crisp Cheesecake Bars are a layered dessert that combines the best parts of an apple crisp and a classic cheesecake.
Instead of using a traditional pie crust, this recipe starts with a buttery graham cracker crust. It provides a firm, slightly crunchy foundation that holds all the other layers together.
On top of the crust comes a smooth cheesecake filling made with cream cheese, granulated sugar, eggs, and vanilla extract. This layer adds a rich, creamy texture that balances the sweetness and natural tartness of the apples.
The apple filling is made with fresh peeled and thinly sliced apples tossed with sugar, brown sugar, flour, cinnamon, nutmeg, and lemon juice. As the bars bake, the apples become tender and develop that familiar warm apple pie flavor.
The crisp topping brings everything together with rolled oats, flour, brown sugar, cinnamon, salt, and melted butter. Once baked, it becomes golden brown and slightly crunchy, creating a delicious contrast with the creamy cheesecake underneath.
Finally, the chilled bars are finished with salted caramel sauce and flaky sea salt. The caramel adds a buttery sweetness, while the sea salt gives the dessert a balanced finish.
Every layer has a purpose, and together they create a dessert that’s rich without feeling one-dimensional.
Why You’ll Love These Salted Caramel Apple Crisp Cheesecake Bars
There are plenty of reasons to love this recipe, especially if you’re a fan of homemade apple desserts.
1. Three Favorite Desserts in One
Can’t decide between cheesecake, apple crisp, and caramel apples? You don’t have to!
These bars combine all three into one delicious dessert. The creamy cheesecake, soft cinnamon apples, and crunchy oat topping make every bite taste like something special.
2. A Buttery Graham Cracker Crust
The graham cracker crust provides a delicious base for all the layers. Its buttery texture and subtle brown sugar sweetness pair perfectly with the tangy cheesecake filling.
Unlike a traditional pastry crust, it’s easy to prepare and doesn’t require rolling or shaping.
3. Fresh Apple Flavor
This recipe uses four medium apples, giving the dessert plenty of natural fruit flavor.
The apples are coated with cinnamon, nutmeg, sugar, and lemon juice before being arranged over the cheesecake. They become tender during baking while keeping their delicious apple flavor.
4. A Golden, Crunchy Crisp Topping
The oat topping is one of the best parts of this recipe.
Rolled oats, flour, brown sugar, cinnamon, salt, and melted butter create coarse crumbs that bake into a golden, buttery layer.
It adds texture to every bite and makes these bars taste like a traditional homemade apple crisp.
5. Salted Caramel Makes Everything Better
The final drizzle of salted caramel sauce gives these bars a rich, buttery sweetness.
A little flaky sea salt helps balance the caramel and brings out the flavors of the apples, cheesecake, and crisp topping.
6. Perfect for Sharing
This recipe makes 16 bars, so it’s ideal for gatherings and celebrations.
Instead of serving a whole cheesecake and worrying about slicing it at the table, you can cut these bars into individual portions ahead of time.
7. Make-Ahead Friendly
These cheesecake bars need at least three hours of chilling time, which makes them a great dessert to prepare in advance.
You can bake them the day before an event and finish them with caramel just before serving.
Ingredients You’ll Need
One of the things I love about these Salted Caramel Apple Crisp Cheesecake Bars is that the ingredients are simple and easy to find.
Most of them are everyday baking staples, and you don’t need any unusual ingredients to create the different layers.
Let’s take a closer look at what each ingredient does.
For the Graham Cracker Crust
2 cups graham cracker crumbs
Graham cracker crumbs create the buttery base of the bars. They provide structure and a slightly sweet, crunchy texture that pairs beautifully with the creamy cheesecake.
You can use store-bought graham cracker crumbs or crush graham crackers yourself until they become fine crumbs.
1/2 cup unsalted butter, melted
Melted butter binds the graham cracker crumbs together and helps the crust hold its shape after baking and chilling.
Using unsalted butter also gives you better control over the overall saltiness of the dessert.
3 tablespoons light brown sugar
Brown sugar adds a subtle caramel-like flavor to the crust and helps enhance its sweetness.
It works especially well with the apple and salted caramel layers.
For the Cheesecake Layer
16 ounces cream cheese, softened
Cream cheese is the main ingredient in the cheesecake layer. It creates that rich, smooth, and slightly tangy texture that makes cheesecake so delicious.
Make sure the cream cheese is softened before mixing. This helps prevent lumps and makes it easier to create a smooth filling.
1/2 cup granulated sugar
Granulated sugar sweetens the cheesecake filling and balances the natural tanginess of the cream cheese.
2 large eggs
Eggs help bind the cheesecake ingredients together and allow the filling to set properly during baking.
1 teaspoon vanilla extract
Vanilla adds warmth and enhances the flavor of the cream cheese and sugar.
For the Apple Filling
4 medium apples, peeled, cored, and thinly sliced
Fresh apples are the star of this layer. They provide natural sweetness, a little tartness, and that classic apple dessert flavor.
Peeling, coring, and thinly slicing the apples helps them cook evenly and become tender during baking.
2 tablespoons granulated sugar
Granulated sugar adds sweetness to the apples and helps bring out their natural flavor.
2 tablespoons light brown sugar
Brown sugar adds a deeper sweetness with a subtle caramel-like taste that works beautifully with cinnamon and nutmeg.
2 tablespoons all-purpose flour
The flour helps absorb some of the moisture released by the apples during baking, helping the filling maintain a better consistency.
1 teaspoon ground cinnamon
Cinnamon gives the apple filling its warm, familiar flavor. It’s one of the most important ingredients in a classic apple crisp.
1/4 teaspoon ground nutmeg
Nutmeg adds a gentle warmth and depth to the apple filling. It complements the cinnamon without overpowering the apples.
1 tablespoon lemon juice
Lemon juice adds a little brightness and balances the sweetness of the sugars. It also helps keep the apple flavor fresh.
For the Crisp Topping
3/4 cup old-fashioned rolled oats
Rolled oats create the classic crisp texture. They become slightly crunchy during baking and add a delicious contrast to the smooth cheesecake filling.
1/2 cup all-purpose flour
Flour helps bind the topping ingredients and creates the crumbly texture.
1/3 cup light brown sugar
Brown sugar adds sweetness and helps the topping develop its golden, crisp texture.
1/2 teaspoon ground cinnamon
Cinnamon brings extra warmth to the topping and ties it together with the apple filling.
1/4 teaspoon salt
Salt balances the sweetness and enhances the buttery flavor of the crisp topping.
1/2 cup unsalted butter, melted
Melted butter brings all the topping ingredients together and creates those delicious buttery crumbs.
For the Salted Caramel Drizzle
1/2 cup salted caramel sauce
Salted caramel sauce adds a rich, buttery sweetness to the finished cheesecake bars.
You can use your favorite store-bought salted caramel sauce or homemade salted caramel sauce.
1/4 teaspoon flaky sea salt
Flaky sea salt adds a delicate salty finish and balances the sweetness of the caramel.
Best Apples to Use for Apple Crisp Cheesecake Bars
Choosing the right apples can make a difference in the texture and flavor of your finished dessert.
For this recipe, you’ll want apples that hold their shape reasonably well during baking while becoming tender enough to enjoy in every bite.
Here are some popular options:
Granny Smith Apples
Granny Smith apples are a great choice if you prefer a slightly tart dessert.
Their natural tartness balances the sweetness of the brown sugar, cheesecake, and salted caramel. They also hold their shape well during baking.
Honeycrisp Apples
Honeycrisp apples are known for their sweet flavor and crisp texture.
They’re a wonderful option if you want a naturally sweet apple filling with a little refreshing tartness.
Fuji Apples
Fuji apples are naturally sweet and juicy. They work well in baked desserts and bring a pleasant apple flavor to the filling.
Gala Apples
Gala apples have a mild sweetness and soft flavor. They’re a good choice if you prefer a less tart apple dessert.
Can You Mix Different Apple Varieties?
Absolutely!
Using a combination of sweet and tart apples can create a more balanced flavor.
For example, mixing Granny Smith and Honeycrisp apples gives you a nice contrast between tartness and sweetness.
Whatever variety you choose, make sure to peel, core, and thinly slice the apples as directed.
How to Make Salted Caramel Apple Crisp Cheesecake Bars
These bars have several layers, but each one is easy to prepare.
The key is to work in order, starting with the crust, followed by the cheesecake filling, apple layer, and crisp topping.
Step 1: Prepare the Oven and Baking Pan
Preheat your oven to 350°F (175°C).
Line a 9-by-13-inch baking pan with parchment paper, making sure to leave some extra parchment hanging over the sides.
This overhang will act as handles later, making it much easier to lift the chilled cheesecake bars out of the pan.
Make sure the parchment covers the bottom and sides of the pan as evenly as possible.
Step 2: Make the Graham Cracker Crust
In a medium mixing bowl, combine the graham cracker crumbs, 1/2 cup melted unsalted butter, and 3 tablespoons light brown sugar.
Stir until the crumbs are evenly coated with the butter and the mixture resembles damp sand.
The mixture should hold together when pressed between your fingers.
Transfer the graham cracker mixture to the prepared baking pan.
Using the bottom of a measuring cup or a flat spatula, press the crumbs firmly and evenly across the bottom of the pan.
Pay special attention to the corners and edges so the crust has an even thickness.
Place the pan in the preheated oven and bake for 8 minutes.
Once baked, remove the crust from the oven and allow it to cool slightly while preparing the cheesecake filling.
Pre-baking helps the crust become firm and gives it a better structure underneath the creamy layers.
Step 3: Prepare the Cheesecake Filling
Add the softened cream cheese and 1/2 cup granulated sugar to a large mixing bowl.
Using an electric mixer, beat the ingredients until the mixture becomes smooth and creamy.
Scrape down the sides of the bowl when needed to make sure there are no lumps of cream cheese hiding around the edges.
Add the eggs one at a time, mixing after each addition until incorporated.
Next, add the vanilla extract and mix until the cheesecake filling is smooth and evenly combined.
Avoid overmixing once the eggs are added. You want a creamy filling without incorporating too much air.
Step 4: Spread the Cheesecake Layer
Take the slightly cooled graham cracker crust.
Pour the cheesecake mixture over the crust and spread it gently using a spatula.
Make sure the filling reaches the edges and forms an even layer across the pan.
A smooth cheesecake layer creates a nice foundation for the apple filling and helps the finished bars look neat when sliced.
Set the pan aside while you prepare the apples.
Step 5: Prepare the Apple Filling
Peel and core the four medium apples.
Slice them thinly and place them in a large mixing bowl.
Add the granulated sugar, light brown sugar, all-purpose flour, ground cinnamon, ground nutmeg, and lemon juice.
Toss everything together until the apple slices are evenly coated.
Make sure the flour and spices are distributed throughout the apples rather than collecting at the bottom of the bowl.
The sugar brings out the natural apple flavor, the cinnamon and nutmeg add warmth, and the lemon juice gives the filling a little brightness.
Step 6: Arrange the Apples Over the Cheesecake
Take the prepared apple mixture and arrange the slices over the cheesecake filling.
Spread the apples as evenly as possible so every portion gets a good amount of fruit.
Try to distribute the slices across the entire surface instead of piling them all in the center.
This helps the bars bake more evenly and gives each slice a beautiful apple layer.
Step 7: Make the Crisp Topping
In a separate mixing bowl, combine the old-fashioned rolled oats, all-purpose flour, light brown sugar, ground cinnamon, and salt.
Stir until the dry ingredients are evenly mixed.
Pour in the 1/2 cup melted unsalted butter.
Mix everything together until coarse crumbs form.
The topping should look crumbly rather than like a smooth dough.
If some larger crumbs form, that’s perfectly fine. Those bigger pieces will create a delicious crunchy texture after baking.
Step 8: Add the Crisp Topping
Sprinkle the oat mixture evenly over the apple layer.
Make sure the topping covers the apples from edge to edge.
You don’t need to press it down firmly. Keeping the topping loose helps it develop a crumbly, crisp texture during baking.
At this point, you’ll have four beautiful layers: the graham cracker crust, cheesecake filling, cinnamon apples, and oat crisp topping.
Step 9: Bake the Cheesecake Bars
Place the baking pan in the preheated oven.
Bake for 45–50 minutes, until the crisp topping becomes golden brown and the cheesecake edges are set.
The topping should look lightly toasted, while the cheesecake layer should appear firm around the edges.
Keep in mind that the center may still have a little softness when the pan comes out of the oven. It will continue to set as the bars cool and chill.
Avoid cutting into the dessert while it’s still hot because the cheesecake layer needs time to firm up.
Step 10: Cool the Bars Completely
Remove the pan from the oven and place it on a heat-safe surface.
Allow the dessert to cool completely at room temperature.
This step is important because placing a hot cheesecake dessert directly into the refrigerator can create excess condensation and affect the texture.
Once completely cooled, cover the pan.
Step 11: Refrigerate Until Firm
Transfer the covered pan to the refrigerator.
Chill for at least 3 hours.
This gives the cheesecake enough time to firm up and allows the different layers to hold together properly.
For the cleanest slices, make sure the bars are thoroughly chilled before removing them from the pan.
Step 12: Add the Salted Caramel Drizzle
Once the cheesecake bars are chilled, remove the pan from the refrigerator.
Warm the salted caramel sauce slightly if needed to make it easier to drizzle.
Pour the caramel over the top of the crisp topping, distributing it evenly across the surface.
Sprinkle the 1/4 teaspoon flaky sea salt over the caramel.
The caramel adds a rich sweetness, while the flaky salt creates a delicious sweet-and-salty finish.
Step 13: Lift and Slice the Bars
Use the parchment paper overhang to carefully lift the dessert out of the baking pan.
Place it on a cutting board.
Using a sharp knife, cut the dessert into 16 equal bars.
For cleaner slices, wipe the knife between cuts.
Try to cut straight down through all the layers so each bar keeps its shape.
Step 14: Serve and Enjoy
Arrange the bars on a serving platter and serve chilled.
Each bar should have a buttery graham cracker base, creamy cheesecake, tender cinnamon apples, crunchy oat topping, and a beautiful salted caramel finish.
Enjoy!
Tips for Perfect Salted Caramel Apple Crisp Cheesecake Bars
A few simple techniques can help you get the best results every time you make this recipe.
Soften the Cream Cheese Before Mixing
Cold cream cheese can create lumps in the cheesecake filling.
Allowing it to soften before mixing makes it easier to blend with the sugar and eggs.
The result is a smoother, creamier cheesecake layer.
Press the Graham Cracker Crust Firmly
A loosely packed crust can crumble when you cut the bars.
Use the bottom of a measuring cup to press the crumbs firmly into an even layer.
Make sure the corners are packed well so the crust holds together after chilling.
Slice the Apples Thinly and Evenly
Thin apple slices cook more evenly than thick chunks.
Try to keep the slices similar in thickness so they soften at roughly the same rate.
This also makes the finished bars easier to cut and enjoy.
Don’t Skip the Lemon Juice
Lemon juice adds brightness to the apple filling and balances the sweetness of the sugars.
It also helps keep the apple flavor fresh and lively.
Keep the Crisp Topping Crumbly
When mixing the melted butter into the oats, flour, sugar, cinnamon, and salt, stop once coarse crumbs form.
You don’t want to turn the mixture into a smooth dough.
The crumbly texture is what gives the dessert its classic apple crisp finish.
Watch the Baking Time
The topping should be golden brown, and the cheesecake edges should be set.
Start checking toward the end of the recommended baking window.
Ovens can vary, so use the appearance and texture of the dessert as your guide.
Let the Bars Chill Long Enough
Chilling is one of the most important steps in this recipe.
The cheesecake layer needs time to firm up, and the crust needs time to hold together.
At least three hours in the refrigerator is recommended.
Add the Caramel After Chilling
Drizzling the salted caramel over the chilled bars makes it easier to create an attractive finish.
It also helps prevent the caramel from mixing too much with the soft cheesecake layer.
Common Mistakes to Avoid
Even though this recipe is straightforward, there are a few things worth keeping in mind.
Using cold cream cheese: This can make the cheesecake filling lumpy. Let it soften before mixing.
Not pressing the crust firmly: A loose crust may crumble when the bars are lifted and sliced.
Cutting the apples too thick: Thick apple pieces may remain firmer after baking and make the bars harder to slice.
Overmixing the cheesecake filling: Excessive mixing after adding the eggs can incorporate too much air into the batter.
Making the crisp topping too wet: Add the melted butter as directed and mix until coarse crumbs form.
Removing the bars too early: The cheesecake needs enough cooling and chilling time to become firm.
Skipping the parchment paper overhang: The extra parchment makes it much easier to lift the dessert out of the baking pan without damaging the layers.
How to Get Clean, Beautiful Cheesecake Bar Slices
One of the best things about making cheesecake bars is how easy they are to serve individually.
However, getting neat slices can be a little tricky when you’re working with multiple layers.
Here are a few tips.
First, make sure the bars have chilled for at least three hours. A fully chilled cheesecake layer is much easier to cut than a warm or slightly soft one.
Next, use the parchment overhang to lift the dessert out of the pan carefully.
Place it on a large cutting board and use a long, sharp knife.
Cut straight down rather than using a back-and-forth sawing motion. This helps keep the layers from shifting.
After each cut, wipe the blade clean with a damp cloth or paper towel.
If the caramel is particularly sticky, cleaning the knife between cuts becomes even more helpful.
For an attractive presentation, aim for 16 evenly sized bars.
Easy Ways to Customize This Apple Crisp Cheesecake Recipe
The original recipe has a wonderful balance of flavors, but there are a few ways to change the presentation or add variety while keeping the main recipe intact.
Use a Combination of Apples
Try mixing sweet and tart apple varieties.
Granny Smith apples provide a tangy contrast, while Honeycrisp apples bring natural sweetness.
A combination gives the filling a more complex apple flavor.
Make the Caramel Drizzle More Generous
If you’re a big caramel fan, you can serve a little extra salted caramel sauce on the side.
This is especially delicious when serving the bars at a holiday gathering.
Add a Little Extra Cinnamon for Serving
A very light sprinkle of cinnamon over the finished bars can enhance their warm fall flavor.
Keep the original recipe quantities unchanged if you’re following the recipe exactly.
Serve With Vanilla Ice Cream
A scoop of vanilla ice cream alongside a chilled cheesecake bar creates a delicious contrast.
The creamy vanilla flavor pairs beautifully with the apples, cinnamon, and salted caramel.
What to Serve With Salted Caramel Apple Crisp Cheesecake Bars
These bars are rich enough to stand on their own, but they also pair wonderfully with a few simple additions.
Vanilla Ice Cream
Vanilla ice cream is one of the best pairings for apple desserts.
Its cool, creamy texture contrasts with the crunchy oat topping and warm cinnamon flavors.
Fresh Whipped Cream
A small dollop of whipped cream adds a light and airy texture.
It also complements the rich cheesecake filling without competing with the salted caramel.
Hot Coffee
The slightly bitter flavor of coffee balances the sweetness of the apples and caramel.
Serve a slice with a cup of freshly brewed coffee for an easy afternoon treat.
Hot Apple Cider
For a cozy fall dessert, pair these bars with a warm mug of apple cider.
The apple flavors complement each other beautifully.
Black Tea
A cup of black tea is another great option, especially if you prefer something simple alongside a rich dessert.
How to Store Salted Caramel Apple Crisp Cheesecake Bars
Because these bars contain cream cheese and eggs, they should be stored in the refrigerator.
Allow the dessert to cool completely before covering and refrigerating it.
Place leftover bars in an airtight container or keep them covered in the original baking pan.
For the best quality, enjoy them within 3–4 days.
The graham cracker crust and cheesecake layer will stay delicious, although the oat topping may gradually soften as it sits in the refrigerator.
For the best texture, keep the bars chilled until you’re ready to serve them.
Can You Freeze Apple Crisp Cheesecake Bars?
Yes, cheesecake bars can generally be frozen, although the texture of the apple and oat layers may change slightly after thawing.
For the best results, freeze the bars before adding the salted caramel drizzle and flaky sea salt.
Once the bars are completely chilled and firm, cut them into individual portions.
Wrap each portion tightly in plastic wrap, then place the wrapped bars in a freezer-safe airtight container.
When you’re ready to enjoy them, transfer the desired number of bars to the refrigerator and allow them to thaw slowly.
Add the salted caramel sauce and flaky sea salt after thawing for the best presentation.
Avoid leaving cheesecake bars out at room temperature for extended periods.
Can You Make Salted Caramel Apple Crisp Cheesecake Bars Ahead of Time?
Absolutely!
This is one of the best things about this dessert.
The cheesecake bars need at least three hours of refrigeration to set properly, so preparing them ahead of time is a natural fit.
You can bake the entire dessert, let it cool completely, and refrigerate it overnight.
When you’re ready to serve, lift it from the pan using the parchment paper, cut it into 16 bars, and finish with the salted caramel sauce and flaky sea salt.
Making the dessert ahead of time also gives you one less thing to worry about when preparing a holiday meal or party menu.
When to Serve These Apple Cheesecake Bars
These Salted Caramel Apple Crisp Cheesecake Bars are versatile enough for many occasions.
Thanksgiving Dessert
Apple desserts are always a welcome addition to Thanksgiving.
These bars offer something a little different from traditional apple pie while still delivering familiar fall flavors.
Christmas Gatherings
The combination of cinnamon, apples, and caramel makes these bars a wonderful choice for Christmas dessert tables.
Their individual portions also make serving guests easy.
Fall Potlucks
If you’re bringing dessert to a potluck, these bars are a great option.
They’re easy to transport in a covered baking pan and can be sliced ahead of time.
Birthday Parties
For anyone who loves cheesecake and caramel desserts, these bars make a delicious alternative to a traditional birthday cake.
Weekend Family Desserts
You don’t need a special occasion to enjoy them.
They’re a fun baking project when you’re craving something homemade and comforting.
Frequently Asked Questions
Can I use a different type of crust?
This recipe uses graham cracker crumbs, melted unsalted butter, and light brown sugar for the crust.
Graham crackers provide a classic buttery base that complements the cheesecake and apple layers.
Do I have to peel the apples?
The recipe calls for peeled apples. Peeling them helps create a softer, more consistent texture in the filling.
Why is flour added to the apple filling?
The flour helps absorb some of the moisture released by the apples during baking. This helps the filling maintain a better consistency.
Can I use quick oats instead of old-fashioned rolled oats?
Old-fashioned rolled oats are recommended because they create a more noticeable crisp texture.
Quick oats may produce a slightly different topping texture.
Why does the cheesecake need to chill for three hours?
Chilling allows the cheesecake layer to become firm enough to hold its shape.
It also makes it easier to lift the dessert from the pan and cut it into clean bars.
Can I use homemade salted caramel sauce?
Yes! Homemade salted caramel sauce works beautifully in this recipe.
You can also use your favorite store-bought version to save time.
When should I add the flaky sea salt?
Add the flaky sea salt after drizzling the salted caramel sauce over the chilled bars.
This helps the salt remain visible and creates a lovely finishing touch.
Why is my crisp topping not crunchy?
The topping may soften as it absorbs moisture from the apples and cheesecake.
For the best texture, make sure the topping is baked until golden brown and allow the dessert to cool and chill as directed.
Can I prepare the cheesecake bars the night before?
Yes! These bars are excellent when prepared a day ahead.
Bake them, cool completely, and refrigerate overnight. Add the caramel and flaky sea salt before serving.
How many bars does this recipe make?
This recipe makes 16 bars when cut into equal portions using a 9-by-13-inch baking pan.
Should I serve these bars warm or cold?
These bars are designed to be served chilled because the cheesecake layer needs to remain firm.
You can let them sit briefly before serving, but keep them refrigerated when not being served.
Can I use salted butter instead of unsalted butter?
The original recipe uses unsalted butter in both the crust and crisp topping.
Using salted butter would change the overall salt balance, especially because the finished dessert also includes flaky sea salt.
For the intended flavor, stick with unsalted butter.
Can I make this recipe without the caramel drizzle?
The salted caramel is part of what makes this dessert special, but the bars will still have delicious apple, cheesecake, and crisp layers without it.
For the full salted caramel apple crisp flavor, finish with the caramel sauce and flaky sea salt as directed.
Recipe Details
- Recipe Name: Salted Caramel Apple Crisp Cheesecake Bars
- Prep Time: 30 minutes
- Cook Time: 58 minutes
- Chilling Time: 3 hours
- Total Time: 4 hours 28 minutes
- Servings: 16 bars
- Course: Dessert
- Cuisine: American
- Difficulty: Intermediate
- Main Ingredients: Apples, cream cheese, graham cracker crumbs, rolled oats, salted caramel
- Cooking Method: Baking
Salted Caramel Apple Crisp Cheesecake Bars
Ingredients
For the Crust
- 2 cups graham cracker crumbs
- 1/2 cup unsalted butter, melted
- 3 tablespoons light brown sugar
For the Cheesecake Layer
- 16 ounces cream cheese, softened
- 1/2 cup granulated sugar
- 2 large eggs
- 1 teaspoon vanilla extract
For the Apple Filling
- 4 medium apples, peeled, cored, and thinly sliced
- 2 tablespoons granulated sugar
- 2 tablespoons light brown sugar
- 2 tablespoons all-purpose flour
- 1 teaspoon ground cinnamon
- 1/4 teaspoon ground nutmeg
- 1 tablespoon lemon juice
For the Crisp Topping
- 3/4 cup old-fashioned rolled oats
- 1/2 cup all-purpose flour
- 1/3 cup light brown sugar
- 1/2 teaspoon ground cinnamon
- 1/4 teaspoon salt
- 1/2 cup unsalted butter, melted
For the Drizzle
- 1/2 cup salted caramel sauce
- 1/4 teaspoon flaky sea salt
Instructions
- Preheat the oven to 350°F (175°C). Line a 9-by-13-inch baking pan with parchment paper, leaving an overhang.
- Combine the graham cracker crumbs, melted butter, and light brown sugar. Press firmly into the prepared pan. Bake for 8 minutes and allow to cool slightly.
- Beat the softened cream cheese and granulated sugar until smooth. Mix in the eggs one at a time, then add the vanilla extract. Spread the cheesecake filling over the crust.
- Toss the sliced apples with the granulated sugar, light brown sugar, flour, cinnamon, nutmeg, and lemon juice. Arrange the apple mixture over the cheesecake filling.
- Combine the rolled oats, flour, brown sugar, cinnamon, and salt for the topping. Stir in the melted butter until coarse crumbs form. Sprinkle evenly over the apples.
- Bake for 45–50 minutes, until the topping is golden brown and the cheesecake edges are set.
- Cool completely at room temperature. Cover and refrigerate for at least 3 hours.
- Drizzle with salted caramel sauce and sprinkle with flaky sea salt.
- Lift the dessert out using the parchment paper overhang and cut into 16 bars.
- Serve chilled and enjoy!
Final Thoughts
These Salted Caramel Apple Crisp Cheesecake Bars are the kind of dessert that brings together everything we love about homemade fall baking.
The buttery graham cracker crust gives each bar a delicious foundation, while the creamy cheesecake adds richness and a smooth texture. The cinnamon-spiced apples bring that familiar apple crisp flavor, and the golden oat topping adds the perfect amount of crunch.
But the salted caramel is what really makes these bars unforgettable. Its buttery sweetness, combined with a little flaky sea salt, ties all the layers together beautifully.
Whether you’re making them for Thanksgiving, Christmas, a family gathering, or simply because you’re craving something sweet, these cheesecake bars are sure to be a hit.
Prepare them ahead of time, let them chill until perfectly firm, add that gorgeous caramel drizzle, and serve each slice chilled.
One bite is all it takes to understand why this combination of apple crisp, cheesecake, and salted caramel is so hard to resist!