Indulge in this rich, creamy Nutella Mousse Cake—a decadent dessert that makes all your chocolate dreams come true! This spectacular, no-bake layered masterpiece fuses a deeply decadent, buttery chocolate biscuit crust with a velvety, air-whipped hazelnut chocolate mousse crown.
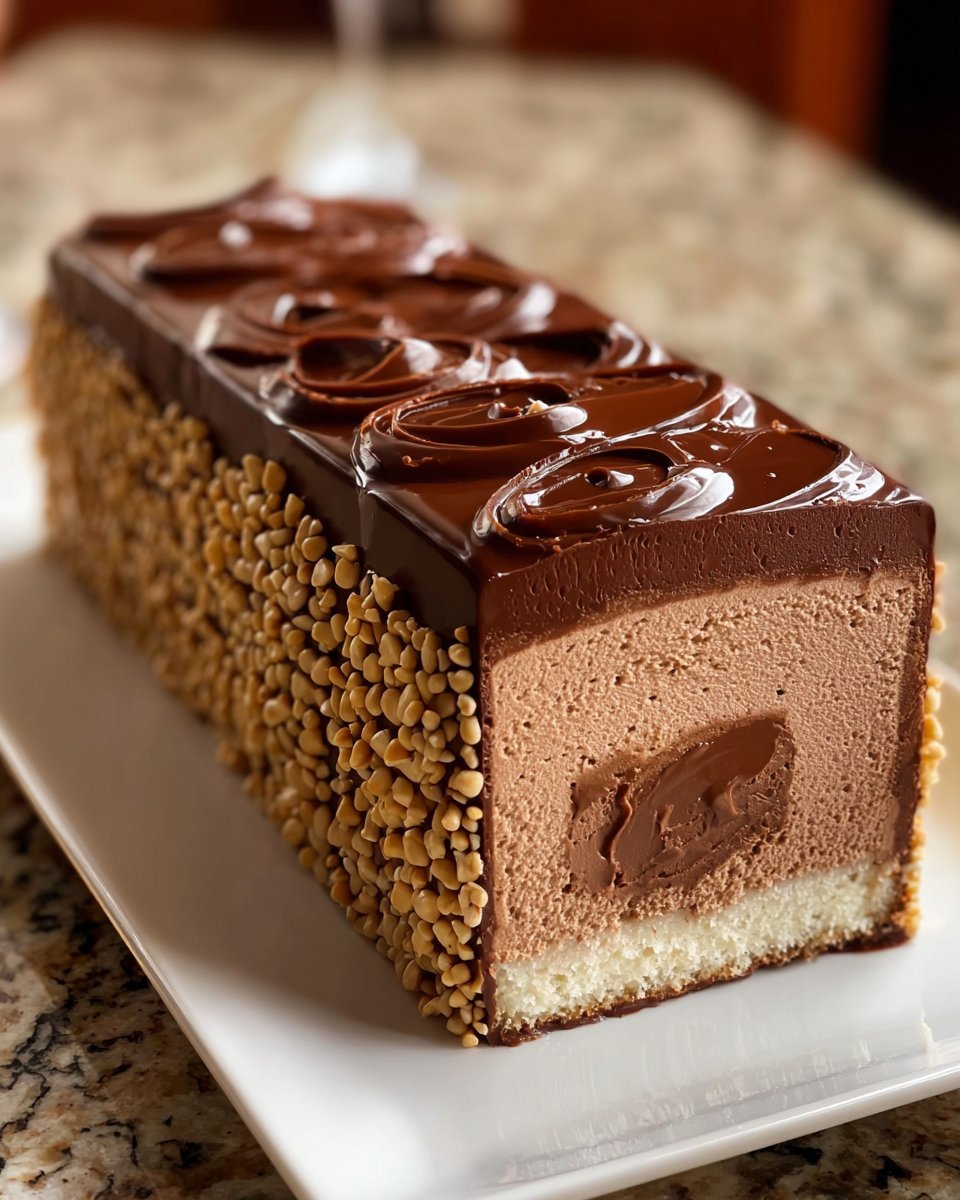
By gently folding beautifully structured whipped cream into smooth, creamy Nutella, you unlock a cloud-like texture that pairs perfectly with a classic chocolate crunch. It is the ultimate showstopping centerpiece for summer gatherings, milestone birthday parties, or any weekend baking triumph that demands maximum elegance with effortless preparation.
Why You Will Love This Layered Delight
-
No-Bake Mousse Convenience: Keep your kitchen completely cool! Once your quick biscuit crust is pressed, the entire luscious filling sets up beautifully in the chill of your refrigerator.
-
Flawless, Air-Whipped Texture: The harmony of rich hazelnut spread and stiff-peaked heavy cream creates a velvet-smooth mouthfeel that melts instantly on the tongue.
-
The Ultimate Crowd-Pleaser: Packed with iconic, globally loved hazelnut chocolate flavor notes, this dessert is an absolute hit with kids and adults alike at any celebration.
-
Beautiful Presentation Contrast: The striking visual contrast between the crisp, dark chocolate biscuit base and the thick, luxurious mousse layer makes it an instant showstopper.
 Prep Time: 30 mins   |   Cook Time: 0 mins   |   Chill Time: 4 hrs minimum
 Course: Dessert      |   Cuisine: American   |   Yield: 8 - 10 exquisite servings
Ingredients Checklist
To ensure your mousse achieves a perfectly seamless, lump-free texture, make sure your heavy cream is ice-cold before you begin mixing so it traps enough air to build rigid, stable volume.
For the Decadent Biscuit Crust
-
1 cup Chocolate Biscuits: Crushed into a fine sand to build a sturdy, deeply flavorful foundation.
-
2 tablespoons Unsalted Butter (Melted): Binds the dry biscuit crumbs so they compress cleanly into your pan.
For the Velvety Nutella Mousse Filling
-
1 cup Nutella: The star ingredient; provides a rich, creamy, and instantly recognizable hazelnut-chocolate character.
-
1 cup Heavy Cream: Must be deeply chilled straight from the fridge to guarantee maximum volume when whipped.
-
½ cup Powdered Sugar: Dissolves effortlessly to ensure an impeccably smooth, grit-free finish.
-
1 teaspoon Vanilla Extract: Infuses the cream base with a warm, elegant pastry-shop aroma.
For the Finishing Touch Garnish
-
Chocolate Shavings or Hazelnuts: Provides a beautiful rustic texture and a high-end visual pop right before slicing.
Step-by-Step Instructions
Follow these clear, chronological directions to press your crust, whip your velvety filling, and perfectly set your hazelnut chocolate masterpiece.
1. Construct the Biscuit Base
-
Lightly grease the vertical sides of a standard springform pan (an 8-inch or 9-inch pan works beautifully for gorgeous slice height).
-
In a medium-sized bowl, thoroughly combine your 1 cup of crushed chocolate biscuits and 2 tablespoons of melted unsalted butter until the crumbs are uniformly moistened and resemble wet sand.
-
Transfer the mixture into the bottom of your springform pan. Using the flat bottom of a glass or a measuring cup, press the crumbs firmly and evenly across the base to form a highly compact, solid foundation.
-
Pop the crust into the refrigerator to chill and set for exactly 15 minutes.
2. Whip the Heavy Cream Matrix
-
In a deeply chilled mixing bowl, pour your 1 cup of cold heavy cream. Using an electric hand mixer or a stand mixer fitted with the whisk attachment, whip on medium-high speed until soft peaks form.
-
Add in the ½ cup of powdered sugar and 1 teaspoon of vanilla extract.
-
Continue whipping vigorously on high speed until the mixture expands and holds stiff peaks firmly in the air when the beaters are lifted.
3. Fold and Assemble the Mousse
-
In a separate, large mixing bowl, stir your 1 cup of Nutella briefly until it is completely smooth, fluid, and creamy.
-
The Gentle Fold: Add the stiff whipped cream to the Nutella in parts (working in thirds is ideal). Using a flexible rubber spatula, cut down through the center, sweep around the bottom of the bowl, and fold the cream over using an under-and-over motion. Repeat this patiently just until completely incorporated and no brown or white streaks remain. Be exceptionally gentle here; over-mixing will pop the microscopic air bubbles inside the cream, causing your mousse to turn loose and runny rather than fluffy and sliceable.
-
Pour the heavenly, luscious Nutella mousse directly over your chilled chocolate biscuit crust inside the springform pan. Use your spatula or an offset tool to spread it evenly and smooth the top surface into a flat, pristine sheet.
4. Chill, Garnish, and Serve
-
Transfer the pan to the refrigerator and let it chill undisturbed for a minimum of 4 hours (or overnight) until the mousse has set up completely firm.
-
The Clean-Molding Secret: Once set, run a thin plastic knife carefully around the interior edge of the springform pan before opening the latch. Release the outer collar to reveal your gorgeous, clean borders.
-
Just before serving, sprinkle the top generously with chocolate shavings or crushed hazelnuts for that perfect finishing touch. Grab those forks and get ready to impress your friends!
Pro Presentation Secrets
The Flawless Slice Hack: Because this mousse features a delicate, air-whipped dairy texture sitting over a firm biscuit base, never drag your knife through the cake. To secure pristine, professional vertical lines that showcase the distinct boundary between the crust and the mousse, dip a long, sharp chef’s knife into a tall glass of hot water. Wipe it completely dry with a clean towel, and make one swift cut downward. Slide the knife out from the bottom edge rather than pulling it back up, and wipe the blade completely spotless before making your next cut.
Storage and Freshness Guidelines
-
In the Refrigerator: Because this dessert features a light, air-whipped dairy mousse without gelatin, it must always stay cold. Keep it covered tightly under a plastic cake dome or inside an airtight container in the fridge for up to 3 days.
-
Garnish Advice: If you are using roasted hazelnuts for your garnish, wait to sprinkle them on until right before serving. This ensures the nuts retain their crisp, toasted crunch rather than softening from the humidity of the refrigerator overnight.
Nutritional Summary
| Metric | Details |
| Yield | 8 – 10 uniform, decadent portions |
| Setting Time | 4 hours minimum in the refrigerator |
| Texture Profile | Crisp, buttery chocolate biscuit crunch holding a feather-light, velvet hazelnut cream crown. |
Frequently Asked Questions (FAQs)
My Nutella is too stiff to fold into the whipped cream. How can I fix it?
If your kitchen is cool, Nutella can sometimes become dense and difficult to stir. If it feels too stiff, simply pop the Nutella into a microwave-safe bowl and heat it for 5 to 8 seconds (no longer!). You want it to reach a comfortable room temperature so it flows smoothly, but it must not be warm to the touch, or it will instantly melt the whipped cream fats when you try to fold them together.
Can I use a regular cake pan instead of a springform pan?
While a springform pan is highly recommended because its removable outer collar lets you showcase the gorgeous layers of the cake, you can use a regular cake pan in a pinch. To do this, line the bottom and sides of your regular pan with plastic cling wrap, leaving plenty of overhang on the sides. Once the cake has fully set in the fridge, you can use the overlapping plastic wrap to gently lift the entire cake up and out of the pan.
Final Thoughts
This Nutella Mousse Cake represents the absolute height of playful, high-reward dessert styling. By honoring the multi-part folding technique and protecting your whipped cream with a gentle, patient hand, you guarantee an immaculate centerpiece that perfectly celebrates a timeless hazelnut chocolate combination.
Try Also: Irresistible Dessert Ideas from
-
What is Dubai Chocolate Bar Made Of? Key Ingredients Explained
-
Rose Milk Cake Recipe
-
Strawberry Cheesecake Dump Cake Recipe
Be sure to Print Recipe or Pin Recipe so you have these essential air-folding and clean-slicing hacks completely handy for your next casual dinner party or holiday gathering! Feel free to share your stunning creations online using #NutellaMousseCake, #ChocolateLovers, #DessertGoals, #Yummy, and #BakingJoy to inspire your fellow dessert enthusiasts!
Nutella Mousse Cake
- Total Time: 270 minutes
- Yield: 8 - 10 servings 1x
- Diet: Vegetarian
Description
Indulge in this rich, creamy Nutella Mousse Cake—a decadent no-bake dessert layered with a buttery chocolate biscuit crust and velvety hazelnut chocolate mousse.
Ingredients
- 1 cup Chocolate Biscuits, crushed
- 2 tablespoons Unsalted Butter, melted
- 1 cup Nutella
- 1 cup Heavy Cream, chilled
- ½ cup Powdered Sugar
- 1 teaspoon Vanilla Extract
- Chocolate Shavings or Hazelnuts for garnish
Instructions
- Construct the Biscuit Base: Lightly grease the sides of a springform pan. Combine crushed chocolate biscuits and melted butter, then press into the base. Chill for 15 minutes.
- Whip the Heavy Cream Matrix: In a chilled bowl, whip the heavy cream until soft peaks form. Add powdered sugar and vanilla, then whip until stiff peaks form.
- Fold and Assemble the Mousse: Stir Nutella until smooth, then gently fold in the whipped cream until fully incorporated. Pour over chilled crust.
- Chill, Garnish, and Serve: Refrigerate for at least 4 hours. Garnish with chocolate shavings or hazelnuts before serving.
Notes
Keep the mousse covered while chilling to maintain freshness. Use a hot knife for clean slices.
- Prep Time: 30 minutes
- Cook Time: 0 minutes
- Category: Dessert
- Method: No-Bake
- Cuisine: American
Nutrition
- Serving Size: 1 slice
- Calories: 400
- Sugar: 30g
- Sodium: 150mg
- Fat: 25g
- Saturated Fat: 10g
- Unsaturated Fat: 12g
- Trans Fat: 0g
- Carbohydrates: 45g
- Fiber: 2g
- Protein: 5g
- Cholesterol: 30mg
Keywords: Nutella, mousse, cake, dessert, no-bake