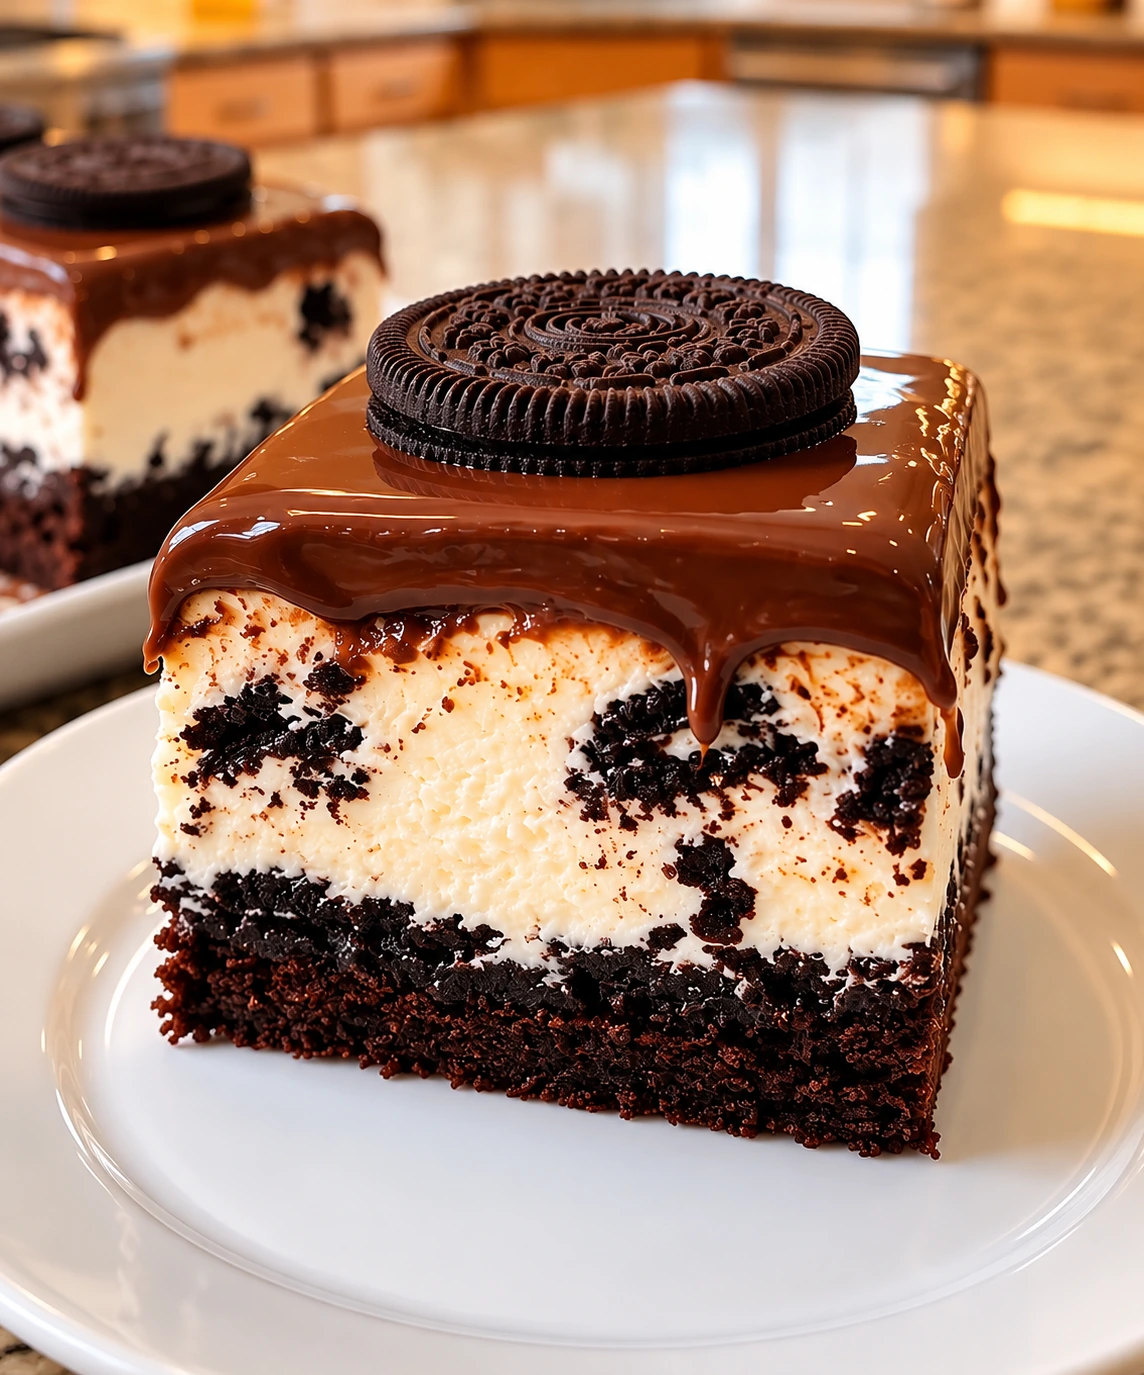
If you love Oreos and creamy cheesecake, these No-Bake Oreo Cheesecake Bars are the perfect dessert to make when you want something rich, chocolatey, and incredibly easy. With a crunchy Oreo cookie crust, a smooth cheesecake filling packed with chopped Oreos, and a silky milk chocolate topping, every bite delivers the perfect combination of textures and flavors.
The best part? There is no oven required. These cheesecake bars are prepared in the refrigerator, making them an excellent dessert for warm days, holidays, parties, birthdays, family gatherings, or whenever a simple chocolate dessert is calling your name.
The recipe starts with a firm Oreo wafer crust made from crushed Oreo cookies and melted butter. The crust is topped with a light and creamy cheesecake mixture made with cream cheese, sugar, whipped cream, and chopped Oreos. After the cheesecake has chilled and become firm, a smooth milk chocolate ganache is spread over the top and finished with whole and halved Oreo cookies.
The result is a beautiful no-bake dessert that looks impressive but requires surprisingly little effort.
Why You’ll Love These No-Bake Oreo Cheesecake Bars
There are plenty of reasons this recipe deserves a place in your dessert rotation.
No Oven Required
One of the biggest advantages of this recipe is that you don’t need to turn on the oven. Everything comes together through mixing, layering, chilling, and decorating.
Rich Oreo Flavor
Oreos are used in multiple parts of the recipe. They create the crust, add crunchy cookie pieces to the cheesecake filling, and provide a decorative finish on top.
Creamy Cheesecake Filling
The combination of softened cream cheese and freshly whipped heavy cream creates a smooth, fluffy filling with a delicious cheesecake texture.
Chocolate Ganache Topping
The milk chocolate topping adds another layer of richness and gives the bars a glossy, elegant finish.
Great for Make-Ahead Desserts
These bars actually benefit from chilling. Preparing them several hours ahead or the night before allows the filling to become firm and easy to slice.
Perfect for Parties
Because the cheesecake is prepared in a square pan and cut into individual bars, it is easy to serve at parties, potlucks, birthdays, and family gatherings.
Ingredients for No-Bake Oreo Cheesecake Bars
You only need a handful of ingredients to make these decadent cheesecake bars.
For the Oreo Crust
- 18 Oreo cookies, cream filling removed
- 4 tablespoons unsalted butter, melted
Removing the cream filling from the cookies creates a firmer, cleaner crust. The chocolate wafers are combined with melted butter to create a compact base that holds together beautifully once chilled.
For the Cheesecake Filling
- 300 g cream cheese, softened to room temperature
- 70 g granulated sugar
- 150 g heavy whipping cream
- 10 Oreo cookies, roughly chopped
The cream cheese provides the classic cheesecake flavor, while whipped heavy cream makes the filling light and fluffy. Chopped Oreo cookies add texture and extra chocolate-cookie flavor throughout the filling.
For the Chocolate Topping
- 150 g milk chocolate, finely chopped
- 50 g heavy whipping cream
- 3 whole Oreo cookies, for garnish
- 3 Oreo cookies, halved, for garnish
The chocolate and cream combine to create a smooth ganache that spreads easily over the chilled cheesecake.
How to Make No-Bake Oreo Cheesecake Bars
Step 1: Prepare the Pan
Start by preparing an 8×8-inch square pan.
Line the pan with parchment paper, leaving some parchment hanging over two opposite sides. These overhanging edges will act as handles, making it much easier to lift the finished cheesecake out of the pan.
Press the parchment against the bottom and sides as neatly as possible.
Set the prepared pan aside.
Step 2: Make the Oreo Crust
Carefully twist apart the 18 Oreo cookies and remove the cream filling.
Place the chocolate wafers into a food processor and pulse until they become fine, even crumbs.
If you don’t have a food processor, you can place the cookies into a sturdy zip-top bag and crush them with a rolling pin.
The finer the crumbs, the more compact and uniform your crust will be.
Transfer the cookie crumbs to a mixing bowl.
Add the melted unsalted butter and stir thoroughly until all of the crumbs are coated.
The mixture should resemble damp sand and should hold together when pressed.
Transfer the mixture to the prepared pan.
Using the flat bottom of a glass, measuring cup, or small jar, firmly press the crumbs into an even layer.
Pay particular attention to the corners and edges.
A firmly packed crust will give the finished cheesecake bars a stable base that is easier to slice.
Place the pan in the refrigerator while you prepare the cheesecake filling.
Step 3: Prepare the Cheesecake Filling
Make sure your cream cheese has softened completely to room temperature before beginning.
Place the cream cheese into a large mixing bowl.
Using an electric mixer on medium speed, beat the cream cheese until it is completely smooth and fluffy.
There should be no visible lumps.
Add the granulated sugar and continue mixing until the sugar is fully incorporated and the mixture is creamy and smooth.
At this stage, the cream cheese mixture should have a silky consistency.
Whip the Heavy Cream
Pour the heavy whipping cream into a separate clean bowl.
For the best results, use a cold mixing bowl and cold beaters.
Beat the cream with an electric mixer until stiff peaks form.
Stiff peaks mean that when you lift the beaters, the whipped cream holds its shape rather than falling back into the bowl.
Be careful not to overbeat the cream, as it can eventually become grainy and begin turning into butter.
Fold the Whipped Cream Into the Cheesecake
Add the whipped cream to the cream cheese mixture in two or three additions.
Use a rubber spatula and gently fold the ingredients together.
Don’t aggressively stir the mixture.
Gentle folding helps preserve the air incorporated into the whipped cream, which gives the cheesecake filling its light and fluffy texture.
Continue folding until the mixture is evenly combined.
Finally, add the roughly chopped Oreo cookies.
Fold them gently into the cheesecake mixture until the cookie pieces are distributed throughout.
Step 4: Fill the Pan and Chill
Remove the Oreo crust from the refrigerator.
Spoon the cheesecake filling over the chilled crust.
Use a spatula to spread the filling evenly across the entire surface.
Smooth the top as much as possible.
Gently tap the pan against the counter a couple of times to help release any large air pockets.
Cover the pan with plastic wrap.
Place it in the refrigerator for at least 4 to 6 hours.
For the best results, refrigerate the cheesecake overnight.
The longer chilling time allows the filling to become firmer, making it easier to cut into clean, attractive bars.
Step 5: Make the Chocolate Ganache
Once the cheesecake has fully set, prepare the chocolate topping.
Place the finely chopped milk chocolate into a heatproof bowl.
Heat the heavy whipping cream in a small saucepan over medium heat.
You want the cream to become hot and just begin to simmer.
Don’t allow it to boil aggressively.
Pour the hot cream directly over the chopped chocolate.
Let the mixture sit undisturbed for approximately 2 minutes.
This resting period gives the hot cream time to soften the chocolate.
After 2 minutes, slowly stir from the center outward.
Continue stirring until the chocolate has completely melted and the mixture becomes smooth, glossy, and uniform.
Allow the ganache to cool for approximately 5 to 10 minutes.
It should thicken slightly while remaining easy to pour and spread.
Step 6: Add the Chocolate Topping
Remove the fully chilled cheesecake from the refrigerator.
Pour the slightly cooled chocolate ganache over the cheesecake layer.
Use a spatula to gently spread the ganache into an even layer.
Work carefully so you don’t disturb the cheesecake underneath.
The ganache should create a smooth chocolate surface.
Step 7: Decorate With Oreos
Now comes the fun part.
Arrange the 3 whole Oreo cookies and 6 Oreo halves over the chocolate topping.
You can create any arrangement you like.
For a clean presentation, space the cookies evenly across the surface so that each bar receives a decorative Oreo piece.
Once decorated, return the pan to the refrigerator for approximately 15 to 20 minutes.
This allows the chocolate topping to set.
Step 8: Slice the Cheesecake Bars
Once the topping has firmed up, use the parchment paper overhang to carefully lift the entire cheesecake out of the pan.
Place it onto a cutting board.
Use a sharp knife to cut the cheesecake into 9 to 12 bars, depending on your preferred serving size.
For professional-looking cuts, run the knife blade under hot water.
Wipe the blade completely dry.
Make one cut.
Repeat the process between each slice.
This technique helps create cleaner edges and prevents the chocolate and cheesecake filling from sticking excessively to the knife.
Tips for Perfect No-Bake Oreo Cheesecake Bars
Use Fully Softened Cream Cheese
This is one of the most important steps.
Cold cream cheese is difficult to beat smoothly and can leave small lumps throughout the filling.
Allow the cream cheese to sit at room temperature for at least 45 minutes before preparing the cheesecake.
Don’t use extremely hot temperatures to soften it because overheating can change its texture.
Chill Your Bowl Before Whipping the Cream
For a more reliable whipped cream, place your mixing bowl and beaters in the freezer for approximately 10 minutes before whipping.
Cold equipment helps the heavy cream whip more efficiently and hold its structure.
This is particularly helpful when making a no-bake cheesecake because the whipped cream contributes to the texture and stability of the filling.
Don’t Overmix the Filling
Once you combine the whipped cream with the cream cheese mixture, use gentle folding motions.
Aggressive mixing can deflate the whipped cream.
The goal is to maintain as much air as possible so the finished cheesecake remains creamy and light.
Chill the Cheesecake Long Enough
Although the cheesecake can be ready after approximately 4 hours, overnight chilling is ideal.
A longer chilling time allows the filling to firm up properly.
This is especially important if you want neat bars that hold their shape after being removed from the pan.
Cool the Ganache Before Adding It
Don’t pour extremely hot ganache directly over the cheesecake.
Hot chocolate can soften the surface of the cheesecake filling.
Allow the ganache to cool for several minutes until it becomes slightly thicker but is still easy to spread.
This will give you a cleaner chocolate layer.
How to Get Clean Cheesecake Bar Slices
If you’re making these bars for guests, presentation matters.
Here are a few simple tricks.
First, make sure the cheesecake is thoroughly chilled.
Second, use a large, sharp knife.
Third, warm the knife under hot water.
Fourth, wipe the knife completely dry.
Finally, make one clean cut instead of repeatedly sawing through the cheesecake.
Clean the knife and repeat for every slice.
This technique gives you smooth layers that clearly show the Oreo crust, creamy cheesecake filling, and chocolate topping.
Can I Make These Oreo Cheesecake Bars Ahead?
Absolutely.
These No-Bake Oreo Cheesecake Bars are an excellent make-ahead dessert.
You can prepare the cheesecake the day before serving and leave it refrigerated overnight.
In fact, overnight chilling is recommended because it allows the filling to become firmer and easier to cut.
You can also prepare the crust and filling earlier in the day, then add the ganache and decorations closer to serving time.
How to Store No-Bake Oreo Cheesecake Bars
Because these bars contain cream cheese and heavy cream, they should be stored in the refrigerator.
Keep them in an airtight container or cover the pan tightly with plastic wrap.
They are best enjoyed chilled.
For the best texture and flavor, consume them within several days.
Avoid leaving the cheesecake at room temperature for extended periods, especially in warm conditions.
Can You Freeze Oreo Cheesecake Bars?
Yes, no-bake cheesecake bars can generally be frozen.
For best results, freeze the cheesecake before cutting it into individual portions.
Wrap it tightly to protect it from freezer odors and freezer burn.
When you’re ready to serve, transfer it to the refrigerator and allow it to thaw gradually.
Once thawed, keep the cheesecake refrigerated until serving.
The texture may be slightly different from freshly prepared cheesecake, but it can still make a convenient make-ahead dessert.
Easy Variations
The basic recipe is delicious, but you can customize these bars in several ways.
Dark Chocolate Oreo Cheesecake Bars
Replace the milk chocolate topping with dark chocolate for a richer and less sweet flavor.
White Chocolate Oreo Cheesecake Bars
Use white chocolate for the ganache to create a beautiful contrast with the dark Oreo crust.
Extra Oreo Cheesecake Bars
Add additional chopped Oreo cookies to the filling if you want even more cookie pieces throughout every bite.
Mini Oreo Cheesecake Bars
Instead of using one large square pan, you can experiment with individual dessert molds or cupcake liners for small portions.
Chocolate Cookie Topping
Crush additional Oreo cookies and sprinkle the crumbs over the ganache before it sets.
What Makes These Bars Different From Traditional Cheesecake?
Traditional cheesecake is usually baked in an oven and often contains eggs.
These No-Bake Oreo Cheesecake Bars don’t require baking.
Instead, the filling gets its structure from chilled cream cheese and whipped cream.
This makes the recipe simpler and eliminates the need to worry about water baths, cracking, oven temperatures, or overbaking.
The result is a softer, creamier dessert with a texture that’s perfect for serving cold.
Perfect Occasions for Oreo Cheesecake Bars
These bars are versatile enough for almost any occasion.
Serve them at:
- Birthday parties
- Family dinners
- Holiday gatherings
- Potlucks
- Afternoon tea
- Baby showers
- Game nights
- Dessert tables
- Weekend gatherings
- Summer parties
- Movie nights
Since they’re made in advance and served cold, they’re particularly convenient when you’re preparing several dishes at once.
Frequently Asked Questions
Do I have to remove the Oreo cream filling?
For this specific crust method, yes. Removing the cream filling helps create a firmer crust when combined with the melted butter.
The Oreo cookies used in the cheesecake filling and decoration can remain whole.
Can I use regular cream cheese?
Yes. Use full-fat cream cheese for the best texture and flavor.
Make sure it is softened to room temperature before beating.
How long should the cheesecake chill?
The minimum recommended chilling time is 4 to 6 hours.
For the firmest texture and cleanest slices, chilling overnight is best.
Can I use a different pan size?
Yes, but changing the pan size will change the thickness of the layers and the final number of bars.
An 8×8-inch pan gives the intended thickness for this recipe.
Why is my cheesecake filling too soft?
The most common reasons are insufficient chilling, cream that wasn’t whipped to stiff peaks, or cream cheese that wasn’t properly incorporated.
Give the cheesecake more refrigerator time before slicing.
Can I make the ganache with dark chocolate?
Yes. Dark chocolate can be substituted if you prefer a stronger chocolate flavor and less sweetness.
No-Bake Oreo Cheesecake Bars Recipe Card
Ingredients
Oreo Crust
- 18 Oreo cookies, cream filling removed
- 4 tablespoons unsalted butter, melted
Cheesecake Filling
- 300 g cream cheese, softened
- 70 g granulated sugar
- 150 g heavy whipping cream
- 10 Oreo cookies, roughly chopped
Chocolate Topping
- 150 g milk chocolate, finely chopped
- 50 g heavy whipping cream
- 3 whole Oreo cookies
- 3 Oreo cookies, halved
Instructions
- Line an 8×8-inch pan with parchment paper.
- Remove the cream filling from 18 Oreos and crush the chocolate wafers into fine crumbs.
- Mix the crumbs with melted butter.
- Press the mixture firmly into the bottom of the pan.
- Refrigerate while preparing the filling.
- Beat softened cream cheese until smooth.
- Add sugar and beat until creamy.
- Whip the heavy cream separately until stiff peaks form.
- Gently fold the whipped cream into the cream cheese mixture.
- Fold in the chopped Oreos.
- Spread the filling over the chilled crust.
- Refrigerate for 4–6 hours or overnight.
- Make the ganache by pouring hot cream over chopped milk chocolate.
- Let it sit for 2 minutes, then stir until smooth.
- Cool for 5–10 minutes.
- Spread the ganache over the chilled cheesecake.
- Decorate with whole and halved Oreos.
- Chill for another 15–20 minutes.
- Lift the cheesecake from the pan.
- Slice into 9–12 bars and serve chilled.
Final Thoughts
These No-Bake Oreo Cheesecake Bars combine everything you want in an indulgent dessert: a crunchy chocolate cookie crust, creamy Oreo cheesecake filling, silky milk chocolate ganache, and plenty of Oreo cookies on top.
They’re especially convenient because you don’t need an oven. Most of the preparation involves simple mixing and layering, while the refrigerator does the hard work of setting the cheesecake.
For the best results, don’t rush the chilling process. Give the cheesecake plenty of time to firm up, preferably overnight. Use softened cream cheese, whip the cream to stiff peaks, fold gently, and let the ganache cool slightly before spreading it over the cheesecake.
When you’re ready to serve, use a warm, clean knife to create neat slices. The contrasting layers make these bars just as attractive as they are delicious.
Whether you’re preparing dessert for a special occasion or simply want an easy Oreo treat for the family, these No-Bake Oreo Cheesecake Bars are a rich, creamy, chocolate-filled dessert that’s sure to disappear quickly.