Are you looking for a dessert that tastes like a sweet, fluffy cloud? Look no further. Today, we are making the most incredible **Marshmallow Cheesecake**.
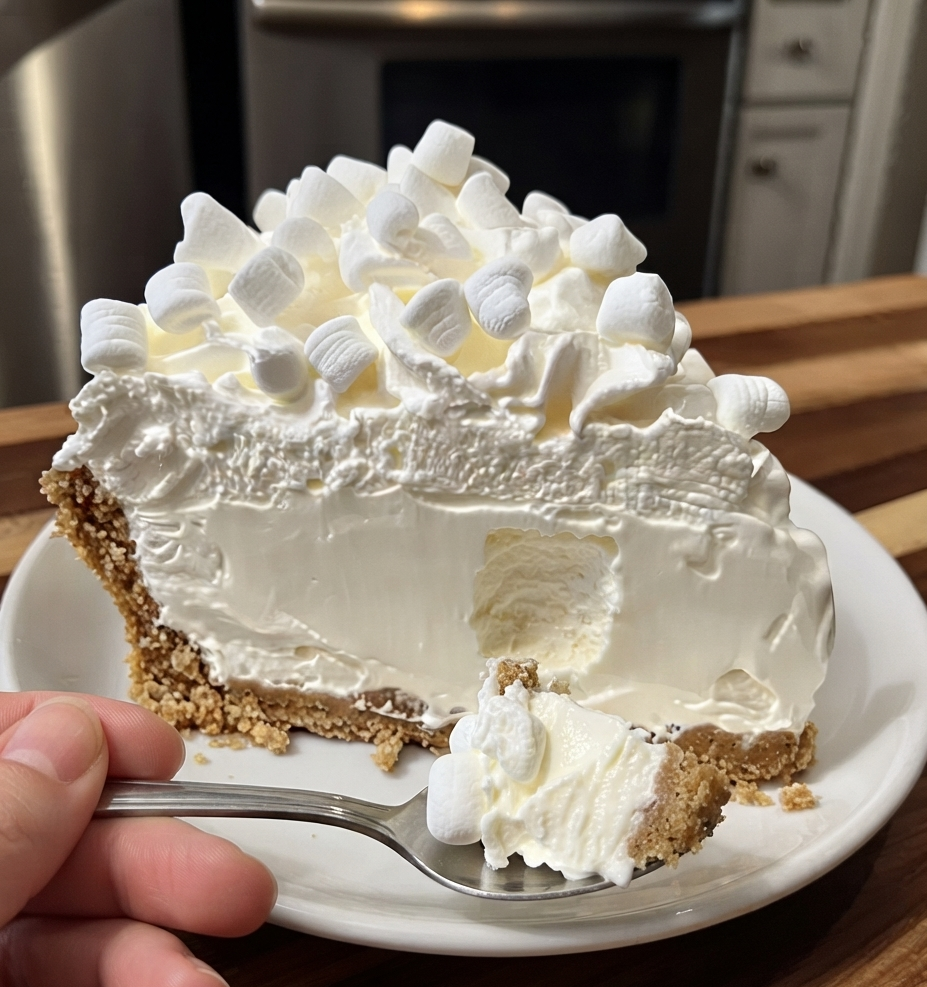
This is not a regular cheesecake. First of all, you do not need an oven. That is right—this is a 100% no-bake dessert! It has a buttery, sweet graham cracker crust at the bottom. On top of that sits a creamy, dreamy marshmallow filling. Finally, it is covered with a light, fluffy marshmallow whip topping.
If you love s’mores, marshmallows, or easy sweet treats, this recipe is going to become your new favorite. It is perfect for summer days when you do not want to turn on the oven, or for any holiday party where you want to impress your guests.
Let’s dive into how you can make this magical marshmallow whip cheesecake at home!
## Why This Marshmallow Cheesecake is the Best
There are thousands of dessert recipes on the internet, but this one stands out from the crowd. Here is why you need to save this recipe right now:
* **Zero Baking Required:** You do not need to use your oven at all. This means your kitchen will not get hot, and you do not have to worry about the cheesecake cracking or sinking while it bakes.
* **Incredible Texture:** Because we use real marshmallow fluff and whipped cream, this cheesecake does not feel heavy. It is light, airy, and melts in your mouth.
* **Amazing S’mores Flavor:** The combination of graham crackers, cream cheese, and marshmallow fluff tastes exactly like a deconstructed s’more, but in an elegant cheesecake form.
* **Perfect for Beginners:** You do not need to be a master baker to make this. If you can mix ingredients in a bowl, you can make this beautiful dessert.
* **Make-Ahead Friendly:** This cheesecake needs time to chill in the fridge, which makes it the perfect recipe to make the day before a big party or family dinner.
## Ingredients You Will Need
To make this fluffy masterpiece, you will need three simple groups of ingredients. You can easily find all of these at your local grocery store.
### For the Graham Cracker Crust:
* **1 ½ cups graham cracker crumbs:** You can buy a box of pre-crushed graham crackers, or you can put whole graham crackers into a plastic bag and crush them with a rolling pin.
* **¼ cup granulated sugar:** Just regular white sugar to sweeten the crust.
* **½ cup unsalted butter, melted:** Make sure the butter is fully melted so it mixes well with the crumbs.
### For the Marshmallow Cheesecake Filling:
* **16 oz (2 blocks) cream cheese, softened:** This is very important. The cream cheese *must* be soft and at room temperature. If it is cold, your filling will have lumps.
* **1 cup powdered sugar:** Also called confectioner’s sugar. This makes the filling sweet and helps it become smooth.
* **1 tsp vanilla extract:** A little bit of vanilla goes a long way to make the flavors taste professional.
* **1 ½ cups marshmallow fluff (marshmallow creme):** This is the secret ingredient that gives the cheesecake its amazing marshmallow flavor and light texture.
* **1 cup heavy whipping cream, whipped to stiff peaks:** You will need to whip this in a separate bowl before adding it.
### For the Fluffy Topping & Garnish:
* **1 cup marshmallow fluff:** More fluff for the top!
* **1 cup heavy whipping cream, whipped to stiff peaks:** More whipped cream to make the topping super light.
* **Mini marshmallows or crushed graham crackers (optional):** We will use these to make the cake look pretty.
—
## Step-by-Step Instructions
Follow these easy steps carefully, and you will have a perfect no-bake cheesecake every single time.
### Step 1: Prepare the Crust
First, grab a medium-sized mixing bowl. Put in the graham cracker crumbs, the granulated sugar, and the melted butter. Stir them together with a spoon or fork. Keep mixing until the mixture looks and feels like wet sand.
Now, take a 9-inch springform pan. (A springform pan is the best choice because you can unclip the sides later to remove the cake easily). Pour the crumb mixture into the pan. Use the bottom of a glass or a measuring cup to press the crumbs down firmly. Press them into the bottom and slightly up the sides of the pan.
Put the pan into the refrigerator to chill while you make the filling. This helps the butter get hard so the crust stays together.
### Step 2: Make the Cheesecake Filling
Take a large bowl. Make sure your softened cream cheese is ready. Using an electric hand mixer or a stand mixer, beat the cream cheese and the powdered sugar together. Mix them on medium speed for about 2 minutes until the mixture is very smooth and creamy. There should be no lumps!
Next, add the 1 teaspoon of vanilla extract and the 1 ½ cups of marshmallow fluff. Turn the mixer back on and beat everything together until it is completely combined. Scrape down the sides of the bowl with a rubber spatula to make sure no fluff is hiding on the bottom.
Now, we need to add the whipped cream. **Important:** Do not use the mixer for this step! Take your 1 cup of heavy whipping cream that you already whipped to stiff peaks in a separate bowl. Use a spatula to gently “fold” the whipped cream into the marshmallow mixture. Folding means you gently scoop from the bottom and pull over the top. Do this slowly so you do not pop the air bubbles in the cream. Keep folding until the mixture looks uniform, airy, and light.
### Step 3: Chill and Set
Take your springform pan out of the refrigerator. Pour the marshmallow cheesecake filling over the chilled graham cracker crust. Use an offset spatula (or a regular spoon) to smooth the top so it is flat and even.
Take a piece of plastic wrap and cover the pan tightly. Put it back into the refrigerator. You must leave it in the fridge for **at least 4 hours**. However, for the best results, I highly recommend leaving it overnight. This gives the cream cheese time to firm up so you can slice it perfectly.
### Step 4: Prepare the Topping and Serve
Once the cheesecake is completely firm, it is time to add the final touch. In a clean bowl, gently fold together the remaining 1 cup of marshmallow fluff and the second cup of whipped heavy cream. Fold them together just like you did before until it is light and fluffy.
Take the cheesecake out of the fridge, remove the plastic wrap, and spread this fluffy topping evenly over the top of the cake.
Now, make it beautiful! Sprinkle mini marshmallows or extra crushed graham crackers on top. Put the cake back into the fridge for 1 to 2 more hours so the topping can set.
When you are ready to eat, unclip the sides of the springform pan, slice the cake, and enjoy!
—
## Secret Tips for the Perfect No-Bake Cheesecake
Even though this recipe is easy, there are a few mistakes that can ruin your dessert. Here are my top pro-tips to guarantee success:
**1. Room Temperature is Everything:**
The number one reason no-bake cheesecakes fail is cold cream cheese. If your cream cheese is cold from the fridge, it will not mix well with the sugar. You will end up with a lumpy, grainy filling. Take the cream cheese out of the fridge at least 2 hours before you start baking.
**2. Whip the Cream Correctly:**
When you whip the heavy cream, make sure you whip it to “stiff peaks.” This means when you pull the mixer beaters out of the cream, the cream stands straight up like a little peak without falling over. If the cream is too runny, your cheesecake will not hold its shape.
**3. Do Not Mix the Whipped Cream Too Hard:**
Whipped cream is full of air. That air is what makes the cheesecake fluffy. If you use an electric mixer to add the whipped cream to the filling, you will destroy the air bubbles. The cheesecake will become dense and heavy. Always fold it in gently by hand!
**4. Let it Chill Completely:**
Do not rush the chilling time. If you try to cut the cheesecake after only 2 hours, it will fall apart and look like a messy puddle. Be patient and let the fridge do its job overnight.
**5. The Hot Knife Trick:**
Cheesecakes—especially no-bake ones—can be very sticky to cut. To get beautiful, clean slices like you see in bakeries, take a sharp knife and dip it into a glass of hot water. Wipe the water off with a towel, and then make your cut. Dip and wipe the knife between *every single cut*.
—
## How to Store Your Marshmallow Cheesecake
Because this dessert has cream cheese and whipped cream, it needs to stay cold.
* **In the Fridge:** Keep the cheesecake in an airtight container or tightly wrapped in plastic wrap in the refrigerator. It will stay fresh and delicious for up to 4 days.
* **Can You Freeze It?** Yes, you can! This is a great make-ahead dessert for the holidays. Wrap the cheesecake tightly in plastic wrap, and then wrap it again in aluminum foil. It can stay in the freezer for up to 2 months. When you are ready to eat it, move it to the fridge the night before to let it thaw slowly. Do not thaw it on the counter, or it might become too soft.
—
## Frequently Asked Questions (FAQs)
**Can I use a regular cake pan instead of a springform pan?**
You can, but it will be very hard to get the cheesecake out in one piece. If you do not have a springform pan, line a regular 9-inch cake pan with plastic wrap, letting the extra wrap hang over the sides. When the cake is frozen, you can pull the wrap to lift the cake out.
**Can I use real marshmallows instead of marshmallow fluff?**
It is highly recommended to use marshmallow fluff (also called marshmallow creme). Real marshmallows have gelatin in them, and if you try to melt them and mix them into the cream cheese, the texture can become sticky and strange. Marshmallow fluff gives the smoothest, creamiest result.
**My filling is too runny. What did I do wrong?**
This usually happens for two reasons. First, your cream cheese might have been too warm and melted. Second, your whipped cream might not have been whipped to stiff peaks. If the filling is runny, put it in the fridge for an hour to firm up before pouring it over the crust.
**Is this dessert safe for vegetarians?**
Yes! Unlike recipes that use real gelatin (like some mousses or traditional marshmallows), this recipe uses marshmallow fluff, which is usually gelatin-free. Always double-check your specific brand’s ingredient list to be 100% sure.
—
## Final Thoughts
Desserts should bring joy, and this **No-Bake Marshmallow Cheesecake** does exactly that. It is sweet, it is fluffy, and it tastes absolutely incredible. The best part is that anyone can make it. You do not need any special baking skills or expensive tools.
Whether you are making it for a summer BBQ, a Christmas dinner, or just a Tuesday night sweet tooth craving, this recipe will not let you down.
Grab your ingredients, grab your mixing bowl, and get ready to make the fluffiest cheesecake of your life. Enjoy!
***
**Prep Time:** 25 Minutes
**Cook Time:** 0 Minutes
**Total Time:** 25 Minutes (plus chilling time)
**Yield:** 10 Servings (1 9-inch cheesecake)
**Category:** Desserts / Sweet Treats
**Method:** No-Bake
**Dietary:** Vegetarian
*Tags: #marshmallowcheesecake #nobakedessert #marshmallowfluff #easydesserts #cheesecakerecipe #sweettooth*
Print
No-Bake Marshmallow Cheesecake
- Total Time: 25 minutes (plus chilling time)
- Yield: 10 servings 1x
- Diet: Vegetarian
Description
This fluffy, light, no-bake marshmallow cheesecake combines a sweet graham cracker crust with a creamy marshmallow filling and airy topping, perfect for summer gatherings.
Ingredients
- 1 ½ cups graham cracker crumbs
- ¼ cup granulated sugar
- ½ cup unsalted butter, melted
- 16 oz (2 blocks) cream cheese, softened
- 1 cup powdered sugar
- 1 tsp vanilla extract
- 1 ½ cups marshmallow fluff (marshmallow creme)
- 1 cup heavy whipping cream, whipped to stiff peaks
- 1 cup marshmallow fluff (for topping)
- 1 cup heavy whipping cream, whipped to stiff peaks (for topping)
- Mini marshmallows or crushed graham crackers (optional for garnish)
Instructions
- Prepare the crust by mixing graham cracker crumbs, granulated sugar, and melted butter in a bowl and press into a 9-inch springform pan. Refrigerate.
- Make the cheesecake filling by beating softened cream cheese and powdered sugar until smooth. Add vanilla extract and marshmallow fluff and mix well. Gently fold in whipped cream.
- Chill the filled crust in the fridge for at least 4 hours or overnight.
- Prepare the topping by folding together marshmallow fluff and whipped cream, then spread it over the chilled cheesecake. Garnish with mini marshmallows or crushed graham crackers if desired.
- Serve chilled from the fridge, slicing with a hot knife for clean cuts.
Notes
Ensure the cream cheese is at room temperature to avoid lumps. Always fold the whipped cream gently into the mixture to maintain its airy texture.
- Prep Time: 25 minutes
- Cook Time: 0 minutes
- Category: Desserts
- Method: No-Bake
- Cuisine: American
Nutrition
- Serving Size: 1 slice
- Calories: 320
- Sugar: 20g
- Sodium: 210mg
- Fat: 21g
- Saturated Fat: 12g
- Unsaturated Fat: 8g
- Trans Fat: 0g
- Carbohydrates: 34g
- Fiber: 1g
- Protein: 4g
- Cholesterol: 60mg
Keywords: marshmallow cheesecake, no-bake dessert, easy desserts, cheesecake recipe, sweet treats