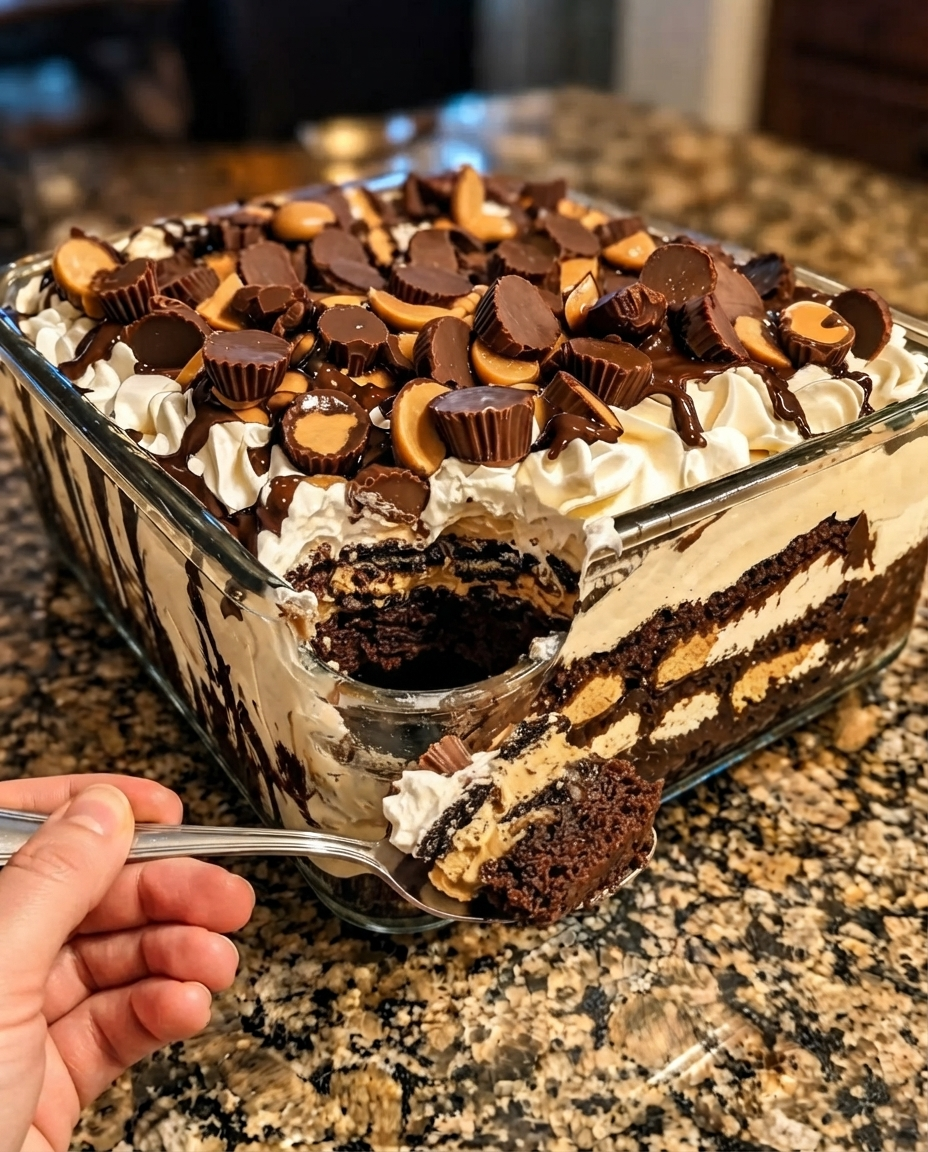
If you are looking for a dessert that will make everyone stop talking and start eating, you have found it. This Reese’s Peanut Butter Chocolate Dessert—often called “Heaven in a Bowl”—is the kind of treat that does not just sit quietly on the table. It steals the spotlight.
Built in generous layers inside a clear glass dish, this recipe combines soft chunks of chocolate cake, a rich and creamy peanut butter filling, light whipped cream, and a decadent chocolate drizzle. To finish it off, it is covered with chunks of Reese’s peanut butter cups scattered across the top. It truly belongs in the sweet treats hall of fame.
Recipe Overview & Quick Facts
| Key Metrics | Details |
| Prep Time | 30 Minutes |
| Bake Time | 30 Minutes (For the cake base) |
| Chilling Time | 2 Hours (Minimum) |
| Total Time | ~3 Hours |
| Yield | 10–12 Servings |
| Category | Desserts, Candy & Sweets |
Why You Will Love This Chocolate Peanut Butter Dessert
There are thousands of dessert recipes out there, but this layered masterpiece is special for a few simple reasons:
-
No Baking Stress: You use a boxed cake mix for the base. This means you get the wonderful taste of a baked cake without the hassle of making one from scratch.
-
Perfect Flavor Balance: The mix of sweet chocolate, salty peanut butter, and rich cream cheese creates a flawless flavor profile.
-
Beautiful Presentation: Because you build it in a clear 9×13 inch dish, you can see all the beautiful layers through the glass.
-
Make-Ahead Friendly: This dessert needs to chill in the fridge, making it the absolute best recipe to make the day before a big party, potluck, or holiday dinner.
Ingredients You Need to Gather
To build this heavenly dessert, you will need to gather ingredients for four simple parts. You can find all of these easily at any local grocery store.
For the Chocolate Cake Base
-
1 box chocolate cake mix: Plus whatever ingredients are listed on the back of the box (usually eggs, oil, and water).
For the Peanut Butter Layer
-
1 cup creamy peanut butter: Do not use the chunky kind for this layer; you want it to be perfectly smooth.
-
8 oz cream cheese: Softened to room temperature so it mixes easily without lumps.
-
1 cup powdered sugar: This sweetens the peanut butter and helps the layer thicken up.
For the Whipped Cream Layer
-
2 cups heavy whipping cream: Use heavy liquid cream found in the dairy aisle rather than frozen whipped topping.
-
1 teaspoon vanilla extract: For that classic, sweet bakery flavor.
For the Extras & Toppings
-
1 cup chocolate pudding: This is optional but highly recommended for extra creaminess. You can use instant pudding prepared according to the package.
-
1 cup chopped Reese’s peanut butter cups: Regular size or mini size both work great.
-
½ cup chocolate syrup: To drizzle over the top for a beautiful finish.
Step-by-Step Instructions
Follow these easy steps, and you will have a gorgeous layered dessert ready to chill in no time.
Step 1: Bake and Cool the Chocolate Cake
-
Preheat your oven and prepare the chocolate cake mix exactly as the instructions on the box dictate. Bake it in a standard-size cake pan.
-
Once the cake is done baking, let it cool completely.
Important Note: Do not rush the cooling step! If the cake is still warm when you build your dessert, it will melt the cream cheese and whipped cream layers, resulting in a messy presentation.
-
Once the cake is 100% cool, cut it into medium-sized chunks using a knife. Avoid crumbling it too finely, as defined chunks help create distinct, beautiful layers.
Step 2: Mix the Creamy Peanut Butter Filling
-
In a large mixing bowl, add the creamy peanut butter, softened cream cheese, and powdered sugar.
-
Using an electric hand mixer or a stand mixer, beat these three ingredients together until the mixture is smooth, thick, and creamy.
-
Ensure you beat it long enough that there are no cream cheese lumps left to achieve a perfectly uniform texture.
Step 3: Whip the Vanilla Cream
-
In a separate, clean bowl, pour in the heavy whipping cream and vanilla extract.
-
Turn on your mixer and whip the cream until soft peaks form. This means when you lift the beaters out of the bowl, the cream stands up in a little peak that gently falls over at the top.
-
Be careful not to over-whip it—if it gets too stiff, it will lose its airy balance.
Step 4: Assemble the Dessert Layers
Get out a clear glass 9×13 inch rectangular dish so the layers are visible. Start building your layers in this exact order:
-
First Layer: Spread half of your chocolate cake chunks across the bottom.
-
Second Layer: Drop small spoonfuls of the peanut butter mixture over the cake and gently spread it so you don’t displace the cake underneath.
-
Third Layer: Spread half of your whipped cream over the peanut butter layer.
-
Fourth Layer: Spread half of the chocolate pudding (if using) over the whipped cream.
-
Drizzle: Drizzle a little bit of the chocolate syrup over the top.
Repeat the process: Repeat the layers one more time in the exact same order (Cake chunks, peanut butter, whipped cream, pudding, and drizzle). Take your time spreading each layer gently to keep them distinct.
Step 5: Add the Final Toppings & Chill
-
After your second set of layers, finish the dessert with one final layer of whipped cream.
-
Take your chopped Reese’s peanut butter cups and scatter a generous handful all over the top.
-
Drizzle the remaining chocolate syrup generously across the top in a zig-zag pattern.
-
Place the dessert in the refrigerator and let it chill for at least 1 to 2 hours before serving.
Pro Tips for the Best Layered Dessert
-
Cake Texture Matters: Always cut the cake into distinct chunks, not fine crumbs. Chunks keep the layers clean, defined, and beautifully structured.
-
Use Room Temperature Ingredients: Make sure your cream cheese is truly softened. Cold cream cheese will leave tiny white lumps in your peanut butter layer.
-
Do Not Overwhip the Cream: Stop mixing the heavy cream the second it reaches soft peaks. If you whip it too long, it will turn into butter and lose its light texture.
-
Chilling is Essential: Do not skip the fridge time! Overnight chilling yields the best results, allowing the peanut butter and cream cheese layers to firm up for perfectly clean slices.
Creative Flavor Variations to Try
-
Add Some Crunch: Sprinkle a layer of crushed Oreo cookies or chopped peanuts between the layers to add an amazing textual contrast.
-
Swap the Cake Base: Instead of traditional chocolate cake, use baked fudgy brownies cut into chunks. This makes the dessert even richer and denser.
-
Enhance the Peanut Flavor: Add a tiny pinch of sea salt (just 1/8 of a teaspoon) to the peanut butter layer to balance the sweetness and elevate the nutty flavor profile.
Final Thoughts
Desserts are supposed to bring joy to the table, and this Reese’s Peanut Butter Chocolate Dessert does exactly that. It is incredibly fun to assemble, stunning to look at, and undeniably delicious to eat. Because it utilizes reliable, simple ingredients alongside a convenient boxed cake mix, it removes all the stress of high-level baking while still delivering a bakery-quality showstopper.
Reese’s Peanut Butter Chocolate Dessert
- Total Time: 180 minutes
- Yield: 10-12 servings 1x
- Diet: Vegetarian
Description
A delightful layered dessert featuring chocolate cake, creamy peanut butter filling, whipped cream, and topped with Reese’s peanut butter cups.
Ingredients
- 1 box chocolate cake mix (plus ingredients from the box)
- 1 cup creamy peanut butter
- 8 oz cream cheese, softened
- 1 cup powdered sugar
- 2 cups heavy whipping cream
- 1 teaspoon vanilla extract
- 1 cup chocolate pudding (optional)
- 1 cup chopped Reese’s peanut butter cups
- ½ cup chocolate syrup
Instructions
- Preheat your oven and prepare the chocolate cake mix as per box instructions. Bake in a standard-size cake pan.
- Let the cake cool completely before cutting into medium-sized chunks.
- In a large mixing bowl, add the peanut butter, cream cheese, and powdered sugar. Beat until smooth and creamy.
- In a separate bowl, whip the heavy cream and vanilla extract until soft peaks form.
- Get a clear 9×13 inch dish and start layering: half the cake chunks, peanut butter mixture, half the whipped cream, half the chocolate pudding (if using), and drizzle some chocolate syrup.
- Repeat the layers in the same order, finishing with whipped cream on top.
- Scatter chopped Reese’s peanut butter cups on top and drizzle with chocolate syrup.
- Chill in the refrigerator for at least 1 to 2 hours before serving.
Notes
For the best results, ensure the cake is completely cool and use room temperature cream cheese.
- Prep Time: 30 minutes
- Cook Time: 30 minutes
- Category: Desserts, Candy & Sweets
- Method: Chilling
- Cuisine: American
Nutrition
- Serving Size: 1 serving
- Calories: 450
- Sugar: 32g
- Sodium: 300mg
- Fat: 26g
- Saturated Fat: 10g
- Unsaturated Fat: 12g
- Trans Fat: 0g
- Carbohydrates: 55g
- Fiber: 3g
- Protein: 10g
- Cholesterol: 55mg
Keywords: chocolate dessert, peanut butter dessert, layered dessert, no bake dessert