There is something undeniably magical about the combination of smooth milk chocolate, creamy white chocolate, and the unmistakable, nutty luxury of Kinder treats. When you take those iconic flavors and layer them into individual, elegant dessert glasses, you get the ultimate crowd-pleasing treat.
These No-Bake Kinder Chocolate Cheesecake Cups offer a brilliant twist on a traditional cheesecake. Instead of worrying about water baths, cracks, or slicing a delicate cake, these pre-portioned cups build stunning visual layers that look like they came straight from a gourmet pastry shop. Featuring a buttery biscuit base, a velvety white chocolate cream cheese center, and a glossy milk chocolate ganache top, this dessert delivers pure indulgence with just 25 minutes of active kitchen prep.

Why You Will Love These Individual Cheesecake Cups
-
Flawless No-Bake Method: No oven required! This recipe relies entirely on your refrigerator to set, making it an incredibly reliable and stress-free dessert option.
-
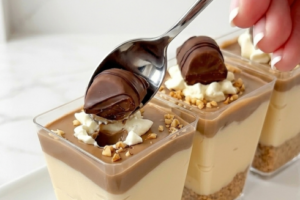
Stunning Layered Visuals: Serving desserts in individual glasses reveals the distinct, beautiful layers of golden crust, snow-white cheesecake, and rich chocolate ganache.
-
Pre-Portioned Convenience: These cups are the ultimate hack for dinner parties, holiday tables, or kids’ celebrations. They are easy to serve, easy to transport, and require zero messy slicing.
-
The Ultimate Crowd-Pleaser: By fusing high-quality white and milk chocolates with hazelnut toppings, this treat satisfies both intense chocolate cravings and lighter, creamy dessert preferences.
 Prep Time: 25 mins   |   Chill Time: 2 hrs   |   Servings: 6 large cups
 Course: Dessert      |   Cuisine: Modern     |   Keywords: Kinder Cheesecake, Dessert Cups
Ingredients Checklist
Because this is an artisanal, no-bake assembly, using premium quality chocolate and proper ingredient temperatures is crucial for achieving that silky, melt-in-your-mouth texture.
For the Buttery Biscuit Base
-
2 cups Crushed Digestive Biscuits: Digestive biscuits provide a signature, slightly salty graham-cracker-like crunch. You can substitute them with Graham crackers or crushed golden Oreos if preferred.
-
6 tablespoons Unsalted Butter (Melted): Binds the crumbs together so they form a clean, cohesive base layer that won’t turn into loose dust.
For the White Chocolate Cheesecake Filling
-
500 g Cream Cheese (Softened): It is absolutely imperative that your cream cheese is completely at room temperature. If it is cold, it will instantly seize the melted white chocolate, creating an unpleasant, lumpy texture.
-
1 cup Heavy Cream: Kept cold in the refrigerator until the exact moment you are ready to whip it, ensuring maximum volume and fluffiness.
-
½ cup Powdered Sugar: Dissolves effortlessly into the cream cheese without leaving any grainy residue.
-
1 teaspoon Vanilla Extract: Complements the milky, sweet notes of the white chocolate base.
-
200 g White Chocolate: Melted smoothly and allowed to cool to room temperature (it should be fully liquid but no longer hot to the touch).
For the Rich Chocolate Ganache Layer
-
200 g Milk Chocolate: High-quality milk chocolate bars work best here to recreate that distinct, sweet Kinder flavor profile.
-
¾ cup Heavy Cream: Used to emulsify the chocolate into a glossy, pourable, and velvety glaze.
The Ultimate Kinder Toppings
-
Whipped Cream: For a light, cloud-like finishing flourish.
-
Chopped Hazelnuts: Toasted and finely chopped to mirror the hazelnut cream inside Kinder Bueno bars.
-
Kinder Bueno Pieces or Chocolate Bars: The undisputed star garnish that instantly communicates the luxury waiting inside the cup.
Step-by-Step Instructions
Follow these clear, layer-by-layer instructions to construct your gourmet chocolate cups.
1. Press and Chill the Crust Base
-
In a medium mixing bowl, combine your 2 cups of crushed digestive biscuits with the 6 tablespoons of melted butter. Stir thoroughly with a fork until the mixture evenly resembles wet sand.
-
Divide the buttery crumbs evenly among your 6 chosen dessert cups.
-
Using the back of a small spoon or a clean cocktail muddler, press the crumbs down gently into the bottom of each glass to form a flat, level base. Do not pack it too tightly, or it will become rock-hard in the fridge.
-
Place the cups in the refrigerator to chill and firm up for 15 minutes while you prepare the filling.
2. Whip Up the Silk-Smooth Cheesecake Filling
-
In a large mixing bowl, place your fully softened cream cheese. Using an electric hand mixer, beat on medium speed for 1 to 2 minutes until completely smooth, light, and creamy.
-
Add the ½ cup of powdered sugar and 1 teaspoon of vanilla extract. Beat again until fully incorporated.
-
Slowly pour in your cooled, melted 200 g of white chocolate. Mix gently on low speed until a glossy, silky-smooth paste forms.
-
In a separate, chilled glass or metal bowl, pour in your 1 cup of cold heavy cream. Whip on medium-high speed until soft peaks form (the cream should hold its shape, but the tips will gently slouch over when you lift the beaters).
-
Using a rubber spatula, add the whipped cream to your white chocolate cream cheese base. Gently fold the mixture using an under-and-over motion just until combined. This step traps air, giving the cheesecake a light and incredibly fluffy texture.
3. Layer and Smooth the Cheesecake
-
Spoon the fluffy white chocolate cheesecake mixture evenly over your chilled biscuit bases in the cups. Alternatively, you can transfer the filling to a piping bag fitted with a large round nozzle for a flawlessly clean, professional look.
-
Use the back of a small spoon or an offset spatula to smooth out the tops evenly.
-
Place the cups back into the refrigerator to keep cool while you prepare the ganache glaze.
4. Create the Glossy Milk Chocolate Ganache
-
Finely chop your 200 g of milk chocolate and place it into a heatproof bowl.
-
In a small saucepan over medium heat, heat your ¾ cup of heavy cream until it is warm and steaming, but do not let it boil.
-
Immediately pour the hot cream over the chopped milk chocolate. Let it sit untouched for exactly 1 minute to allow the heat to melt the cocoa fats naturally.
-
Using a small whisk or spatula, stir gently starting from the center and working your way out until the mixture transforms into a perfectly smooth, rich, and glossy liquid ganache. Let it cool slightly for 5 minutes so it is not piping hot.
5. The Final Set and Garnish
-
Retrieve your cheesecake cups from the fridge. Carefully pour or spoon a layer of the warm milk chocolate ganache over each white chocolate layer, tilting the cups slightly to ensure it spreads into a beautiful, even sheet.
-
Place the completed dessert cups into the refrigerator for a minimum of 2 hours to allow the ganache to set and the cheesecake flavors to deep-meld.
-
Just before serving: Pipe a decorative swirl of fresh whipped cream on top of each cup, sprinkle generously with chopped hazelnuts, and crown each masterpiece with a piece of Kinder Bueno or a mini Kinder chocolate bar.
Pro Pastry Chef Presentation Hacks
If you want to maximize the look of this dessert for a food blog, social media portfolio, or a high-end dinner party, implement these presentation secrets:
The Flawless Layer Definition: When assembling the cups, avoid letting the white chocolate filling or chocolate ganache touch the upper sides of the glass. Using a piping bag for the white layer and a narrow-spouted measuring cup to pour the ganache ensures laser-sharp, pristine layers that look incredibly professional from the outside.
Toasting the Hazelnuts: For an exponentially better aroma and crunch, toss your chopped hazelnuts in a dry skillet over medium-low heat for 3 to 4 minutes before garnishing. The heat releases the natural oils, multiplying the authentic Kinder hazelnut flavor profile.
Storage and Make-Ahead Guidelines
-
The Ultimate Make-Ahead Dessert: These cups are a dream come true for hosts because they actually taste better when made the day before! A 24-hour rest gives the biscuit base time to soften just slightly, while the white chocolate filling matures into an incredibly rich texture.
-
In the Fridge: Store the cups covered loosely with plastic wrap or foil in the refrigerator for up to 3 to 4 days. Keep the actual Kinder Bueno cookie garnishes off the cups until right before serving to prevent the wafer from absorbing moisture and becoming soggy.
Nutritional Summary (Per Cup)
| Nutrient | Amount Per Serving |
| Calories | 480 kcal |
| Servings | 6 large, indulgent cups |
| Texture Profile | Crunchy base, light and fluffy white chocolate middle, with a rich, melt-in-your-mouth ganache glaze. |
Frequently Asked Questions (FAQs)
Why did my white chocolate seize and become grainy when I added it to the cream cheese?
This happens due to a temperature shock. If your cream cheese is even slightly cold from the fridge, it will cause the warm cocoa butter in the melted white chocolate to instantly solidify into hard, tiny grains. Always make sure your cream cheese sits on the counter for at least 1-2 hours before starting.
Can I use Kinder bars instead of regular milk chocolate for the ganache?
Yes, absolutely! You can swap out the 200 g of milk chocolate for 200 g of standard melted Kinder chocolate bars. Because Kinder bars contain an inner milk filling, your ganache will be slightly lighter in color and creamier, which fits the theme of this dessert beautifully.
Can I make this as one large cheesecake instead of individual cups?
Yes, you can adapt this recipe into a standard 7-inch or 8-inch springform pan. However, because this filling is incredibly light and does not contain gelatin, a single large cake will be very soft and mousse-like when sliced. Serving it in individual cups guarantees a flawless presentation every single time without the structural worry.
Final Thoughts
These Kinder Chocolate Cheesecake Cups prove that magnificent, high-end desserts do not require hours of complex baking or expert pastry skills. By leaning into smart flavor layering—contrasting an airy, eggless white chocolate mousse with a glossy, rich ganache—you create a texturally exciting, decadent treat that completely satisfies every sweet tooth at the table.
Try Also: Irresistible Dessert Ideas from
-
What is Dubai Chocolate Bar Made Of? Key Ingredients Explained
-
Rose Milk Cake Recipe
-
Strawberry Cheesecake Dump Cake Recipe
Be sure to Print Recipe or Pin Recipe so you have this incredibly popular, crowd-pleasing chocolate treat ready for your next big celebration or weekend indulgence!
No-Bake Kinder Chocolate Cheesecake Cups
- Total Time: 145 minutes
- Yield: 6 large cups 1x
- Diet: Vegetarian
Description
Delicious individual cheesecake cups featuring smooth milk chocolate, creamy white chocolate, and a buttery biscuit base, perfect for any occasion.
Ingredients
- 2 cups Crushed Digestive Biscuits
- 6 tablespoons Unsalted Butter (Melted)
- 500 g Cream Cheese (Softened)
- 1 cup Heavy Cream
- ½ cup Powdered Sugar
- 1 teaspoon Vanilla Extract
- 200 g White Chocolate (Melted)
- 200 g Milk Chocolate
- ¾ cup Heavy Cream
- Whipped Cream (for topping)
- Chopped Hazelnuts (for topping)
- Kinder Bueno Pieces or Chocolate Bars (for topping)
Instructions
- Press and chill the crust base: Combine the crushed digestive biscuits with melted butter. Press into dessert cups and chill for 15 minutes.
- Whip up the silk-smooth cheesecake filling: Beat softened cream cheese until smooth, then add powdered sugar and vanilla. Mix in melted white chocolate, followed by whipped cream.
- Layer and smooth the cheesecake: Spoon the cheesecake mixture over the chilled biscuit base and smooth tops.
- Create the glossy milk chocolate ganache: Finely chop milk chocolate, heat heavy cream, then pour over chocolate. Let it sit and stir until smooth.
- Retrieve your cheesecake cups from the fridge. Pour a layer of milk chocolate ganache over each cheesecake layer and chill for a minimum of 2 hours.
Notes
For optimal texture, ensure cream cheese is at room temperature. This dessert can be made a day ahead for enhanced flavor.
- Prep Time: 25 minutes
- Cook Time: 0 minutes
- Category: Dessert
- Method: No-Bake
- Cuisine: Modern
Nutrition
- Serving Size: 1 cup
- Calories: 480
- Sugar: 30g
- Sodium: 150mg
- Fat: 30g
- Saturated Fat: 15g
- Unsaturated Fat: 10g
- Trans Fat: 0g
- Carbohydrates: 40g
- Fiber: 2g
- Protein: 6g
- Cholesterol: 45mg
Keywords: Kinder Cheesecake, No-Bake Dessert, Chocolate Cups, Individual Desserts, Cheesecake Recipes