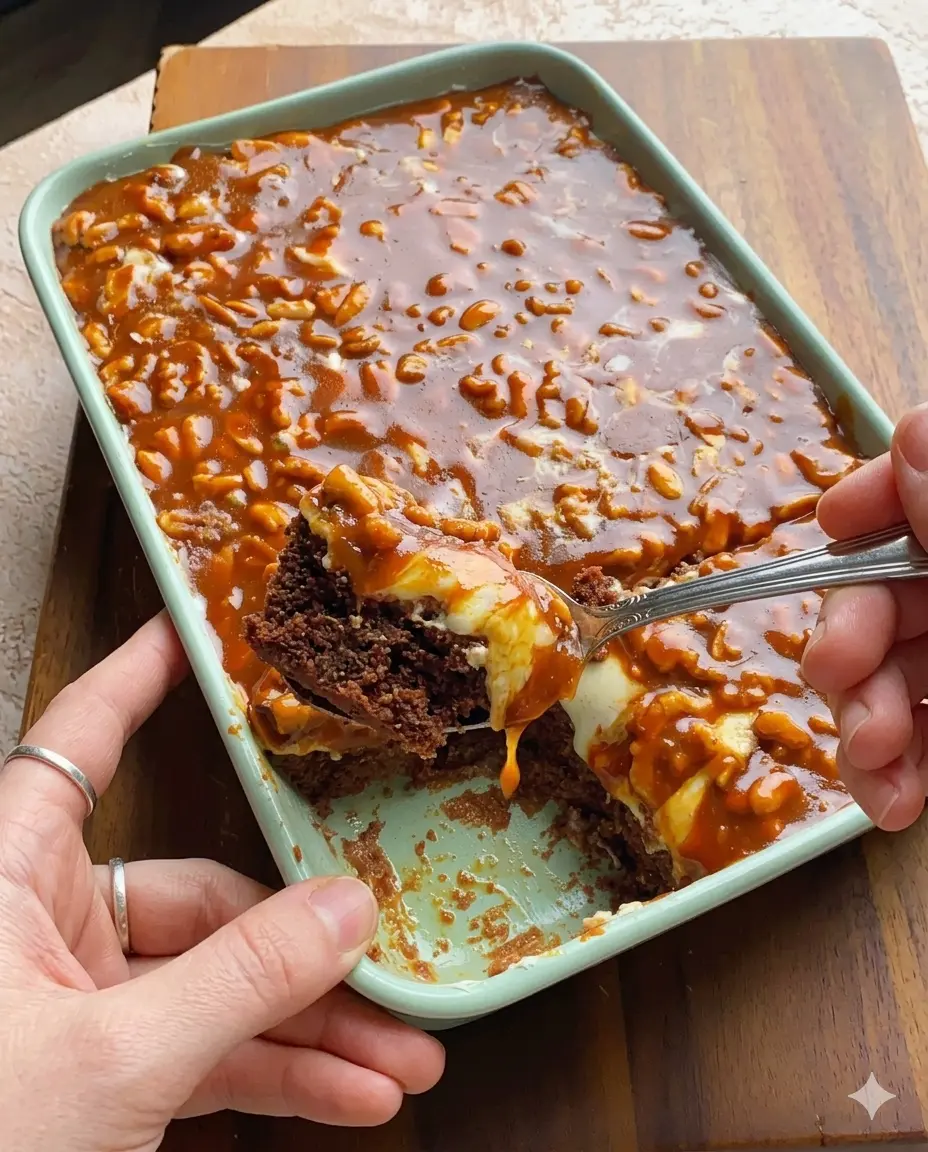
If you are a fan of the classic chocolate bar, this Homemade Snickers Cake is about to become your absolute favorite dessert. Richer, fresher, and infinitely better than anything you can buy at a bakery, this cake layers a moist chocolate sponge with an airy cream filling, crunchy roasted nuts, and a deeply golden scratch-made caramel sauce.
By utilizing simple kitchen staples, you can recreate the iconic contrast of sweet, salty, creamy, and crunchy textures right at home. It is an absolute showstopper of a centerpiece that looks highly sophisticated but comes together with straightforward, foolproof steps.
Why You Will Love This Recipe
-
Better Than Store-Bought: Controlling your own ingredients means no artificial preservatives—just pure, deep chocolate and authentic buttery caramel flavors.
-
The Perfect Textural Balance: Melds a soft, close-crumbed chocolate sponge with an ultra-fluffy cream layer and the satisfying crunch of roasted nuts.
-
Authentic Stovetop Caramel: Liquid gold caramel sauce made from scratch handles the heavy lifting, delivering that signature Snickers chewiness.
-
Crowd-Pleasing Showstopper: Perfectly adapts to whatever nuts you have on hand, making it a highly customizable dessert for birthdays or gatherings.
 Prep Time: 25 mins   |   Bake Time: 35-40 mins   |   Cooling Time: 1 hr minimum
 Course: Dessert      |   Cuisine: Fusion American|   Yield: 1 elegant layer cake (12 slices)
 Target Pan Size: 9-inch Round Cake Pan            |   Profile: Rich, nutty, chocolaty, and decadent
Ingredients Checklist
For a completely uniform batter and a lump-free cream, ensure your eggs, milk, and butter are brought entirely to room temperature before you begin assembly.
For the Rich Chocolate Sponge Base
-
2¼ cups All-Purpose Flour: Provides the necessary structural framework for the cake layer.
-
1 cup Granulated Sugar: Sweetens and helps lock moisture into the baked crumb.
-
4 Large Eggs: Binds the batter while providing essential lift and richness.
-
½ cup Unsalted Butter (Softened): Creams smoothly with the sugar for a traditional, tender bakery texture.
-
½ cup Milk: Hydrates the flour proteins to yield a perfectly soft interior.
-
1 tablespoon Baking Powder: The essential leavening agent responsible for a beautiful oven rise.
-
2 tablespoons Unsweetened Cocoa Powder: Establishes the robust, dark chocolate color and flavor profile.
-
1 teaspoon Vanilla Extract: Complements and rounds out the deep cocoa notes.
-
1 pinch of Salt: Sharpens the sweetness and elevates the overall flavor profile.
For the Fluffy Whipped Cream Layer
-
1 cup Heavy Whipping Cream: Whips up into a rich, structured mousse-like base.
-
½ cup Crème Chantilly Powder (or Whipped Topping Mix): Stabilizes and sweetens the cream layer seamlessly.
-
3 tablespoons Real Chocolate (Melted & Cooled): Folded smoothly into the whipped cream matrix for a subtle chocolate-cream finish.
For the Chewy Snickers Caramel Sauce & Crunch
-
2 cups Granulated Sugar: Melted down into a beautiful, deeply aromatic amber base.
-
1 cup Milk: Thins and emulsifies the hot sugar into a rich, pourable caramel sauce.
-
½ cup Unsalted Butter: Adds a silky, velvet-smooth mouthfeel to the warm caramel glaze.
-
1 cup Roasted Peanuts, Walnuts, or Hazelnuts: The essential crunch factor; pick your favorite nut to mimic the classic candy bar.
-
1 pinch of Vanilla Powder (or Extract): Rounds out the sweet, caramelized sugars with a warm fragrance.
Step-by-Step Baking & Assembly Instructions
1. Bake the Chocolate Cake Base
-
Preheat your oven to 350°F (175°C). Grease and flour a 9-inch round cake pan (or line the bottom with a circle of parchment paper for a flawless release).
-
In a medium bowl, whisk together the 2¼ cups of flour, 1 tablespoon of baking powder, 2 tablespoons of unsweetened cocoa powder, and a pinch of salt. Set aside.
-
In a larger mixing bowl, combine the ½ cup of softened butter and 1 cup of sugar. Beat with an electric hand mixer or a stand mixer for 3 to 4 minutes until the mixture turns pale, light, and completely fluffy.
-
Add the 4 eggs one at a time, mixing thoroughly after each addition to completely incorporate the fats. Stir in the 1 teaspoon of vanilla extract.
-
Alternatively add your dry flour mixture and the ½ cup of milk to the whipped butter, starting and ending with the dry ingredients. Mix on low speed just until combined to prevent a tough crumb.
-
Pour the thick batter into your prepared pan and bake for 35 to 40 minutes, or until a toothpick inserted into the center emerges clean. Let the cake cool completely on a wire rack.
2. Whip the Velvet Chocolate Cream
-
In a chilled mixing bowl, combine the 1 cup of heavy whipping cream and ½ cup of crème chantilly powder. Beat on high speed until stiff, stable peaks form.
-
Gently fold in the 3 tablespoons of melted, cooled chocolate with a flexible rubber spatula until no streaks remain. Keep this fluffy chocolate cream in the refrigerator until ready to assemble.
3. Cook the Decadent Stovetop Caramel
-
In a heavy-bottomed saucepan over medium heat, add the 2 cups of granulated sugar. Cook without stirring, swirling the pan occasionally by the handle, until the sugar melts completely and turns a gorgeous, deep amber color.
-
Turn the heat down to low. Carefully whisk in the ½ cup of butter until melted and completely incorporated. Caution: The mixture will bubble up rapidly when the butter hits the hot sugar!
-
Gradually stream in the 1 cup of milk, whisking constantly. Let the mixture simmer gently for 2 to 3 minutes until it turns perfectly smooth and thickens slightly.
-
Remove the saucepan from the heat. Stir in your pinch of vanilla and the 1 cup of roasted peanuts (or your choice of walnuts/hazelnuts). Allow the nutty caramel sauce to cool entirely to room temperature before using.
4. Assemble and Set the Layers
-
Once your chocolate cake base is completely cold, slice it horizontally into two even layers using a long serrated knife.
-
Place the bottom cake layer flat onto your serving plate. Spread the chilled chocolate cream filling evenly over the top surface.
-
Pour half of your completely cooled, nutty caramel sauce right over the cream layer, spreading it gently to the edges.
-
Place the second chocolate cake layer cleanly on top. Pour the remaining nutty caramel sauce generously over the crown of the cake, allowing the glossy caramel to cascade beautifully down the exterior sides.
-
Place the completed cake into the refrigerator to chill for at least 2 hours to lock the creamy layers in place before slicing into clean, magnificent wedges. Serve cold and enjoy your ultimate homemade masterpiece!
Pro Pastry Secrets for Flawless Results
-
The Caramel Temperature Rule: Never attempt to pour your homemade caramel sauce while it is still warm or hot. If warm caramel comes into contact with your whipped chocolate cream, it will instantly melt the dairy fats, turning your elegant layered cake into a runny, collapsed mess. Patience is key—let the caramel cool to a room-temperature gel texture.
-
The Clean-Slice Strategy: Because the caramel topping is naturally thick and sticky, cutting into the cake directly can drag the cream layers. To get pristine, picture-perfect bakery slices, fill a tall glass with hot water. Dip your sharp chef’s knife into the water, wipe the blade completely dry with a towel, and slice straight down. Clean and re-warm the knife between every single cut.
Storage and Freshness Preservation
-
Refrigeration Mandate: Because this cake features fresh dairy cream, real butter, and milk reductions, it cannot live safely at room temperature. Keep any leftover slices stored inside an airtight cake container in the refrigerator for up to 4 days.
-
Serving Strategy: For the absolute best sensory experience, let your individual slice sit out on the kitchen counter for 5 to 10 minutes before eating. This brief window lets the buttery sponge soften slightly while keeping the cream and crunchy caramel layers perfectly intact!
Frequently Asked Questions (FAQs)
Which nut works best to replicate the authentic Snickers flavor?
To get the exact, unmistakable flavor profile of a real Snickers candy bar, roasted peanuts are highly recommended. The natural, slightly salty savoriness of peanuts pairs perfectly with sweet caramel. However, if you prefer a more premium or European twist, substituting them with toasted hazelnuts or crushed walnuts works beautifully and tastes incredibly luxurious!
Why did my sugar turn grainy or crystallize while making the caramel?
Sugar crystallizes when it is stirred too early or too quickly with a spoon while melting. Ambient sugar crystals push against each other and lock up into hard lumps. To avoid this, simply let the sugar melt on its own over medium heat, only tilting and swirling the saucepan by its handle to move dry sugar into melted areas. Once it is completely fluid and liquid, you can safely whisk in your butter and milk!
Try Also: Irresistible Dessert Ideas from
Homemade Snickers Cake
- Total Time: 105 minutes
- Yield: 12 slices 1x
- Diet: Vegetarian
Description
A rich and decadent dessert that layers moist chocolate sponge, airy cream filling, roasted nuts, and scratch-made caramel sauce.
Ingredients
- 2¼ cups All-Purpose Flour
- 1 cup Granulated Sugar
- 4 Large Eggs
- ½ cup Unsalted Butter (Softened)
- ½ cup Milk
- 1 tablespoon Baking Powder
- 2 tablespoons Unsweetened Cocoa Powder
- 1 teaspoon Vanilla Extract
- 1 pinch of Salt
- 1 cup Heavy Whipping Cream
- ½ cup Crème Chantilly Powder (or Whipped Topping Mix)
- 3 tablespoons Real Chocolate (Melted & Cooled)
- 2 cups Granulated Sugar (for caramel)
- 1 cup Milk (for caramel)
- ½ cup Unsalted Butter (for caramel)
- 1 cup Roasted Peanuts, Walnuts, or Hazelnuts
- 1 pinch of Vanilla Powder (or Extract)
Instructions
- Preheat your oven to 350°F (175°C) and prepare a 9-inch round cake pan.
- Whisk together flour, baking powder, cocoa powder, and salt in a medium bowl.
- Combine softened butter and sugar in a larger bowl; beat until fluffy.
- Add eggs one at a time, mixing thoroughly, then stir in vanilla.
- Mix in dry ingredients alternately with milk until just combined.
- Pour the batter into the prepared pan and bake for 35-40 minutes; let cool.
- In a chilled bowl, whip heavy cream and crème chantilly powder until stiff peaks form.
- Gently fold in melted and cooled chocolate.
- In a saucepan, melt sugar over medium heat until amber; whisk in butter.
- Gradually add milk, whisking until smooth; stir in vanilla and nuts.
- Slice cooled chocolate cake into two layers and spread the cream between layers.
- Pour caramel over layers and chill the cake for at least 2 hours before serving.
Notes
Make sure to let the caramel cool to room temperature before pouring over the cream to prevent melting. For clean slices, dip your knife in hot water before cutting.
- Prep Time: 25 minutes
- Cook Time: 40 minutes
- Category: Dessert
- Method: Baking
- Cuisine: Fusion American
Nutrition
- Serving Size: 1 slice
- Calories: 450
- Sugar: 35g
- Sodium: 150mg
- Fat: 23g
- Saturated Fat: 12g
- Unsaturated Fat: 8g
- Trans Fat: 0g
- Carbohydrates: 58g
- Fiber: 2g
- Protein: 6g
- Cholesterol: 90mg
Keywords: snickers cake, dessert, chocolate cake, caramel, fluffy cream