There are very few desserts as universally loved as Cookies & Cream Ice Cream. The contrast between velvety, sweet cream and the satisfying crunch of chocolate sandwich cookies is a masterclass in texture balancing. While you could easily buy a pint at the grocery store, making homemade Cookies & Cream Ice Cream elevates this classic treat to an entirely new level.
By using a simple, no-cook ice cream base, you can skip the tedious step of making a traditional egg custard. The result? An incredibly rich, creamy, and dense dessert that tastes exactly like premium ice cream shop quality—only better, because you control the crunch, the cookie-to-cream ratio, and the quality of ingredients.
As an SEO expert and food content strategist, I have designed this comprehensive guide to help you master the art of homemade ice cream. From the science of the perfect churn to preventing those dreaded ice crystals, here is everything you need to know to create the ultimate scoop.
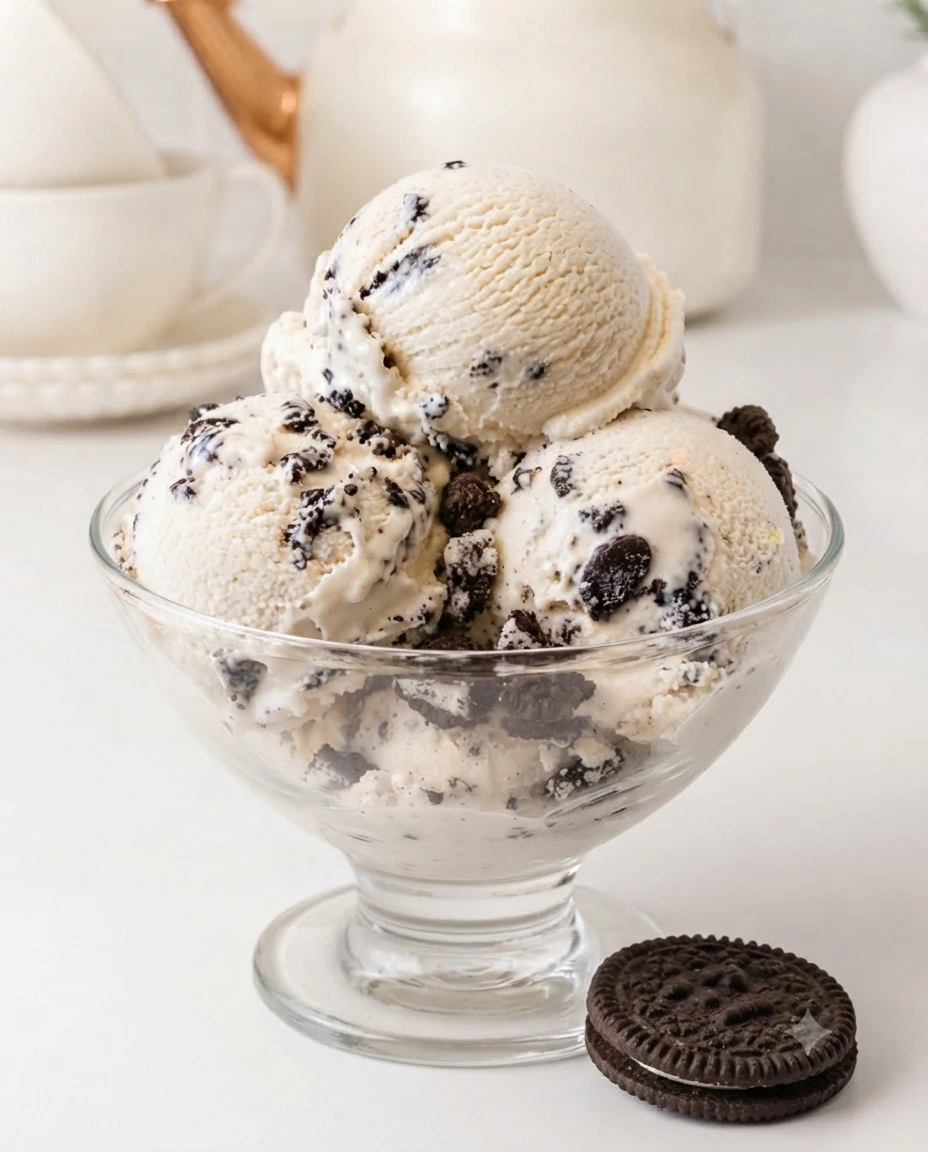
Table of Contents
Why You Need to Make This Ice Cream at Home
Store-bought ice cream is heavily reliant on stabilizers, emulsifiers, and excess air (known as “overrun” in the industry) to increase volume. When you make this recipe at home, you are creating a dense, luxurious product often referred to as “Philadelphia-style” or “no-cook” ice cream.
Because there are no eggs to cook, the preparation takes less than 10 minutes. The flavor is purely driven by high-quality dairy, real vanilla, and fresh cookies. Furthermore, commercial ice creams often suffer from “cookie mush”—where the cookies dissolve into the cream during mass production. By adding your cookies at the very end of the churning process, you guarantee a generous amount of crunchy, identifiable cookie chunks in every single bite.
The Science Behind the Ingredients
To achieve that premium, scoopable texture, every ingredient plays a specific, scientific role:
-
2 cups Heavy Cream (480 ml): This is the backbone of your ice cream. The high fat content (usually 36%+) is what makes the ice cream feel rich and coats your palate, preventing it from tasting icy.
-
1 cup Whole Milk (240 ml): Milk provides necessary proteins and sugars that help form the smooth structure of the ice cream, while keeping the overall fat percentage perfectly balanced so it isn’t overly heavy.
-
0.66 cup Granulated Sugar (135 g): Sugar doesn’t just add sweetness; it lowers the freezing point of the liquid. This is crucial. Without sugar, your ice cream would freeze into a solid block of ice.
-
2 teaspoons Pure Vanilla Extract: Always opt for “pure” rather than artificial. Pure vanilla adds floral, warm notes that bridge the gap between the chocolate cookies and the dairy.
-
0.125 teaspoon Fine Salt: The secret weapon. A tiny pinch of salt does not make the ice cream taste salty; it amplifies the vanilla flavor and cuts through the extreme sweetness of the cookies and sugar.
-
16 Chocolate Sandwich Cookies (coarsely crushed): The star mix-in. Coarsely crushing them (rather than pulverizing them into dust) ensures you get varying sizes of cookie pieces, providing the ultimate crunchy texture.
Step-by-Step Churning Instructions
Quick Recipe Overview
| Metric | Details |
| Prep Time | 10 minutes |
| Churn Time | 25 minutes |
| Freezing Time | 4 hours |
| Yield | 1 Quart (approx. 4 servings) |
Pro Tips for the Perfect Cookie-to-Cream Ratio
To take your ice cream from good to “professional dessert chef,” implement these expert strategies:
-
How to Crush Perfectly: Put your cookies in a zip-top bag and smash them with a rolling pin. Aim for a mix of pea-sized pieces, larger chunks, and a little bit of “cookie dust.” The dust will subtly flavor the cream, while the chunks provide the crunch.
-
The Plastic Wrap Trick: Before putting the lid on your freezer-safe container, press a sheet of plastic wrap directly against the surface of the ice cream. This eliminates air exposure, which is the number one cause of freezer burn and ice crystal formation.
-
Go Beyond the Basic Cookie: While classic Oreos are fantastic, try experimenting with double-stuffed cookies, golden sandwich cookies, or even peanut butter chocolate cookies for a unique twist on the flavor profile.
-
Serving Suggestions: Serve this in a freshly made waffle bowl, piled high in a glass sundae dish, or simply sandwiched between two homemade chocolate chip cookies for an epic ice cream sandwich.
Storage Secrets to Prevent Freezer Burn
Homemade ice cream is best consumed within the first 3 to 4 days, as it begins to lose its prime texture over time. However, it will safely last in the freezer for up to 2 weeks if stored correctly.
Always store it in an airtight, shallow container (shallow containers freeze faster and more evenly than deep, narrow ones). Avoid keeping the tub in the door of your freezer, as the temperature fluctuates too much there due to constant opening and closing. Keep it on the main shelf toward the back.
Frequently Asked Questions (FAQs)
Can I make this recipe if I don’t own an ice cream maker?
Yes! You can use the “freeze-and-stir” method. Pour your chilled base into a deep, freezer-safe dish (like a 9×13 pan) and place it in the freezer. Every 45 minutes, take it out and vigorously whisk it with a hand mixer or fork to break up the forming ice crystals. Repeat this 3 or 4 times until it is thick and frozen, stirring in the crushed cookies during the final mix.
Why does my homemade ice cream feel so hard to scoop?
Commercial ice creams use gums and stabilizers to keep it soft at low temperatures. Because this recipe is all-natural, it freezes solid. Remember the 5-minute room-temperature tempering rule, or you can briefly microwave your ice cream scoop for 10 seconds before digging in.
Can I use a dairy-free milk alternative?
You can, but the texture will change. If using almond, oat, or coconut milk, ensure you are using the “barista” or full-fat versions to replicate the fat content of heavy dairy cream. You may also want to add 1 tablespoon of cornstarch to your base and heat it slightly on the stove to create a vegan custard that mimics the creaminess of dairy.
Should I remove the cream filling from the sandwich cookies before crushing them?
Absolutely not! The white cream filling adds essential sweetness and a wonderful chewy texture that contrasts beautifully with the crisp chocolate wafers.
Final Thoughts
You no longer need to visit an expensive creamery to get premium, chunky, velvety Cookies & Cream Ice Cream. With just six base ingredients and an ice cream maker, you can craft a dessert that rivals the best in the business right in your own kitchen. The combination of the rich, vanilla-scented base and the satisfying crunch of the cookies is guaranteed to be a hit with kids and adults alike.
Grab your heavy cream, crush those cookies, and get churning!
Did you enjoy this recipe? Save it to your Pinterest boards, tag us in your photos on social media using #HomemadeIceCream, and leave a comment below with your favorite way to serve this classic treat!
Cookies & Cream Ice Cream
- Total Time: 250 minutes
- Yield: 4 servings 1x
- Diet: Vegetarian
Description
Homemade Cookies & Cream Ice Cream with a rich and creamy base, featuring crunchy chocolate sandwich cookies.
Ingredients
- 2 cups Heavy Cream (480 ml)
- 1 cup Whole Milk (240 ml)
- 0.66 cup Granulated Sugar (135 g)
- 2 teaspoons Pure Vanilla Extract
- 0.125 teaspoon Fine Salt
- 16 Chocolate Sandwich Cookies (coarsely crushed)
Instructions
- Dissolve the Base: In a large mixing bowl, whisk together heavy cream, whole milk, granulated sugar, pure vanilla extract, and fine salt for about 2 minutes until sugar is dissolved.
- Chill the mixture: Cover and refrigerate for at least 2 hours.
- Churn to Perfection: Pour the chilled base into your ice cream maker and churn according to manufacturer’s instructions for 20-25 minutes.
- Add the Cookies: During the last 2-3 minutes of churning, add the coarsely crushed chocolate sandwich cookies.
- Freeze to Set: Transfer the soft ice cream to a freezer-safe container and freeze for 3-4 hours before serving.
Notes
For the best cookie-to-cream ratio, crush cookies into varying sizes and store ice cream in an airtight container to prevent freezer burn.
- Prep Time: 10 minutes
- Cook Time: 25 minutes
- Category: Dessert
- Method: Churning
- Cuisine: American
Nutrition
- Serving Size: 1 serving
- Calories: 350
- Sugar: 30g
- Sodium: 150mg
- Fat: 22g
- Saturated Fat: 14g
- Unsaturated Fat: 8g
- Trans Fat: 0g
- Carbohydrates: 38g
- Fiber: 1g
- Protein: 5g
- Cholesterol: 80mg
Keywords: ice cream, dessert, cookies and cream, homemade ice cream, no-cook ice cream