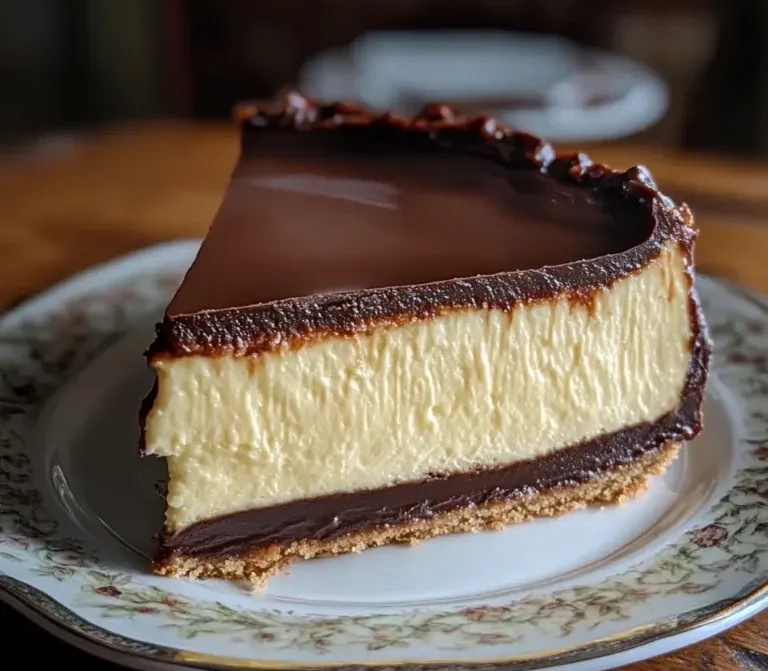
When two iconic desserts merge into one, pastry magic happens. This Heavenly Boston Cream Pie Cheesecake is a brilliant, showstopping fusion of a velvety baked cheesecake, a smooth and silky vanilla pastry custard, and a glossy, decadent chocolate ganache glaze.
By layering the comforting textures of a traditional American cheesecake with the signature components of a classic Boston cream pie, you get an incredibly rich, multi-dimensional dessert. It is the ultimate centerpiece for holiday tables, milestone birthdays, or any special occasion that demands a luxurious, bakery-quality finish.
Why You Will Love This Fusion Masterpiece
-
Three Desserts in One: You get the crunch of a buttery graham cracker crust, the rich tang of a classic cheesecake, the pillowy softness of real vanilla custard, and a deep chocolate snap.
-
Gentle Oven-Cooling Technique: Utilizing a residual-heat cooling method inside the oven guarantees a smooth, crack-free cream cheese base without the hassle of a complex water bath.
-
True Scratch-Made Custard: The middle layer features a beautifully thickened, tempered egg yolk custard that tastes light-years better than anything made from a box.
-
Spectacular Visual Slices: Cutting into this cake reveals distinct, clean geometric layers of cream, yellow custard, and dark chocolate that will instantly wow your guests.
 Prep Time: 30 mins   |   Cook Time: 55 mins   |   Chill Time: 4 hrs minimum
 Course: Dessert      |   Cuisine: American    |   Yield: 10 elegant servings
Equipment Needed
-
9-inch springform pan
-
Mixing bowls
-
Electric mixer or hand whisk
-
Saucepan & hand whisk
-
Spatula & measuring cups/spoons
-
Baking sheet
Ingredients Checklist
Because this recipe features distinct cooked layers, ensuring your dairy and eggs are at the correct temperatures will yield the smoothest textures.
For the Golden Crust Base
-
2 cups Graham Cracker Crumbs: Provides a sweet, sturdy foundation for the heavy layers above.
-
¼ cup Granulated Sugar: Helps lock the crumbs together as they bake.
-
½ cup Unsalted Butter (Melted): Binds the dry crumbs completely.
For the Creamy Cheesecake Filling
-
16 oz (2 blocks) Cream Cheese: Must be fully softened to room temperature to prevent small white lumps in your final batter.
-
¾ cup Granulated Sugar: Dissolves into the cream cheese for a perfectly sweet base.
-
2 Large Eggs: Room temperature; provides structure and a custard-like texture.
-
1 teaspoon Vanilla Extract: Enhances the dairy flavors.
-
½ cup Sour Cream: Provides that essential, signature New York-style tang and keeps the interior exceptionally moist.
For the Silky Vanilla Custard Layer
-
1 cup Whole Milk: The rich liquid base needed for a traditional pastry cream.
-
¼ cup Granulated Sugar: Sweetens the custard layer gently.
-
1 tablespoon Cornstarch: The essential thickening agent that keeps the custard stable enough to slice cleanly.
-
2 Egg Yolks: Adds a beautiful golden color and a velvety, luxurious mouthfeel.
-
1 teaspoon Vanilla Extract: Added at the very end to keep the aromatic profile bright and sweet.
For the Glossy Chocolate Ganache
-
½ cup Heavy Cream: The liquid fat base that softens the chocolate into a pourable glaze.
-
4 oz Semi-Sweet Chocolate: Finely chopped. Semi-sweet provides the perfect bittersweet contrast to the sweet vanilla custard below.
Step-by-Step Instructions
1. Bake the Graham Cracker Crust
-
Preheat your conventional oven to 325°F (163°C).
-
In a medium bowl, stir together the 2 cups of graham cracker crumbs, ¼ cup of granulated sugar, and ½ cup of melted unsalted butter until the mixture holds together like wet sand.
-
Press the buttery crumbs firmly and evenly into the bottom of your 9-inch springform pan to create a solid base.
-
Bake at 325°F (163°C) for exactly 10 minutes, then place the pan on a wire rack to cool completely.
2. Mix and Bake the Cheesecake Filling
-
In a large mixing bowl, beat the 16 oz of softened cream cheese and ¾ cup of granulated sugar with an electric mixer until completely smooth, airy, and free of lumps.
-
Add the 2 large eggs one at a time, beating gently on low speed after each addition just until the yellow yolk disappears. Do not over-mix here, as excess air will cause the cake to crack.
-
Gently stir in the 1 teaspoon of vanilla extract and ½ cup of sour cream until the batter is smooth and uniform.
-
Pour the creamy batter over your cooled graham cracker crust and smooth out the top surface with a spatula.
-
Place the springform pan onto a large baking sheet and bake at 325°F (163°C) for 45 minutes. The cheesecake is done when the edges are stable but the very center is still slightly jiggly.
-
The Gentle Cool Method: Turn off your oven completely. Crack the oven door open slightly (about an inch) and let the cheesecake sit inside the cooling oven for 10 minutes. This slowly drops the temperature to prevent cracking. Afterward, remove it and let it cool completely on the counter.
3. Cook the Silky Vanilla Custard
-
In a medium saucepan, combine the 1 cup of whole milk and ¼ cup of granulated sugar. Heat over medium heat until warm and steaming, but do not let it reach a boil.
-
While the milk warms, whisk the 2 egg yolks and 1 tablespoon of cornstarch together in a separate small bowl until completely smooth and pale yellow.
-
The Tempering Trick: Slowly pour a few tablespoons of the warm milk into the egg yolk mixture, whisking vigorously and constantly. This gently raises the temperature of the cold eggs so they don’t accidentally scramble when added to the hot pan.
-
Pour the tempered egg mixture back into the saucepan with the remaining warm milk. Cook over low heat, stirring continuously with a whisk, until the mixture thickens into a rich, pudding-like consistency.
-
Remove the pan from the heat, stir in the 1 teaspoon of vanilla extract, and let the custard cool down to room temperature. Once cooled, spread it evenly over the top of the completely cooled cheesecake layer.
4. Glaze with Smooth Chocolate Ganache
-
Place your 4 oz of chopped semi-sweet chocolate into a small heatproof bowl.
-
Heat the ½ cup of heavy cream in a small saucepan or in the microwave until hot and steaming (but not boiling).
-
Pour the hot cream directly over the chopped chocolate and let it sit undisturbed for 1 to 2 minutes to allow the chocolate to melt naturally.
-
Whisk the mixture gently from the center outward until it transforms into a beautifully smooth, glossy liquid ganache.
-
Pour the warm ganache directly over the custard layer, using an offset spatula to spread it smoothly and evenly to the edges.
5. Chill and Serve
-
Place the entire assembled cheesecake into the refrigerator to chill for a minimum of 4 hours, though letting it set overnight is highly recommended for the absolute best flavor depth and clean slicing texture.
-
Before releasing the latch on your springform pan, carefully run a thin, warm knife around the inside edges of the pan to ensure a flawless release. Slice, serve cold, and enjoy!
Pro Presentation & Baking Secrets
The Hot-Knife Slice Trick: To keep the rich chocolate ganache from dragging into the golden vanilla custard layer when you slice the cake, dip a long, sharp chef’s knife into a tall glass of hot water, wipe it completely dry with a towel, and make one clean, swift cut downward. Wipe the blade completely clean and re-dip it in hot water before making your next cut.
Keep it Covered: When chilling the cheesecake, wait until the chocolate ganache has completely set and cooled in the fridge before covering it loosely with plastic wrap. Covering it while the ganache is still warm will trap steam, creating condensation droplets that can mar the glossy finish of your glaze.
Storage and Freshness Guidelines
-
In the Refrigerator: Because this dessert contains both baked cream cheese and a cooked egg-and-milk custard layer, it must always be stored in the fridge. Keep it covered loosely or under a cake dome for up to 3 to 4 days.
-
Freezing Note: While traditional baked cheesecakes freeze beautifully, desserts with a heavy cornstarch-based custard layer can sometimes weep or separate slightly upon thawing. For the absolute best texture experience, it is highly recommended to enjoy this particular cake fresh from the refrigerator within its 4-day window.
Nutritional Summary
| Metric | Details |
| Yield | 10 uniform, decadent portions |
| Pan Size | 9-inch Springform Pan |
| Texture Profile | Crunchy biscuit base, rich baked cream core, velvet cream layer, and a snappy chocolate finish. |
Frequently Asked Questions (FAQs)
My custard looks a little lumpy. How can I fix it?
If your custard thickens too quickly or isn’t whisked constantly, minor lumps of cooked egg or cornstarch can form. Don’t worry! Simply press the warm custard through a fine-mesh metal sieve or strainer using the back of a spoon before spreading it onto the cake. This will instantly catch the lumps and leave you with a perfectly silky pastry cream.
Can I use store-bought vanilla pudding instead of making the custard?
Yes, you can use a high-quality thick store-bought vanilla pudding or chilled custard if you are short on time. However, ensure the pudding is quite thick and fully set before spreading it onto the cake, otherwise, it may slide or run when you pour the warm chocolate ganache over the top.
Final Thoughts
This Heavenly Boston Cream Pie Cheesecake is a beautiful testament to creative baking fusion. By treating your egg yolks with care during the tempering process and allowing the baked cream cheese base to cool down slowly in the oven, you guarantee a structurally perfect, incredibly elegant dessert that balances rich, nostalgic flavors with sophisticated pastry style.
Try Also: Irresistible Dessert Ideas from
-
What is Dubai Chocolate Bar Made Of? Key Ingredients Explained
-
Rose Milk Cake Recipe
-
Strawberry Cheesecake Dump Cake Recipe
Be sure to Print Recipe or Pin Recipe so you have this ultimate multi-layered dessert guide saved and ready for your next big holiday gathering or special celebration!
Heavenly Boston Cream Pie Cheesecake
- Total Time: 265 minutes
- Yield: 10 servings 1x
- Diet: Vegetarian
Description
A luxurious fusion of baked cheesecake, vanilla pastry custard, and chocolate ganache, perfect for special occasions.
Ingredients
- 2 cups Graham Cracker Crumbs
- ¼ cup Granulated Sugar
- ½ cup Unsalted Butter (Melted)
- 16 oz (2 blocks) Cream Cheese
- ¾ cup Granulated Sugar
- 2 Large Eggs
- 1 teaspoon Vanilla Extract
- ½ cup Sour Cream
- 1 cup Whole Milk
- ¼ cup Granulated Sugar
- 1 tablespoon Cornstarch
- 2 Egg Yolks
- 1 teaspoon Vanilla Extract
- ½ cup Heavy Cream
- 4 oz Semi-Sweet Chocolate
Instructions
- Preheat your conventional oven to 325°F (163°C).
- In a medium bowl, stir together the graham cracker crumbs, granulated sugar, and melted butter until the mixture holds together.
- Press the mixture firmly into the bottom of a 9-inch springform pan.
- Bake at 325°F for 10 minutes, then cool completely.
- In a large mixing bowl, beat the cream cheese and granulated sugar until smooth.
- Add the eggs one at a time, mixing gently.
- Stir in the vanilla extract and sour cream until smooth.
- Pour the batter over the cooled crust and smooth the top.
- Bake at 325°F for 45 minutes.
- Remove from the oven and cool in the oven for 10 minutes.
- In a medium saucepan, combine milk and sugar, heat until warm.
- Whisk the egg yolks and cornstarch together until smooth.
- Temper the egg yolks by slowly adding warm milk.
- Return the mixture to the saucepan and cook until thickened.
- Stir in the vanilla extract and cool before spreading over the cheesecake.
- Pour hot cream over chopped chocolate and whisk until smooth.
- Pour the ganache over the custard layer.
- Chill the cheesecake for at least 4 hours before serving.
Notes
For best results, allow to chill overnight for enhanced flavor and texture.
- Prep Time: 30 minutes
- Cook Time: 55 minutes
- Category: Dessert
- Method: Baking
- Cuisine: American
Nutrition
- Serving Size: 1 slice
- Calories: 450
- Sugar: 30g
- Sodium: 300mg
- Fat: 30g
- Saturated Fat: 18g
- Unsaturated Fat: 8g
- Trans Fat: 0g
- Carbohydrates: 40g
- Fiber: 1g
- Protein: 6g
- Cholesterol: 90mg
Keywords: cheesecake, Boston cream pie, dessert, chocolate, custard