If you are looking for a spectacular, crowd-pleasing dessert that requires zero oven time and takes only 15 minutes of hands-on prep, this Chocolate Peanut Butter Pie is the ultimate answer. Bringing together the classic, deeply loved combination of chocolate and peanut butter, this layered refrigerator pie feels luxurious but uses incredibly simple pantry shortcuts.
Built on a deeply crunchy homemade Oreo cookie crust, this dessert stacks a silky, cloud-like peanut butter cream cheese layer beneath a rich layer of instant chocolate fudge pudding. Crowned with a fluffy blanket of whipped cream, warm peanut butter and hot fudge drizzles, and a scatter of mini peanut butter candies, it is a magnificent center-stage treat. Whether you are hosting a casual summer barbecue, an autumn holiday dinner, or a game-day watch party, this foolproof pie always disappears in minutes.
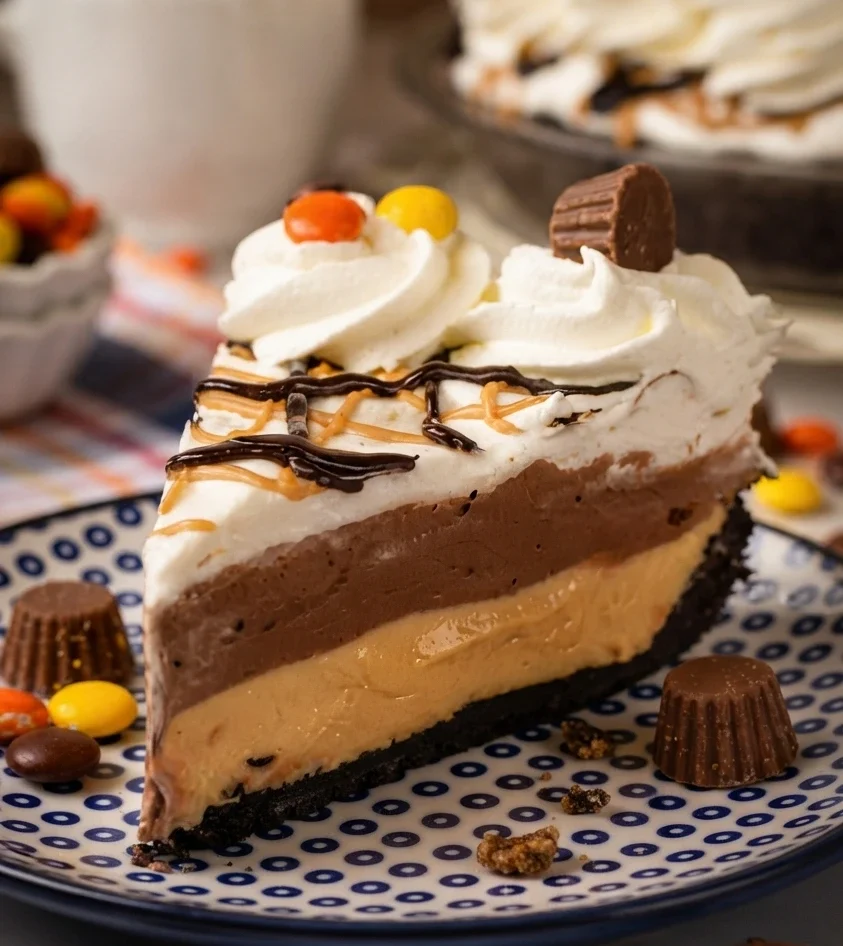
Table of Contents
Why This 15-Minute Refrigerator Pie Rules
-
Absolutely No Baking Required: The Oreo crust sets perfectly in the cold fridge while you build the fillings, saving you from heating up your kitchen.
-
Flawless Texture Stack: By folding whipped topping into both the cream cheese and the pudding bases, you get light, velvety layers that hold their shape beautifully when cut.
-
Gourmet Bakery Visuals: The alternating cross-hatched drizzles of melted peanut butter and rich hot fudge make it look like it walked out of a boutique pastry shop.
Master Ingredients List
1. The Crunchy Oreo Crust
-
2 cups Oreo Cookie Crumbs: (About 20 whole Oreo cookies, crushed fine with their inner cream filling kept intact).
-
5 tablespoons Unsalted Butter: Melted to lock the shell base together.
2. The Velvet Peanut Butter Fluff Layer
-
8 oz (1 package) Cream Cheese: Completely softened to room temperature.
-
0.5 cup Powdered Sugar: Smooths out the density of the cheese.
-
0.5 cup Creamy Peanut Butter: Use traditional shelf-stable brands (like Jif or Skippy) rather than natural stirring oils.
-
0.5 cup Whipped Topping (Cool Whip): Thawed completely to add airiness.
3. The Chocolate Fudge Pudding Layer
-
3.9 oz (1 box) Instant Chocolate Fudge Pudding Mix: The dry powder base.
-
1 cup Whole Milk: Cold, to activate the instant thickening properties.
-
1 cup Whipped Topping (Cool Whip): Thawed, folded in to create a light mousse finish.
4. The Border and Crowning Garnish
-
Remaining Whipped Topping (Cool Whip): Divided into 1.5 cups for the top coat and the rest for edge piping.
-
2 tablespoons Creamy Peanut Butter & 2 tablespoons Hot Fudge: Melted slightly for the dramatic drizzle design.
-
0.5 cup Mini Reese’s Pieces & Mini Peanut Butter Cups: For the ultimate candy crunch decoration.
Step-by-Step Layering and Drizzling Guide
Quick Recipe Overview
| Metric | Details |
| Prep Time | 15 minutes |
| Chilling Time | 2 to 3 hours (minimum) |
| Total Time | 15 minutes hands-on |
| Yield | 12 Rich, Bakery-Style Slices |
Pro Tips for Flawless Layers and Clean Slices 💡
-
Say No to Natural Peanut Butters: For the filling layers, avoid using natural or organic peanut butters that require stirring before use. The separating oils in natural peanut butter will break down the structural stability of the cream cheese and whipped cream, causing your layers to turn runny and weep. Stick to classic, thick, shelf-stable brands.
-
Bring the Cream Cheese to True Room Temp: Trying to blend cold cream cheese straight out of the refrigerator will fill your gorgeous peanut butter fluff layer with stubborn, unappealing little white lumps. Let your block sit on the kitchen counter for 45 to 60 minutes before you begin beating.
-
The Immaculate Cut Secret: To showcase those stunning, perfectly defined layers of dark chocolate pudding and golden peanut butter cream, submerge a long chef’s knife in hot water for a few seconds before cutting. Wipe the blade completely dry with a clean towel, make one steady slice straight down, and pull the blade out sideways. Wipe clean and repeat the hot water dip before every single slice!
Creative Recipe Twists & Storage Hacks
-
The Homemade Whipped Cream Swap: If you prefer to skip store-bought whipped topping, you can easily build your own stabilized cream! Simply whip 3 cups of ice-cold heavy whipping cream with 0.75 cup of powdered sugar on high speed until completely stiff peaks form, then swap it volume-for-volume into the recipe steps.
-
The Extra Nutty Crust Upgrade: Want even more peanut butter depth? Swap out traditional chocolate Oreos and use Peanut Butter Oreos or crunchy Nutter Butter cookies for your crust crumbs instead!
-
How to Make it Nut-Free: You can easily transform this into a magnificent allergy-safe treat. Simply swap out the peanut butter volume-for-volume with premium cookie butter (like Biscoff spread) and replace the peanut butter candy toppings with dark chocolate curls.
-
Storage Guidelines: Because of the fresh dairy components, keep this pie covered loosely with plastic wrap or tucked inside an airtight pie keeper in the refrigerator for up to 4 to 5 days. For a firm, ice-cream-like texture, you can also freeze the pie solid for up to 1 month!

Chocolate Peanut Butter Pie
- Total Time: 180 minutes
- Yield: 12 servings 1x
- Diet: Vegetarian
Description
A creamy, no-bake dessert that combines chocolate and peanut butter in a decadent layered pie, perfect for any occasion.
Ingredients
- 2 cups Oreo Cookie Crumbs
- 5 tablespoons Unsalted Butter, melted
- 8 oz Cream Cheese, softened
- 0.5 cup Powdered Sugar
- 0.5 cup Creamy Peanut Butter
- 0.5 cup Whipped Topping (Cool Whip), thawed
- 3.9 oz Instant Chocolate Fudge Pudding Mix
- 1 cup Whole Milk, cold
- 1 cup Whipped Topping (Cool Whip), thawed
- 1.5 cups Whipped Topping (Cool Whip), for top coat
- 2 tablespoons Creamy Peanut Butter, melted
- 2 tablespoons Hot Fudge, melted
- 0.5 cup Mini Reese’s Pieces & Mini Peanut Butter Cups, for decoration
Instructions
- Press and Chill the Oreo Crust: Pulse the whole Oreo cookies in a food processor until fine. Mix the cookie crumbs and melted butter and press into a 9-inch pie plate. Refrigerate to firm up.
- Whip the Velvet Peanut Butter Fluff: Beat the cream cheese, powdered sugar, and peanut butter until smooth. Fold in whipped topping and spread over the crust.
- Whisk the Mousse-Like Chocolate Fudge: Mix the pudding mix with cold milk until thick. Fold in whipped topping and spread over the peanut butter layer.
- Top Coat and the Grand Art Drizzle: Spread 1.5 cups of whipped topping over the chocolate layer. Drizzle melted peanut butter and hot fudge in a cross-hatch design on top.
- Pipe the Edges and Deep Chill: Pipe remaining whipped topping around edge, add candies on top, and chill for at least 2 to 3 hours before slicing.
Notes
Avoid using natural peanut butters as they can affect the stability of the layers. Ensure cream cheese is at room temperature for best texture.
- Prep Time: 15 minutes
- Cook Time: 0 minutes
- Category: Dessert
- Method: Chilling
- Cuisine: American
Nutrition
- Serving Size: 1 slice
- Calories: 320
- Sugar: 22g
- Sodium: 220mg
- Fat: 20g
- Saturated Fat: 9g
- Unsaturated Fat: 9g
- Trans Fat: 0g
- Carbohydrates: 30g
- Fiber: 2g
- Protein: 6g
- Cholesterol: 30mg
Keywords: chocolate, peanut butter, pie, no-bake dessert, easy dessert