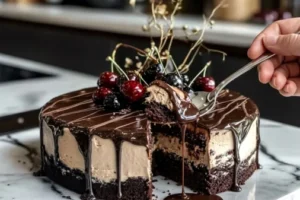
This recipe is an incredible hybrid dessert. While titled a Black Forest Cake, the actual ingredient profile reveals a brilliant, creative twist: it fuses a rich Red Velvet Cookies-and-Cream Cheesecake with a luxurious Chocolate Ganache Drip. Standing on a buttery Oreo crust, packed with crushed chocolate biscuits, and tinted a deep velvet crimson, this showstopper is finished with silky chocolate ganache, whipped cream stars, and festive mini cookies.
Recipe Specifications
-
Yield: 10–12 decadent slices
-
Prep Time: 25 minutes
-
Baking Time: 70–80 minutes (including crust)
-
Total Time: ~1 hour 45 minutes (plus overnight chilling)
-
Pan Size: 9-inch springform pan
-
Theme: Decadent Cookies-and-Cream Red Velvet Fusion
Comprehensive Ingredients Checklist
1. The Crunchy Oreo Crust
-
2 cups Oreo cookies, finely crushed into crumbs (about 20-22 whole cookies)
-
¼ cup unsalted butter, melted
2. The Red Velvet Cookies-and-Cream Core
-
24 ounces (680g) full-fat cream cheese, thoroughly softened to room temperature
-
1 cup granulated white sugar
-
1 cup sour cream, room temperature (delivers the signature velvet tang)
-
1 teaspoon pure vanilla extract
-
3 large eggs, room temperature
-
2 tablespoons unsweetened cocoa powder (sifted to eliminate lumps)
-
1 teaspoon red food coloring (gel-based preferred for a deep maroon hue)
-
½ cup Oreo cookies, coarsely crushed or chopped
3. The Decadent Chocolate Drip & Toppings
-
1 cup semi-sweet chocolate chips
-
½ cup heavy whipping cream
-
Whipped cream (sweetened, canned or freshly whipped for piping decoration)
-
Mini Oreos (for the final topping arrangement)
-
Red velvet cake crumbs (optional garnish for color contrast)
-
Sprinkles (for a touch of fun!)
Step-by-Step Production & Assembly Guide
+-------------------------------------------------------------+
|    GARNISH: Whipped Cream Swirls, Mini Oreos, & Sprinkles    |
+-------------------------------------------------------------+
|    DRIP: Silky, Rich Semi-Sweet Chocolate Ganache Cascade   |
+-------------------------------------------------------------+
|    FILLING: Deep Crimson Red Velvet & Crushed Oreo Core     |
+-------------------------------------------------------------+
|    BASE: Compact, Buttery Crunchy Oreo Cookie Crust         |
+-------------------------------------------------------------+
|               BAKED IN A 9-INCH SPRINGFORM PAN              |
+-------------------------------------------------------------+
Phase 1: Constructing the Chocolate Crust
-
Oven Prep: Preheat your oven to 163°C (325°F). Lightly grease the base and inside ring of a 9-inch springform pan.
-
Combine and Pack: In a medium-sized bowl, mix the 2 cups of fine Oreo crumbs with the ¼ cup of melted butter until it resembles wet sand. Pour into the prepared pan and press the crumbs firmly into the bottom in a flat, uniform layer.
-
Blind Bake: Bake the crust for 10 minutes to set its structure. Remove from the oven and set aside on a wire rack to cool down completely while you build the core.
Phase 2: Processing the Velvet Cheesecake Core
-
Cream the Cheese: In a large mixing bowl, beat your 24 ounces of softened cream cheese on medium speed for 2–3 minutes until it is perfectly smooth, velvety, and entirely free of tiny lumps.
-
Blend the Aromatics: Add the 1 cup of granulated sugar, 1 cup of sour cream, and 1 teaspoon of vanilla extract. Mix well until everything is perfectly uniform and smooth.
-
The Low-Speed Egg Addition: Turn your mixer down to its lowest speed. Add the 3 large eggs one at a time, mixing just until the yellow yolk disappears after each addition. Chef’s Rule: Do not overmix here; introducing excess air will cause the cake to balloon up and crack.
-
Fold the Crimson Accents: Gently fold in the 2 tablespoons of sifted cocoa powder, 1 teaspoon of red food coloring, and the ½ cup of coarsely crushed Oreos. Use a rubber spatula to fold from the bottom up until the batter turns an even, gorgeous red velvet shade with flecks of chocolate cookie.
-
The Pour: Pour the velvety crimson batter directly over the cooled Oreo crust, smoothing the surface completely flat with your spatula.
Phase 3: The Slow Bake and Progressive Cool Down
-
Bake: Slide the pan into the center of your preheated oven. Bake for 60 to 70 minutes. The cheesecake is done when the outer edges look set and slightly puffed, but a small circle in the very center still retains a slight, uniform jiggle when the pan is nudged.
-
The Oven Rest: Turn off the oven entirely. Crack the oven door open an inch or two and let the cheesecake sit inside undisturbed for 1 hour. This slow drop in temperature relaxes the structure and prevents center splitting.
-
The Overnight Chill: Remove from the oven, allow it to cool down to room temperature on a wire rack, and then slide it into the refrigerator. Chill for at least 4 hours, or ideally overnight, to let the cake set completely firm.
Phase 4: Constructing the Drip and Decoration
-
Melt the Ganache: In a microwave-safe bowl, combine the 1 cup of semi-sweet chocolate chips and ½ cup of heavy cream. Microwave in brief 20-second bursts, stirring thoroughly between each interval, until the mixture transforms into a silky, shiny, pourable chocolate ganache. Let it cool slightly so it is warm, not hot.
-
The Elegant Drip: Carefully release the collar of your chilled springform pan. Load your warm ganache into a piping bag (or use a spoon) and slowly drizzle it along the top edge of the cold cheesecake, letting it cascade down the sides in beautiful, distinct drips. Spread the remaining ganache evenly across the top center of the cake.
-
The Final Presentation: Pipe beautiful star bursts of whipped cream around the border of the cake. Nestled a mini Oreo cookie into each whipped cream peak. Garnish with a scattering of red velvet cake crumbs and your favorite colorful sprinkles for a beautiful festive finish. Slice and enjoy!
Chef’s Professional Success Tips
-
Achieving Perfect Drips: The secret to a gorgeous ganache drip lies in temperature contrast. Ensure your cheesecake is bone-cold from the refrigerator before applying the ganache. When the warm chocolate hits the chilly cake surface, it slows down and solidifies into beautiful, thick, perfect droplets rather than running all the way down to the serving platter.
-
The Slicing Clean Cut: Because this cheesecake features a dark cookie crust, a crimson core, and dark chocolate ganache, wiping your knife clean between cuts is essential for pristine plating. Dip your sharp chef’s knife into a tall glass of hot water, dry it fully on a clean towel, make one clean slice from edge to center, and repeat the process for every cut.
Try Also: Irresistible Dessert Ideas from
Decadent Cookies-and-Cream Red Velvet Cheesecake
- Total Time: 105 minutes
- Yield: 10-12 slices 1x
- Diet: Vegetarian
Description
An incredible hybrid dessert that fuses rich Red Velvet Cookies-and-Cream Cheesecake with a luxurious Chocolate Ganache Drip, all on a buttery Oreo crust.
Ingredients
- 2 cups Oreo cookies, finely crushed into crumbs (about 20–22 whole cookies)
- ¼ cup unsalted butter, melted
- 24 ounces full-fat cream cheese, softened to room temperature
- 1 cup granulated white sugar
- 1 cup sour cream, room temperature
- 1 teaspoon pure vanilla extract
- 3 large eggs, room temperature
- 2 tablespoons unsweetened cocoa powder
- 1 teaspoon red food coloring (gel-based preferred)
- ½ cup Oreo cookies, coarsely crushed or chopped
- 1 cup semi-sweet chocolate chips
- ½ cup heavy whipping cream
- Whipped cream for decoration
- Mini Oreos for garnish
- Red velvet cake crumbs (for optional garnish)
- Sprinkles for decoration
Instructions
- Preheat your oven to 163°C (325°F) and lightly grease a 9-inch springform pan.
- Mix the Oreo crumbs and melted butter together until it resembles wet sand, then press into the pan.
- Bake the crust for 10 minutes, and then let it cool.
- Beat the cream cheese until smooth, then add sugar, sour cream, and vanilla.
- Add eggs one at a time at low speed, mixing only until the yolk disappears.
- Fold in cocoa powder, red food coloring, and coarsely crushed Oreos until uniformly mixed.
- Pour the mix over the cooled crust, smoothing the top.
- Bake for 60 to 70 minutes, until the edges are set but the center jiggles slightly.
- Turn off the oven and let the cheesecake rest inside for 1 hour.
- Chill in the refrigerator for at least 4 hours, ideally overnight.
- Combine chocolate chips and heavy cream, microwave until melted, then let cool slightly.
- Drizzle the ganache over the cheesecake, letting it drip down the sides.
- Pipe whipped cream around the edge and garnish with mini Oreos and sprinkles.
Notes
Ensure the cheesecake is completely chilled before drizzling ganache for perfect drips. Clean your knife between slices for a pristine presentation.
- Prep Time: 25 minutes
- Cook Time: 80 minutes
- Category: Dessert
- Method: Baking
- Cuisine: American
Nutrition
- Serving Size: 1 slice
- Calories: 450
- Sugar: 30g
- Sodium: 300mg
- Fat: 25g
- Saturated Fat: 15g
- Unsaturated Fat: 8g
- Trans Fat: 0g
- Carbohydrates: 55g
- Fiber: 2g
- Protein: 6g
- Cholesterol: 80mg
Keywords: red velvet cheesecake, cookies and cream, chocolate ganache, dessert, celebration cake