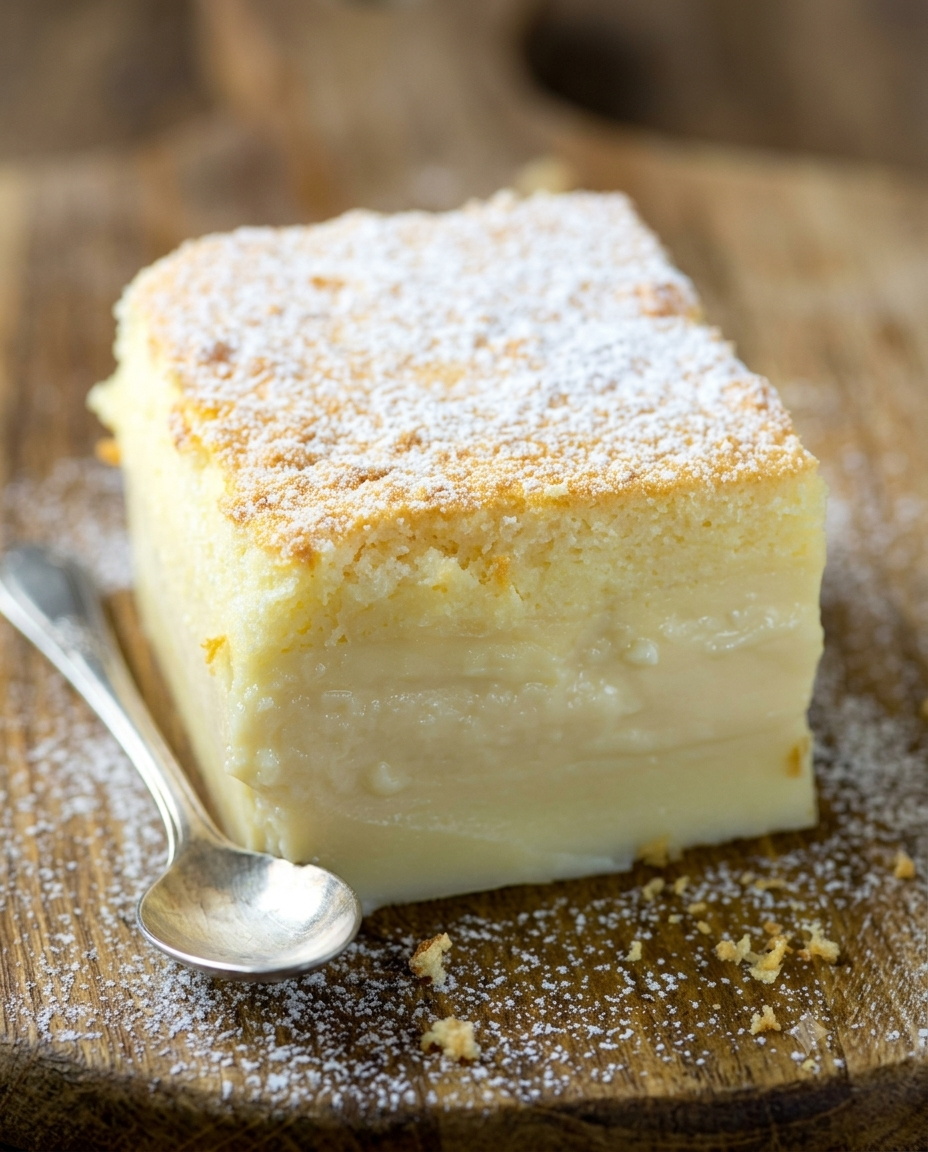
A true marvel of home baking chemistry, the Vanilla Magic Custard Cake transforms a single, highly fluid batter into three distinct, luxurious layers as it bakes. At the base, a dense, rich fudge forms; the center settles into a silky, delicate vanilla custard; and the top develops into an incredibly light, airy sponge.
By gently folding whipped egg whites into a thin, milk-heavy yolk emulsion, the whipped whites naturally float to the surface while the heavy liquids settle underneath. This precise separation produces an elegant, multi-textured patisserie-style dessert entirely on its own—no stacking or filling required.
Recipe Specifications
-
Yield: 10 delicate bakery-style squares
-
Prep Time: 20 minutes
-
Baking Time: 40–60 minutes (50 minutes average)
-
Total Time: 1 hour 10 minutes (plus 2–3 hours structural chilling)
-
Nutritional Estimate: ~285 kcal per serving
-
Flavor Profile: Pure, comforting vanilla creaminess balanced by light egg-white sweetness and a clean dusting of sugar.
Comprehensive Ingredients Checklist
1. The Tri-Layer Magic Batter
-
4 large eggs, carefully separated into whites and yolks (room temperature)
-
½ cup unsalted butter, melted and slightly cooled
-
2 cups lukewarm whole milk (essential for preventing the melted butter from seizing)
-
1 ¼ cups powdered sugar, sifted
-
1 tablespoon water
-
1 cup all-purpose flour
-
2 teaspoons pure vanilla extract
-
¼ teaspoon salt
2. The Finishing Garnish
-
Extra powdered sugar, for dusting the surface
Step-by-Step Production & Assembly Guide
+-------------------------------------------------------------+
|    SURFACE CROWN: Delicate Snow Dusting of Sifted Powdered Sugar|
+-------------------------------------------------------------+
|    LAYER 1 (TOP): Light, Fluffy, Aerated Sponge Cake        |
+-------------------------------------------------------------+
|    LAYER 2 (MID): Silky, Melt-in-Your-Mouth Vanilla Custard |
+-------------------------------------------------------------+
|    LAYER 3 (BASE): Dense, Rich, Fudgy Fondant Foundation    |
+-------------------------------------------------------------+
|               2 TO 3-HOUR COMPULSORY REFRIGERATION SET      |
+-------------------------------------------------------------+
Phase 1: Thermal Prep & Aeration
-
Oven Setting: Preheat your oven to 163°C (325°F). Lightly grease an 8×8-inch square baking dish and line the bottom with parchment paper for effortless removal later.
-
The Structural Separation: Meticulously separate the 4 large eggs. Place the egg whites into a spotlessly clean, grease-free mixing bowl, and drop the yolks into another large bowl.
-
The Meringue Lift: Add the ¼ teaspoon of salt to the egg whites. Using an electric mixer fitted with clean beaters, whip the whites on high speed until stiff, rigid peaks form. Set aside.
-
The Creamy Paste: In the bowl with the egg yolks, add the 1 ¼ cups of powdered sugar. Beat on medium speed until the mixture becomes remarkably pale, thick, and creamy.
-
The Liquid Binding: Pour the ½ cup of melted, slightly cooled butter and 1 tablespoon of water into the yolk paste. Continue mixing for approximately 2 minutes until completely smooth and emulsified.
Phase 2: Sifting & Folding the Matrix
-
The Flour Sift: Gradually sift the 1 cup of all-purpose flour directly over the yolk mixture, running the mixer on low speed just until the flour is fully incorporated.
-
Streaming the Liquids: Keep the mixer running on its lowest speed and slowly pour in the 2 cups of lukewarm whole milk. Mix until the batter is smooth. Note: The batter will look remarkably thin, watery, and completely unlike traditional cake batter—this is exactly correct.
-
The Flavor Injection: Stir in the 2 teaspoons of pure vanilla extract until evenly distributed.
-
The Magic Fold: Using a flexible silicone spatula, gently fold the whipped egg whites into the thin batter, adding one-third of the meringue at a time. Do not overmix. You want to break up the large clumps, but the final batter must remain thin with small, fluffy pieces of egg white floating throughout. These floating clouds are what form the top sponge layer.
Phase 3: The Bake & The Setting Chill
-
The Pour: Pour the thin batter into your prepared square baking dish. Gently tap the pan on the kitchen counter once or twice to pop any trapped large air bubbles.
-
The Precision Bake: Bake at 163°C (325°F) for 40 to 60 minutes. The cake is perfectly cooked when the top turns an elegant, light golden-brown color, and the center has only a very slight, gelatinous jiggle when the pan is gently shaken. If the top begins browning too early, loosely tent a sheet of aluminum foil over the dish.
-
The Structural Chill: Remove the cake from the oven and let it cool completely to room temperature inside the pan. Once cool, transfer the dish to the refrigerator for 2 to 3 hours. This refrigeration window is mandatory, as it locks the custard layer in place and sharpens the clean definition between the three tiers.
-
The Bakery Slice: Just before serving, dust the surface generously with sifted powdered sugar. Using a long, sharp knife, slice the cake into neat squares. To ensure beautiful, sharp, bakery-style edges, wipe the blade completely clean with a warm towel between every single cut. Serve chilled alongside hot espresso or tea.
Pastry Chef Success Tips
The Lukewarm Milk Mandate: Make sure your whole milk is strictly lukewarm before streaming it into the batter. If you use ice-cold milk straight from the refrigerator, it will instantly shock the melted butter, causing it to solidify into small, hard specks of fat. This ruins the uniform separation of the layers and prevents the custard from setting evenly.
Storage & Preservation Parameters
Refrigerator Protocol
Because of the high concentration of eggs and fresh whole milk in the core custard layer, this cake must always be stored in the refrigerator. Keep the squares inside an airtight container or tightly wrap the baking dish with plastic wrap. It will hold its crisp, multi-layered texture and clean vanilla flavor perfectly for up to 3 to 4 days. Always serve it slightly cool or chilled directly from the refrigerator for the ultimate fudgy-meets-custard mouthfeel.
Try Also: Irresistible Dessert Ideas from
Vanilla Magic Custard Cake
- Total Time: 70 minutes
- Yield: 10 servings 1x
- Diet: Vegetarian
Description
A marvel of home baking, this Vanilla Magic Custard Cake features three distinct layers: a fudgy base, silky custard center, and airy sponge top, all achieved through careful folding and baking.
Ingredients
- 4 large eggs, separated
- ½ cup unsalted butter, melted and slightly cooled
- 2 cups lukewarm whole milk
- 1 ¼ cups powdered sugar, sifted
- 1 tablespoon water
- 1 cup all-purpose flour
- 2 teaspoons pure vanilla extract
- ¼ teaspoon salt
- Extra powdered sugar, for dusting
Instructions
- Preheat the oven to 163°C (325°F) and prepare an 8×8-inch baking dish.
- Separate the egg whites from the yolks into two bowls.
- Add salt to the egg whites and whip until stiff peaks form.
- Combine powdered sugar with the yolks and beat until pale and creamy.
- Pour in melted butter and water into the yolk mixture and mix until smooth.
- Sift flour over the yolk mixture and mix on low speed until incorporated.
- Stream in lukewarm milk while mixing on low speed until smooth.
- Stir in vanilla extract.
- Fold whipped egg whites into the batter gently in thirds.
- Pour the batter into the prepared baking dish and tap to remove air bubbles.
- Bake for 40 to 60 minutes until golden on top with a slight jiggle.
- Cool completely in the pan, then refrigerate for 2 to 3 hours.
- Dust with powdered sugar and slice before serving.
Notes
Make sure to keep the whole milk lukewarm to prevent the melted butter from solidifying. Store in the refrigerator for up to 3 to 4 days.
- Prep Time: 20 minutes
- Cook Time: 50 minutes
- Category: Dessert
- Method: Baking
- Cuisine: French
Nutrition
- Serving Size: 1 square
- Calories: 285
- Sugar: 18g
- Sodium: 200mg
- Fat: 18g
- Saturated Fat: 10g
- Unsaturated Fat: 6g
- Trans Fat: 0g
- Carbohydrates: 30g
- Fiber: 1g
- Protein: 6g
- Cholesterol: 110mg
Keywords: custard cake, vanilla cake, baking, dessert recipe