Ultimate Chocolate Strawberry Drip Cake: The Luxury Centerpiece
An absolute showstopper designed for the most elevated celebrations, this Ultimate Chocolate Strawberry Drip Cake balances intense cocoa depth with a dramatic, modern aesthetic. Built upon ultra-moist, coffee-enhanced chocolate sponges, this cake is layered with a silk-textured buttercream, sealed with an artisanal dark chocolate drip cascade, and crowned with a luxurious pile of chocolate-covered strawberries and gourmet confections.
Achieving a flawless, bakery-quality finish requires a strict understanding of temperature control—ensuring your cake is properly chilled so your ganache drips hold their geometric definition without pooling at the base.
Recipe Specifications
- Yield: 12 to 16 elegant slices
- Prep Time: 45 minutes
- Baking Time: 30–35 minutes
- Assembly & Chilling Time: 1 hour 30 minutes
- Baking Vessel: Two premium 8-inch round aluminum cake pans, greased and lined with parchment paper circles
- Flavor Profile: Deep, bittersweet cacaos contrasted by rich, sweet dairy buttercream and the bright, juicy acidity of fresh strawberries.
Comprehensive Ingredients Checklist
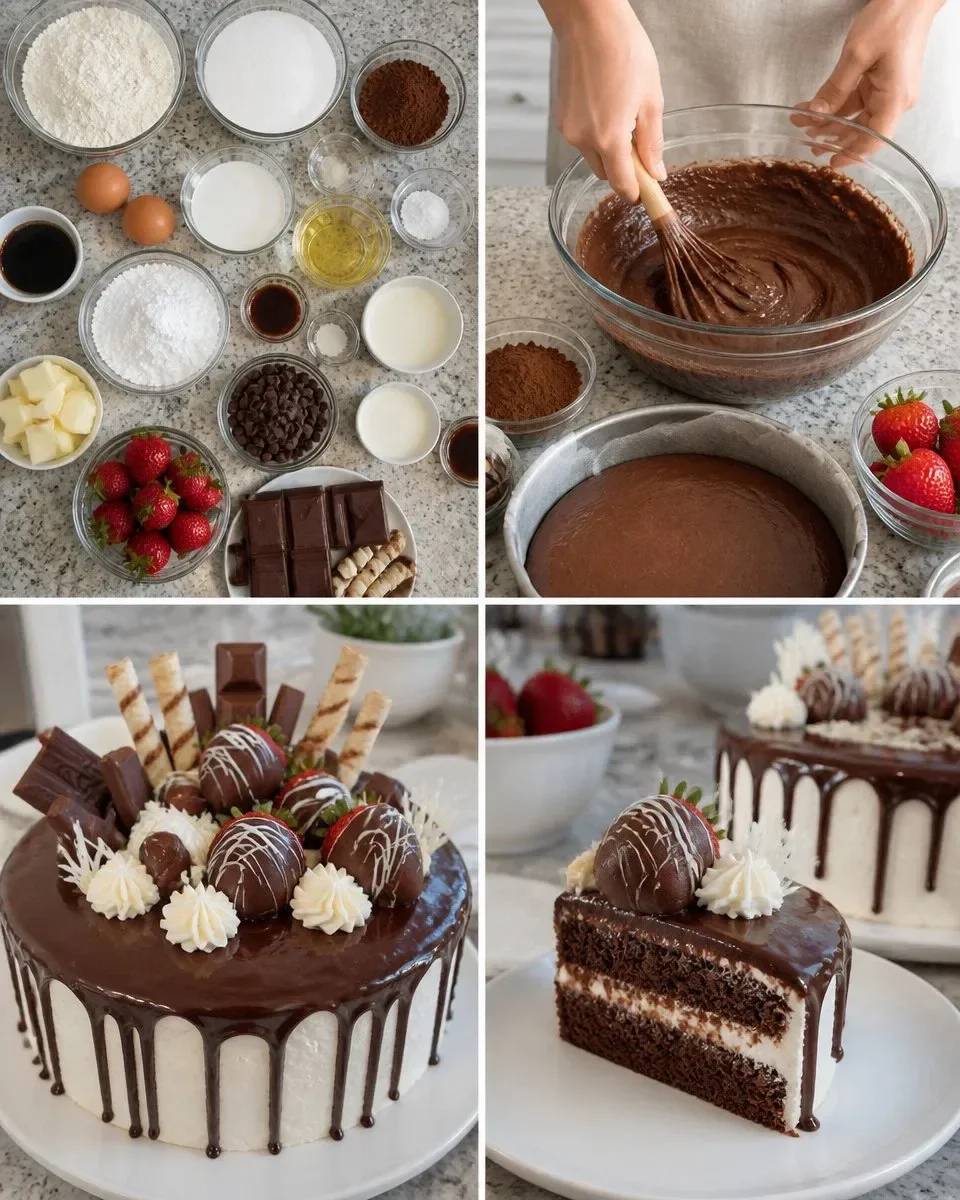
1. The Coffee-Infused Chocolate Sponges
- 2 cups all-purpose flour, accurately spooned and leveled
- 2 cups granulated white sugar
- ¾ cup unsweetened premium cocoa powder (alkalized Dutch-process yields the deepest color and flavor)
- 2 teaspoons baking powder
- 1 ½ teaspoons baking soda
- 1 teaspoon fine sea salt
- 2 large eggs, room temperature
- 1 cup buttermilk, shaken (the acidity activates the baking soda for a velvety crumb)
- ½ cup neutral vegetable oil or canola oil (guarantees a crumb that stays moist for days)
- 2 teaspoons pure vanilla extract
- 1 cup fresh hot coffee or boiling water (essential for blooming the cocoa powder starches)
2. The Silken Velvet Buttercream
- 1 ½ cups (3 sticks) unsalted butter, thoroughly softened at room temperature
- 4 ½ cups powdered sugar, finely sifted (to eliminate any graininess)
- ½ cup heavy whipping cream, room temperature
- 1 teaspoon pure vanilla extract
3. The Glossy Drip Ganache
- 1 cup semi-sweet chocolate chips or chopped chocolate couverture
- ¾ cup heavy cream (minimum 35% fat content)
4. The Confectionery Overload (Garnishes)
- 6 to 8 chocolate-covered strawberries, fully set
- Handful of premium chocolate bars and shards broken into rustic geometric shapes
- 4 to 6 Pirouette cookie wafer rolls
- 4 artisan chocolate truffles
- ¼ cup melted white chocolate for a delicate zigzag drizzle
Step-by-Step Production & Assembly Guide
+-------------------------------------------------------------+
|    CROWN: Chocolate Strawberries, Truffles, Wafers & Bars   |
+-------------------------------------------------------------+
|    DRIP: High-Definition, Satine Chocolate Ganache Cascade  |
+-------------------------------------------------------------+
|    COATING: Thick, Flawless Velvet Buttercream Shell        |
+-------------------------------------------------------------+
|    SPONGE 2: Light, Coffee-Bloomed Moist Chocolate Layer     |
+-------------------------------------------------------------+
|    INTERIOR FILLING: Generous Layer of Fluffy Buttercream   |
+-------------------------------------------------------------+
|    SPONGE 1: Deep, Intensely Dark Chocolate Layer Base      |
+-------------------------------------------------------------+
Phase 1: Baking the Sponges
- Oven Architecture: Preheat your oven to 175°C (350°F). Grease the walls of two 8-inch cake pans, line the bottoms with parchment paper discs, and dust lightly with cocoa powder to prevent sticking.
- Unify the Dry Matrix: In a large mixing bowl, whisk together the 2 cups of flour, 2 cups of sugar, ¾ cup of cocoa powder, 2 teaspoons of baking powder, 1 ½ teaspoons of baking soda, and 1 teaspoon of salt until homogeneous.
- Emulsify the Liquids: Add the 2 room-temperature eggs, 1 cup of buttermilk, ½ cup of vegetable oil, and 2 teaspoons of vanilla extract directly into the dry blend. Mix on medium speed with an electric mixer for 2 minutes until thick and fully unified.
- Bloom the Cocoa: With the mixer running on its lowest speed, slowly stream in the 1 cup of hot coffee. Chef’s Note: The batter will become very thin and watery. This is completely correct; the heat dissolves the cocoa starches, yielding an incredibly tender, moist crumb.
- The Precision Bake: Divide the liquid batter equally between your two prepared pans. Bake for 30 to 35 minutes. Verify doneness by inserting a toothpick into the dead center; it must emerge completely clean or with a few moist crumbs attached. Let the cakes sit in their pans for 10 minutes, then invert them onto wire racks to cool completely down to room temperature.
Phase 2: Compounding the Velvet Buttercream
- Aerate the Fat: In a clean, large bowl, beat the 1 ½ cups of softened unsalted butter for 3 to 4 minutes on high speed until it looks completely pale, creamy, and doubled in volume.
- Incorporate the Sugars: Turn the mixer to low and add the sifted powdered sugar 1 cup at a time, alternating with small splashes of the ½ cup of heavy cream and 1 teaspoon of vanilla extract.
- The Final Fluff: Once all ingredients are in, increase the mixer to high and beat for an additional 2 minutes until the icing is cloud-like, spreadable, and smooth.
Phase 3: Stacking and Crumb Coating
- Level the Tiers: If your cake layers have slightly domed tops, use a long serrated knife to slice off the peaks, ensuring both layers are perfectly flat and level.
- The Core Fill: Place your first sponge layer onto a cardboard cake round or a flat serving platter. Pipe or spread a generous, even layer of buttercream across the top.
- The Exterior Finish: Place the second sponge layer upside-down on top of the cream (this gives you a perfectly sharp, flat edge for the top of the cake). Use an offset spatula to apply a thin “crumb coat” of buttercream over the top and sides of the entire cake to lock in any stray crumbs. Chill in the refrigerator for 20 minutes.
- The Final Coat: Apply a thick, generous layer of buttercream over the chilled cake. Use a metal bench scraper held at a 45-degree angle against the sides of the cake while rotating your cake turntable to achieve flawless, sharp vertical walls. Return the cake to the refrigerator to chill for at least 30 minutes (the buttercream surface must be ice-cold before applying the drip).
Phase 4: Fabricating the Drip and Confectionery Top
- Emulsify the Ganache: Place the 1 cup of chocolate chips into a heatproof bowl. In a small saucepan, bring the ¾ cup of heavy cream to a bare simmer (do not let it boil). Pour the hot cream directly over the chocolate chips. Let it sit undisturbed for 2 minutes to melt the fats, then stir smoothly with a spatula in circles from the center outward until a glossy, fluid ganache forms. Let it cool until it is lukewarm but still fluid.
- Execute the Cascade: To control your drips flawlessly, transfer the lukewarm ganache into a squeeze bottle or use a tablespoon. Take the ice-cold cake out of the fridge. Carefully squeeze or drop a bit of ganache right at the top edge of the cake, allowing it to naturally cascade down the cold side. Space your drips intentionally around the entire perimeter, then fill in the center of the top of the cake with the remaining ganache, smoothing it out with an offset spatula.
- The Bakery Crown: While the ganache on top is still slightly sticky, immediately arrange your chocolate-covered strawberries, broken chocolate bars, Pirouette cookie rolls, and artisan truffles into an asymmetrical, luxurious mound on one half of the cake. For a professional final contrast, apply a delicate zigzag drizzle of melted white chocolate over the chocolate decor. Chill for 15 minutes to lock everything in place before slicing with a hot, clean knife.
Chef’s Professional Success Tips
- Why Coffee is Mandatory: Do not worry—your cake will not taste like coffee. The chemical compounds in hot coffee amplify the flavor profile of the cocoa solids without imparting any distinct coffee notes. If you absolutely cannot consume caffeine, replace it with boiling water or decaffeinated espresso.
- The Physics of a Perfect Drip: The absolute secret to clean, beautiful drips that stop halfway down the cake (instead of puddling messily at the bottom) relies entirely on a temperature differential. Your cake must be cold to freeze the descending ganache fats, and your ganache must be lukewarm. If your ganache is too hot, it will melt your buttercream and run straight off the cake. Test a single drip on the back of a cold drinking glass first to check its consistency.
- Eliminating Buttercream Air Bubbles: After your buttercream is fully whipped, turn your mixer to its absolute lowest speed and let the paddle attachment stir the frosting slowly for 2 to 3 minutes. This presses out all the trapped air pockets created during high-speed whipping, leaving you with a dense, silk-smooth icing that sweeps across the cake without leaving tiny holes or drag marks.

Ultimate Chocolate Strawberry Drip Cake
- Total Time: 105 minutes
- Yield: 12-16 slices 1x
- Diet: Vegetarian
Description
A luxurious chocolate strawberry drip cake, perfect for elevated celebrations.
Ingredients
- 2 cups all-purpose flour, accurately spooned and leveled
- 2 cups granulated white sugar
- ¾ cup unsweetened premium cocoa powder
- 2 teaspoons baking powder
- 1 ½ teaspoons baking soda
- 1 teaspoon fine sea salt
- 2 large eggs, room temperature
- 1 cup buttermilk, shaken
- ½ cup neutral vegetable oil or canola oil
- 2 teaspoons pure vanilla extract
- 1 cup fresh hot coffee or boiling water
- 1 ½ cups (3 sticks) unsalted butter, softened
- 4 ½ cups powdered sugar, finely sifted
- ½ cup heavy whipping cream, room temperature
- 1 teaspoon pure vanilla extract
- 1 cup semi-sweet chocolate chips or chopped chocolate
- ¾ cup heavy cream
- 6 to 8 chocolate-covered strawberries
- Handful of premium chocolate bars and shards
- 4 to 6 Pirouette cookie wafer rolls
- 4 artisan chocolate truffles
- ¼ cup melted white chocolate
Instructions
- Preheat your oven to 175°C (350°F) and prepare cake pans.
- Whisk together the dry ingredients in a large bowl until homogeneous.
- Add eggs, buttermilk, oil, and vanilla, then mix until unified.
- Slowly incorporate hot coffee into the batter.
- Divide the batter between the prepared pans and bake for 30-35 minutes.
- Cool cakes in pans for 10 minutes before inverting onto wire racks.
- Beat softened butter until pale and creamy, then gradually add powdered sugar and cream.
- Once light and fluffy, set aside buttercream.
- Make ganache by combining chocolate chips and heated cream, stirring until smooth.
- Chill the buttercream on the cake, then pour ganache on top for drips.
- Top with chocolate-covered strawberries and other garnishes.
- Chill for 15 minutes, then slice and serve.
Notes
For best results, keep cake layers and ganache at proper temperatures for flawless drips.
- Prep Time: 45 minutes
- Cook Time: 35 minutes
- Category: Dessert
- Method: Baking
- Cuisine: American
Nutrition
- Serving Size: 1 slice
- Calories: 400
- Sugar: 30g
- Sodium: 250mg
- Fat: 20g
- Saturated Fat: 10g
- Unsaturated Fat: 8g
- Trans Fat: 0g
- Carbohydrates: 55g
- Fiber: 3g
- Protein: 6g
- Cholesterol: 50mg
Keywords: chocolate cake, strawberry cake, drip cake, dessert, baking