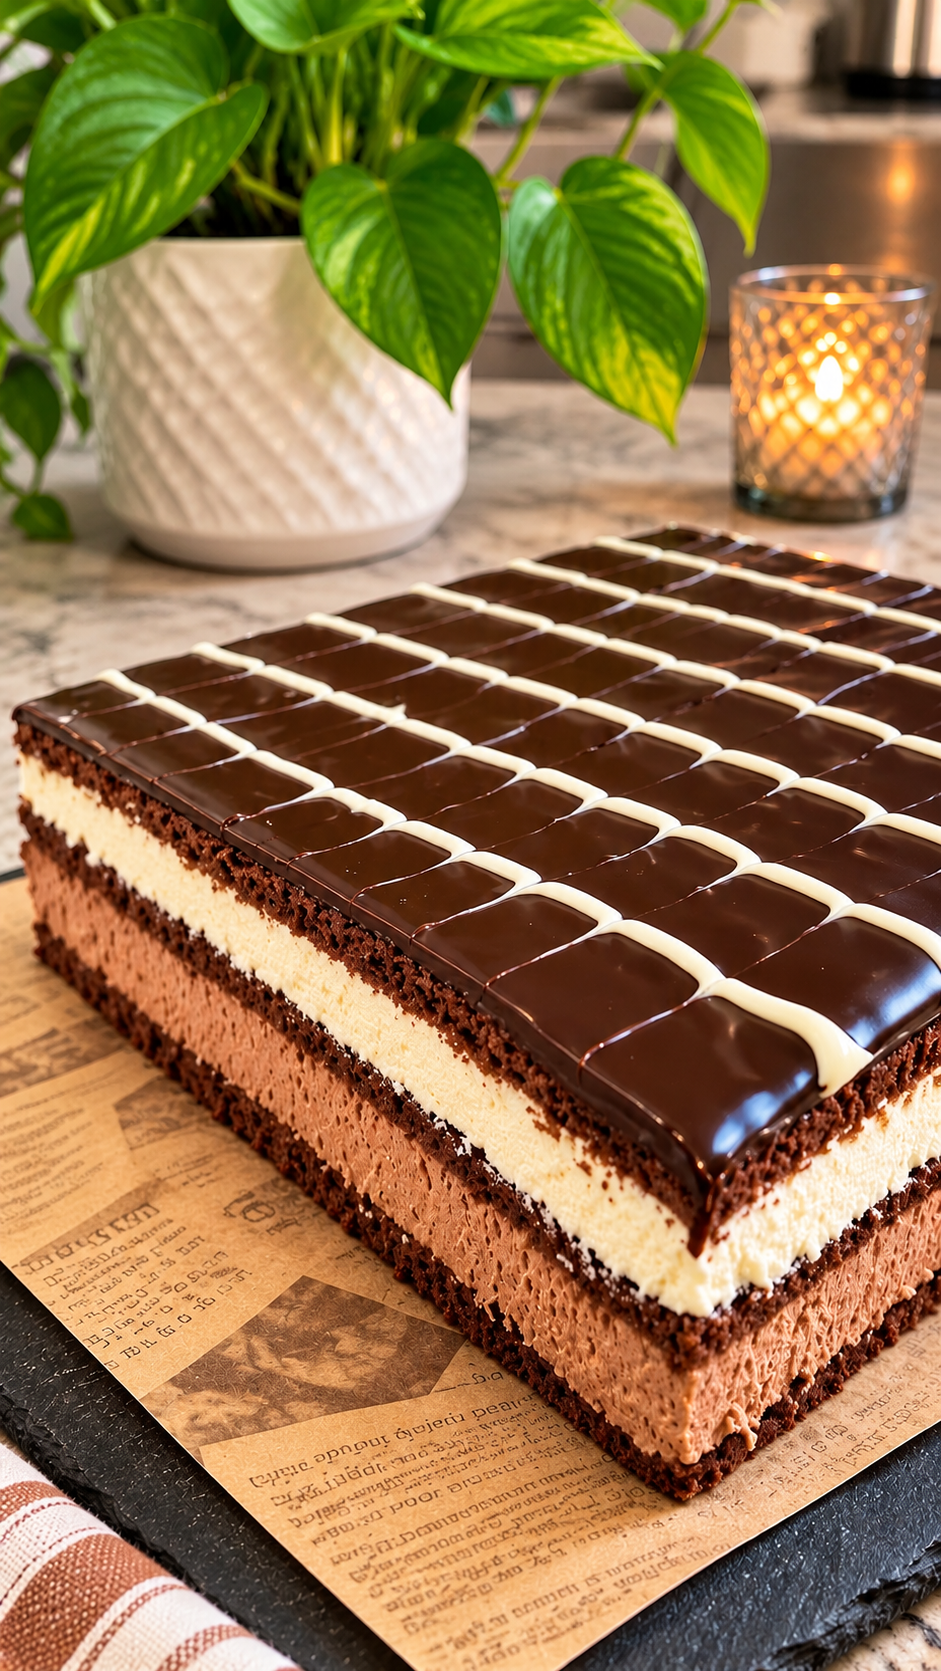
If you love rich chocolate desserts with beautiful layers and creamy fillings, this Tuxedo Chocolate Cake is a must-try! Inspired by the popular Costco Tuxedo Cake, this homemade version features three thin, soft chocolate sponge layers, two luxurious chocolate fillings, and a smooth dark chocolate ganache topping.
Between the layers, you’ll find a delicious milk and dark chocolate mascarpone cream followed by a silky white chocolate mascarpone cream. The contrast between the two fillings gives every slice its signature tuxedo appearance and a wonderful combination of chocolate flavors.
The finishing touch is a glossy dark chocolate ganache, decorated with optional white chocolate stripes for an elegant bakery-style look.
This cake takes a little more time and attention than a simple chocolate cake, but each step is straightforward. The best part? You can prepare it ahead of time and let it chill overnight, giving the layers plenty of time to set before serving.
Whether you’re making it for a birthday, holiday celebration, dinner party, or simply because you love chocolate, this Costco-inspired Tuxedo Chocolate Cake is sure to impress.
Why You’ll Love This Tuxedo Chocolate Cake
- Three beautiful chocolate layers: Soft, airy chocolate sponge gives the cake its delicate structure.
- Two irresistible fillings: Milk and dark chocolate cream meet smooth white chocolate cream for a delicious contrast.
- Rich chocolate topping: A glossy dark chocolate ganache adds an extra layer of chocolate flavor.
- Inspired by a bakery favorite: Enjoy the look and flavor of a classic tuxedo-style dessert at home.
- Perfect for special occasions: Its elegant layers make it a beautiful centerpiece for celebrations.
- Make-ahead friendly: The cake needs several hours in the refrigerator, making it convenient to prepare the day before serving.
What Is Tuxedo Chocolate Cake?
Tuxedo Chocolate Cake is a layered chocolate dessert inspired by the popular tuxedo-style cakes found in bakeries and grocery stores, including Costco.
The name comes from its contrasting chocolate and white chocolate layers, which resemble the classic black-and-white look of a tuxedo.
This homemade version combines three thin chocolate sponge layers with two creamy fillings: one made with milk and dark chocolate and another made with white chocolate. The entire cake is topped with dark chocolate ganache and optional white chocolate stripes.
The result is a rich, creamy, and visually striking dessert with several textures and chocolate flavors in every bite.
Ingredients You’ll Need
This cake has four main components: chocolate sponge, milk and dark chocolate cream, white chocolate cream, and dark chocolate ganache. Each component contributes to the cake’s flavor and layered appearance.
For the Chocolate Sponge Layers
- 6 eggs, separated: The egg whites are whipped separately to create an airy sponge, while the yolks provide richness.
- 220 g sugar, divided into two equal portions: Half is used with the egg whites and half with the yolks.
- 150 g all-purpose flour: Provides the structure for the sponge.
- 40 g cocoa powder: Gives the cake its chocolate flavor and color.
- 1 teaspoon baking powder: Helps the sponge rise.
- ½ teaspoon salt: Balances the sweetness and enhances the chocolate flavor.
- 90 ml oil: Helps keep the sponge soft and moist.
- 90 ml milk: Adds moisture and helps bring the batter together.
- 1 teaspoon vanilla extract: Adds a lovely background flavor.
- 1–2 teaspoons instant espresso powder (optional): Enhances the chocolate flavor without making the cake taste strongly of coffee.
For the Milk and Dark Chocolate Cream
- 250 g mascarpone: Creates a rich, smooth, creamy filling.
- 65 g milk chocolate: Adds sweetness and a mellow chocolate flavor.
- 55 g dark chocolate (55–60% cocoa): Gives the filling a deeper chocolate taste.
- 160 ml heavy cream (35% fat), divided into 50 ml and 110 ml: The first portion is used to melt the chocolate, while the second is whipped and folded into the filling.
For the White Chocolate Cream
- 250 g mascarpone: Gives the white chocolate filling its creamy texture.
- 120 g white chocolate: Provides sweetness and the distinctive white chocolate flavor.
- 160 ml heavy cream (35% fat), divided into 35 ml and 125 ml: The first portion is heated with the chocolate, while the second is whipped.
- 1 teaspoon vanilla extract: Adds warmth and complements the white chocolate.
For the Dark Chocolate Ganache
- 100 g dark chocolate (55–60% cocoa): Creates a rich chocolate topping.
- 80 ml heavy cream: Makes the ganache smooth and pourable.
- 5 g butter: Adds a silky finish.
For the White Chocolate Stripes (Optional)
- 50 g white chocolate: Used to create the decorative stripes.
- 1 tablespoon heavy cream: Helps make the white chocolate smooth enough to pipe.
Kitchen Tools You May Need
Before starting, gather these tools to make the preparation easier:
- Electric hand mixer or stand mixer
- Mixing bowls
- Fine-mesh sieve
- Rubber spatula
- Kitchen scale
- Baking tray or trays
- Parchment paper
- Cake frame or cake pan
- Small saucepan or microwave-safe bowl
- Piping bag
- Sharp knife
A kitchen scale is especially useful for this recipe because the ingredients are measured in grams and milliliters.
How to Make Tuxedo Chocolate Cake
Follow the steps in order to prepare the sponge, both chocolate fillings, the ganache, and the final decoration.
Step 1: Prepare the Oven and Dry Ingredients
Preheat your oven to 180°C.
Line your baking tray or trays with parchment paper so the sponge can be removed easily after baking.
In a mixing bowl, sift together the all-purpose flour, cocoa powder, baking powder, and salt. Stir gently to combine, then set the dry ingredients aside.
Sifting helps remove lumps and distributes the cocoa powder evenly throughout the flour.
Step 2: Whip the Egg Whites
Separate the eggs carefully, placing the egg whites in one clean mixing bowl and the yolks in another.
Using an electric mixer, beat the egg whites until they begin to foam.
Gradually add 110 g of sugar while continuing to beat. Keep mixing until the egg whites become smooth and form medium-firm peaks.
The mixture should hold its shape without becoming overly dry or grainy.
Step 3: Prepare the Egg Yolk Mixture
In a separate bowl, beat the egg yolks with the remaining 110 g of sugar.
Continue mixing until the mixture becomes pale, thick, and creamy.
Add the oil, milk, vanilla extract, and instant espresso powder if using. Mix briefly until everything is combined.
The espresso powder is optional, so you can leave it out if you prefer not to use coffee in your chocolate cake.
Step 4: Fold the Batter Together
Gently fold the whipped egg whites into the egg yolk mixture using a rubber spatula.
Work carefully to preserve as much air as possible. Avoid vigorous mixing because the air incorporated into the egg whites helps create a light sponge.
Next, add the sifted dry ingredients.
Fold gently until no visible streaks of flour or cocoa powder remain. Stop mixing as soon as the batter is combined.
The finished batter should look smooth, light, and airy.
Step 5: Bake the Chocolate Sponge
Spread the batter evenly in your prepared baking tray.
You can bake the entire mixture as one large sheet or divide it between two batches, depending on the dimensions of your trays and the cake layers you want.
Bake each batch for 12–16 minutes. Start checking the sponge with a toothpick after 12 minutes.
When the toothpick comes out clean or with a few moist crumbs, remove the sponge from the oven.
Allow it to cool completely before cutting.
Once cooled, cut the sponge into three equal pieces.
For this version, the sponge was baked in two batches to create three layers measuring approximately 20 × 18 cm each.
Step 6: Prepare the Milk and Dark Chocolate Cream
Finely chop the milk chocolate and dark chocolate and place them together in a heatproof bowl.
Heat 50 ml of heavy cream in a small saucepan until it just reaches a boil.
Pour the hot cream over the chopped chocolate. Stir until the chocolate melts completely and the mixture becomes thick and smooth.
Allow the chocolate mixture to cool for a few minutes. It should be slightly cooled before being added to the mascarpone.
In another bowl, briefly beat the mascarpone until smooth.
Add the cooled chocolate mixture and beat briefly until combined. Avoid overmixing.
In a separate bowl, whip the remaining 110 ml of cold heavy cream until stiff peaks form.
Using a spatula, gently fold the whipped cream into the chocolate and mascarpone mixture.
Continue folding until the filling is smooth and evenly combined.
Set aside until you’re ready to assemble the cake.
Step 7: Prepare the White Chocolate Cream
Finely chop the white chocolate and place it in a heatproof bowl.
Heat 35 ml of heavy cream until it just reaches a boil, then pour it over the chopped white chocolate.
Stir until the chocolate melts and the mixture becomes completely smooth. Leave it to cool for a few minutes.
Meanwhile, whip the remaining 125 ml of cold heavy cream in a separate bowl until stiff peaks form.
In another bowl, briefly beat the mascarpone with the vanilla extract.
Add the slightly cooled white chocolate mixture and beat until combined.
Gently fold in the whipped cream using a spatula. Continue until the filling looks smooth, light, and creamy.
Set aside for assembly.
Step 8: Assemble the Cake Layers
Place the first chocolate sponge layer inside your cake pan or cake frame.
Spread all of the milk and dark chocolate cream evenly over the sponge, making sure the filling reaches the edges.
Carefully place the second chocolate sponge layer on top.
Next, spread all of the white chocolate cream evenly over the second layer.
Finally, place the third chocolate sponge layer on top.
At this point, you should have three chocolate sponge layers and two creamy fillings, with the top sponge ready for the ganache.
Step 9: Prepare the Dark Chocolate Ganache
Finely chop the dark chocolate and place it in a heatproof bowl.
Heat the 80 ml of heavy cream in a small saucepan until it just reaches a boil.
Pour the hot cream over the chopped chocolate.
Let it sit for 1 minute so the heat can soften the chocolate.
Add the butter and stir gently until everything melts into a smooth, glossy ganache.
Pour the ganache over the top sponge layer and spread it evenly with a spatula.
Allow the ganache to cover the surface for a clean, polished finish.
Step 10: Add the Optional White Chocolate Stripes
For the classic tuxedo appearance, you can decorate the cake with white chocolate stripes.
Finely chop the 50 g of white chocolate and place it in a small heatproof bowl.
Heat 1 tablespoon of heavy cream, then pour it over the chopped chocolate.
Stir until smooth.
Allow the mixture to cool slightly while keeping it fluid enough to pipe.
Transfer the white chocolate mixture into a piping bag.
Pipe thin white stripes across the dark chocolate ganache to create the signature tuxedo decoration.
This step is optional, but it gives the finished cake a beautiful bakery-style appearance.
Step 11: Chill the Cake
Place the assembled cake in the refrigerator and chill for 6–8 hours, preferably overnight.
This resting time allows the fillings to firm up and the layers to settle, making the cake easier to slice.
Once properly chilled, remove the cake from its frame or pan and cut it into neat slices using a sharp knife.
For cleaner slices, wipe the knife between cuts.
Tips for the Best Tuxedo Chocolate Cake
A few small details can make a big difference when preparing this layered dessert.
Keep the sponge batter airy. Gently fold the whipped egg whites into the yolk mixture. Vigorous mixing can knock out the air and make the sponge denser.
Use a kitchen scale. Weighing the ingredients helps keep the proportions accurate, especially when preparing several layers and fillings.
Don’t overbake the sponge. Start checking after 12 minutes. Overbaking can make the thin chocolate layers dry and harder to handle.
Cool the chocolate before adding it to mascarpone. Hot chocolate can affect the texture of the mascarpone. Let it cool for a few minutes before mixing.
Use cold heavy cream for whipping. Cold cream whips more easily and helps create stable, fluffy fillings.
Fold the whipped cream gently. Use a spatula and gentle movements to keep the fillings light and smooth.
Keep the fillings in the correct layers. Use all of the milk and dark chocolate cream for the first filling layer and all of the white chocolate cream for the second.
Allow enough chilling time. The refrigerator time is important for helping the cake set properly. Overnight chilling is ideal.
Don’t rush the white chocolate decoration. Let the mixture cool slightly before piping so the stripes keep their shape without becoming too thick.
Common Mistakes to Avoid
- Overmixing the sponge batter: This can remove the air from the whipped egg whites and affect the final texture.
- Adding hot chocolate to mascarpone: Chocolate that is too hot can make the filling difficult to handle.
- Overwhipping the cream: Stop when stiff peaks form. Overwhipped cream can become grainy.
- Cutting the cake before chilling: The fillings need time to firm up, or the layers may slide when sliced.
- Spreading the ganache too roughly: Use a spatula and work gently to create an even top layer.
- Piping stripes while the white chocolate is too warm: If the mixture is too thin, the decoration may spread instead of holding its shape.
How to Store Tuxedo Chocolate Cake
Because this cake contains mascarpone and heavy cream, it should be stored in the refrigerator.
Refrigerator: Keep the cake covered in an airtight cake container or tightly wrapped to protect it from absorbing other refrigerator odors. Keep it chilled until ready to serve.
Make ahead: This cake is ideal for preparing a day before serving. The recommended overnight chilling time also makes it convenient for birthdays and special occasions.
Serving: For the best texture, remove the cake from the refrigerator shortly before serving. Keep any remaining cake refrigerated.
Can You Make Tuxedo Chocolate Cake Ahead of Time?
Yes! In fact, making this cake ahead is a great idea.
The cake needs 6–8 hours of chilling time, and overnight refrigeration is preferred. Preparing it the day before your celebration gives the sponge layers and fillings enough time to settle.
You can assemble the cake, add the ganache and optional white chocolate stripes, then refrigerate it until serving time.
Frequently Asked Questions
Is this Tuxedo Chocolate Cake exactly the same as Costco’s?
This is a homemade, Costco-inspired version of Tuxedo Cake. It uses three chocolate sponge layers, milk and dark chocolate cream, white chocolate cream, and dark chocolate ganache. It is inspired by the bakery-style dessert rather than claimed to be an exact copy of Costco’s original recipe.
How many layers does this cake have?
The cake has three thin chocolate sponge layers and two cream fillings. The first filling is made with milk and dark chocolate, while the second is made with white chocolate.
Can I skip the espresso powder?
Yes. The instant espresso powder is optional. You can leave it out without changing the rest of the recipe.
Are the white chocolate stripes necessary?
No. The white chocolate stripes are optional. The cake will still taste delicious with only the dark chocolate ganache on top.
Why does the cake need to chill for so long?
The mascarpone and whipped cream fillings need time to firm up. Chilling also helps the layers hold together, making the cake easier to cut and serve.
Can I use a cake frame instead of a regular pan?
Yes. The recipe allows you to assemble the layers in either a cake pan or a cake frame. Choose one that fits your sponge dimensions.
What size are the sponge layers?
The sponge layers in this version measure approximately 20 × 18 cm each. The batter can be baked in one large sheet or divided between two batches to achieve the desired dimensions.
Can I leave out the white chocolate decoration?
Absolutely. The white chocolate stripes are only for decoration and are not essential to the cake.
Does this cake need to be refrigerated?
Yes. Since the fillings contain mascarpone and heavy cream, keep the finished cake refrigerated.
Final Thoughts
This Tuxedo Chocolate Cake (Costco-Inspired) is a beautiful dessert for anyone who loves rich chocolate cakes and creamy layered fillings.
The soft chocolate sponge, milk and dark chocolate mascarpone cream, sweet white chocolate filling, and glossy dark chocolate ganache create a delicious combination in every slice.
Although it takes a little extra preparation, the steps are manageable when you work one component at a time. Prepare it the day before, let it chill overnight, and you’ll have an elegant homemade cake ready for your next celebration.
If you’re looking for a special chocolate dessert that looks impressive and tastes even better, this Tuxedo Chocolate Cake is worth making!