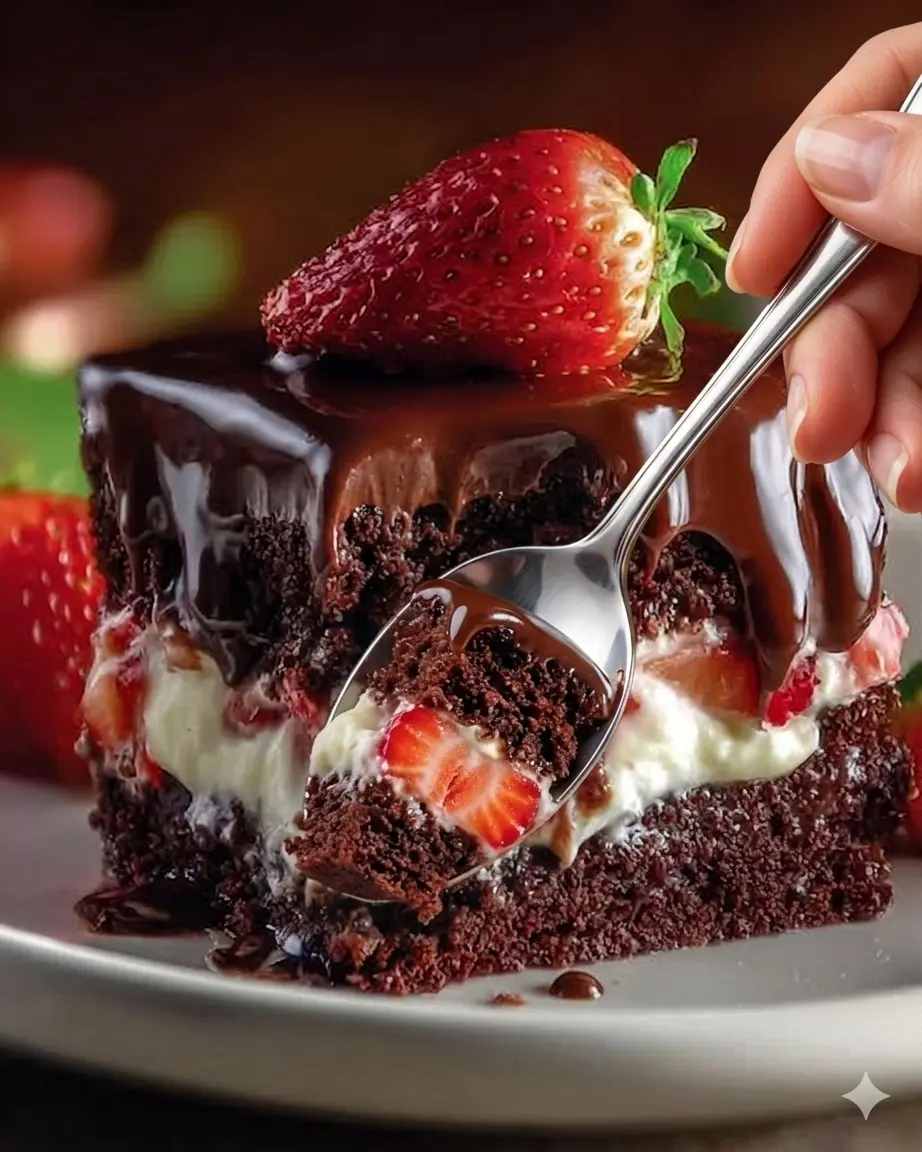
Few flavor combinations are as timeless, elegant, and universally loved as rich dark chocolate and sweet, juicy strawberries. This Strawberry-Filled Chocolate Cake is an absolute showstopper, pairing an incredibly moist and fudgy chocolate sponge with a bright, jammy strawberry compote, and your choice of a velvety cocoa buttercream or a glossy chocolate ganache.
Whether you are celebrating a milestone birthday, hosting an elegant dinner party, or crafting a stunning digital product for your baking portfolio, this multi-layered masterpiece delivers high-end bakery quality right from your own kitchen.
Why You Will Love This Layered Cake Recipe
-
The Ultimate Moisture Hack: Utilizing a combination of buttermilk, oil, and hot coffee/water creates an ultra-tender crumb structure that stays perfectly moist for days.
-
Vibrant Fruit Contrast: The scratch-made strawberry filling cuts through the deep, decadent chocolate fats, providing a perfect balance of acidity and sweetness.
-
Choose-Your-Own-Adventure Frosting: The recipe includes instructions for both a fluffy American cocoa buttercream and a sleek French ganache, allowing you to customize the final look and texture.
-
Stunning High-Contrast Layers: Slicing into the dark cake to reveal a bright crimson strawberry ribbon makes every single slice a beautiful visual experience.
 Prep Time: 30 mins   |   Bake Time: 35-40 mins   |   Chill Time: 30 mins (to set)
 Course: Dessert      |   Cuisine: American       |   Pan Size: Two 8-inch round pans
Ingredients Checklist
This premium recipe consists of three main components: the deep chocolate sponge, the jammy strawberry core, and a luxurious chocolate finish.
1. The Ultra-Moist Chocolate Sponge
-
2 cups All-Purpose Flour: The structural base for your cake layers.
-
1 ¾ cups Granulated Sugar: Sweetens and locks in essential moisture during the bake.
-
¾ cup Unsweetened Cocoa Powder: Opt for a high-quality natural cocoa powder for a rich flavor profile.
-
2 teaspoons Baking Soda & 1 teaspoon Baking Powder: Our leavening agents that react with the buttermilk to create a light, springy rise.
-
½ teaspoon Salt: Crucial for balancing the sugars and brightening the deep cocoa notes.
-
1 cup Buttermilk: The acidity tenderizes the gluten matrix. (If you don’t have it, simply mix 1 cup of whole milk with 1 tablespoon of white vinegar or lemon juice and let it sit for 5 minutes).
-
½ cup Vegetable Oil: Keeps the sponge incredibly meltingly soft, even when refrigerated.
-
2 Large Eggs: Provide structural stability and a rich, custor-like crumb.
-
1 teaspoon Vanilla Extract: Adds a beautiful background warmth.
-
1 cup Hot Water or Hot Coffee: Must be piping hot to correctly bloom the cocoa powder and dissolve the sugars.
2. The Luscious Strawberry Filling
-
2 ½ cups Fresh or Frozen Strawberries: Thoroughly chopped. Fresh summer berries are incredible, but frozen berries work perfectly year-round!
-
½ cup Sugar: Draws out the natural juices to form a rich syrup.
-
2 tablespoons Water & 1 teaspoon Lemon Juice: Adds a touch of liquid and bright acidity to elevate the berry flavors.
-
2 tablespoons Cornstarch: Thickens the filling into a stable, jammy compote that won’t run out of the sides of your cake.
3. Your Choice of Luxury Finish
Option A: Silky Dark Chocolate Ganache
-
200 g Semi-Sweet Chocolate: Finely chopped.
-
1 cup Heavy Cream: Heated to emulsify the chocolate into a sleek, reflective glaze.
Option B: Fluffy Cocoa Buttercream
-
200 g Unsalted Butter: Must be fully softened to room temperature to avoid a lumpy frosting.
-
2 cups Powdered Sugar: Sifted for a smooth, airy mouthfeel.
-
½ cup Cocoa Powder: Adds a rich chocolate flavor and beautiful color.
-
2–3 tablespoons Milk & 1 teaspoon Vanilla: To thin the frosting to a perfect, spreadable consistency.
The Finishing Touches (Garnish)
-
Fresh Strawberries: Whole or halved for a striking crown.
-
Chocolate Shavings or Chunks: Adds an artisanal texture and professional visual depth.
Step-by-Step Instructions
Follow these clear, chronological directions to bake, fill, and style your layered chocolate centerpiece.
1. Simmer the Strawberry Filling
-
In a medium saucepan, combine your 2 ½ cups of chopped strawberries, ½ cup of sugar, 1 teaspoon of lemon juice, and 2 tablespoons of water. Place over medium heat and cook for 5 to 7 minutes until the berries soften and release their brilliant red juices.
-
In a small cup, whisk your 2 tablespoons of cornstarch with a tiny splash of extra water to create a smooth slurry. Pour this into the bubbling strawberry mixture.
-
Cook for an additional 1 to 2 minutes, stirring continuously, until the sauce thickens into a glossy, jam-like consistency. Remove from the heat and allow it to cool completely to room temperature before assembling. Pro Tip: Placing a layer of plastic wrap directly on the surface of the compote will prevent a skin from forming.
2. Mix and Bake the Chocolate Cake
-
Preheat your conventional oven to 350°F (175°C). Lightly grease two 8-inch round cake pans and line the bottoms with parchment paper.
-
In a large bowl, whisk together the dry ingredients: 2 cups flour, 1 ¾ cups sugar, ¾ cup cocoa powder, 2 teaspoons baking soda, 1 teaspoon baking powder, and ½ teaspoon salt.
-
Add the 1 cup of buttermilk, ½ cup of vegetable oil, 2 large eggs, and 1 teaspoon of vanilla extract. Beat with an electric hand mixer or a robust wire whisk until completely smooth and free of large lumps.
-
Gradually stream in the 1 cup of hot water or hot coffee, mixing gently to prevent splashing. The batter will be incredibly thin and watery—this is completely intentional and is the secret behind the cake’s ultimate moisture.
-
Divide the runny batter evenly between your two prepared pans. Bake for 35 to 40 minutes, or until a toothpick inserted right into the center comes out clean or with a few dry crumbs attached. Cool in the pans for 10 minutes, then turn them out onto wire racks to cool completely.
-
Optional Layering: For an even more dramatic presentation, use a long serrated bread knife to slice both cooled cake layers in half horizontally to create a magnificent four-layer cake!
3. Mix Your Chosen Frosting
-
For the Ganache: Place your chopped chocolate in a bowl. Heat the heavy cream in a small saucepan until it just begins to simmer, then pour it over the chocolate. Let it sit untouched for 1 minute, then stir gently from the center outward until a glossy, liquid sheet forms.
-
For the Buttercream: Beat the 200 g of softened butter on high speed for 2 minutes until creamy. Gradually add the sifted 2 cups of powdered sugar and ½ cup of cocoa powder on low speed. Pour in the 1 teaspoon of vanilla and 2–3 tablespoons of milk, then whip on high speed for 2 to 3 minutes until light, fluffy, and cloud-like.
4. Assemble the Cake Layers
-
Place your first cake layer flat-side down on your serving platter or cake stand.
-
Pro Pastry Chef Dam Technique: If using the buttercream, pipe a thick border of frosting around the top edge of the cake layer to act as a barrier. Spoon a generous amount of your cooled strawberry filling inside this ring. This prevents the wet filling from leaking out the sides when you stack the next layer.
-
Carefully place the second cake layer directly on top. If you sliced your cakes into four layers, repeat this process for each layer, finishing with a plain cake top.
5. Coat and Garnish
-
Frost the top and outer sides of the entire cake using your remaining cocoa buttercream or carefully pour the silky ganache over the top, letting it drip elegantly down the sides.
-
Arrange whole or beautifully halved fresh strawberries in a crown pattern across the center top of the cake.
-
Scatter chocolate shavings or chunks around the berries and base for a luxurious, texturally exciting contrast.
-
Place the assembled cake into the refrigerator for at least 30 minutes before slicing. This brief rest firms up the structure, guaranteeing pristine, razor-sharp slices that showcase the distinct red and dark layers perfectly.
Pro Presentation Secrets
The Hot Knife Trick: To achieve flawless, magazine-ready slices where the strawberry filling doesn’t smudge across the dark chocolate sponge, submerge a long, sharp chef’s knife in hot water for a few seconds before slicing. Wipe it completely dry, make one clean slice down, and wipe the blade clean before repeating the process for the next piece.
Storage and Freshness Guide
-
In the Refrigerator: Because this recipe incorporates a fresh fruit filling and heavy cream/butter elements, it must be stored in an airtight container or a sealed cake dome in the fridge. It stays incredibly fresh and delicious for up to 3 to 4 days.
-
Serving Temperature: Always allow your individual slices to sit on the counter for about 10 to 15 minutes before serving. This lets the cold dairy fats soften back up, ensuring the chocolate cake melts in your mouth exactly as intended.
Nutritional Summary (Per Slice)
| Metric | Typical Values |
| Yield | 12 – 14 elegant slices |
| Chilling Phase | 30 minutes minimum |
| Flavor Profile | Deep, bittersweet chocolate balanced by a bright, tart fruit pop. |
Frequently Asked Questions (FAQs)
Can I use store-bought strawberry jam instead of making the filling?
You can use a high-quality store-bought strawberry preserve in a pinch, but a scratch-made compote is highly recommended. Commercial jams tend to have a much higher sugar content and a less vibrant acidity, which can make the overall cake taste overly sweet rather than beautifully balanced.
Why is my strawberry filling leaking out the sides of the cake?
This typically happens if the strawberry filling was still warm when assembled (which melts the frosting), or if you didn’t create a piped “dam” of buttercream around the edge of the cake layer before spooning the fruit inside. Making sure the compote is thoroughly chilled stabilizes the cornstarch matrix perfectly.
Final Thoughts
This Strawberry-Filled Chocolate Cake effortlessly proves that you don’t need a professional bakery kitchen to deliver a show-stopping, sophisticated dessert. By utilizing hot liquid to bloom your cocoa and a simple cornstarch slurry to stabilize your fruit, you create a texturally exciting, perfectly balanced cake that looks just as incredible as it tastes.
Be sure to save or pin this essential recipe so it’s ready for your next big baking project or milestone celebration!
Try Also: Irresistible Dessert Ideas from
Strawberry-Filled Chocolate Cake
- Total Time: 100 minutes
- Yield: 12-14 servings 1x
- Diet: Vegetarian
Description
A luxurious layered chocolate cake filled with jammy strawberries and topped with either a silky ganache or fluffy buttercream.
Ingredients
- 2 cups All-Purpose Flour
- 1 ¾ cups Granulated Sugar
- ¾ cup Unsweetened Cocoa Powder
- 2 teaspoons Baking Soda
- 1 teaspoon Baking Powder
- ½ teaspoon Salt
- 1 cup Buttermilk
- ½ cup Vegetable Oil
- 2 Large Eggs
- 1 teaspoon Vanilla Extract
- 1 cup Hot Water or Hot Coffee
- 2 ½ cups Fresh or Frozen Strawberries, chopped
- ½ cup Sugar (for filling)
- 2 tablespoons Water
- 1 teaspoon Lemon Juice
- 2 tablespoons Cornstarch
- 200 g Semi-Sweet Chocolate (for ganache)
- 1 cup Heavy Cream (for ganache)
- 200 g Unsalted Butter (for buttercream)
- 2 cups Powdered Sugar (for buttercream)
- ½ cup Cocoa Powder (for buttercream)
- 2–3 tablespoons Milk (for buttercream)
- Fresh Strawberries (for garnish)
- Chocolate Shavings or Chunks (for garnish)
Instructions
- Simmer the Strawberry Filling: In a medium saucepan, combine the chopped strawberries, sugar, lemon juice, and water over medium heat. Cook for 5 to 7 minutes until softened. Whisk cornstarch with water, add to the mixture, and cook for 1-2 minutes until thickened. Let cool.
- Mix and bake the Chocolate Cake: Preheat oven to 350°F (175°C) and prepare two 8-inch pans. Whisk dry ingredients, add buttermilk, oil, eggs, and vanilla. Beat until smooth. Gradually mix in hot water, divide batter into pans, and bake for 35-40 minutes.
- Mix your chosen frosting: For ganache, pour heated cream over chopped chocolate, let sit, and stir until smooth. For buttercream, beat softened butter, gradually add powdered sugar and cocoa powder, and whip until fluffy.
- Assemble the Cake Layers: Place the first cake layer on a platter, use frosting to create a barrier, and fill with cooled strawberry mixture. Place the second layer on top and frost the entire cake with either frosting option.
- Garnish: Decorate with fresh strawberries and chocolate shavings. Chill for at least 30 minutes before slicing.
Notes
For best results, let slices sit at room temperature for 10-15 minutes before serving.
- Prep Time: 30 minutes
- Cook Time: 40 minutes
- Category: Dessert
- Method: Baking
- Cuisine: American
Nutrition
- Serving Size: 1 slice
- Calories: 350
- Sugar: 25g
- Sodium: 200mg
- Fat: 18g
- Saturated Fat: 8g
- Unsaturated Fat: 5g
- Trans Fat: 1g
- Carbohydrates: 45g
- Fiber: 2g
- Protein: 5g
- Cholesterol: 55mg
Keywords: strawberry, chocolate cake, dessert, bakery, celebration