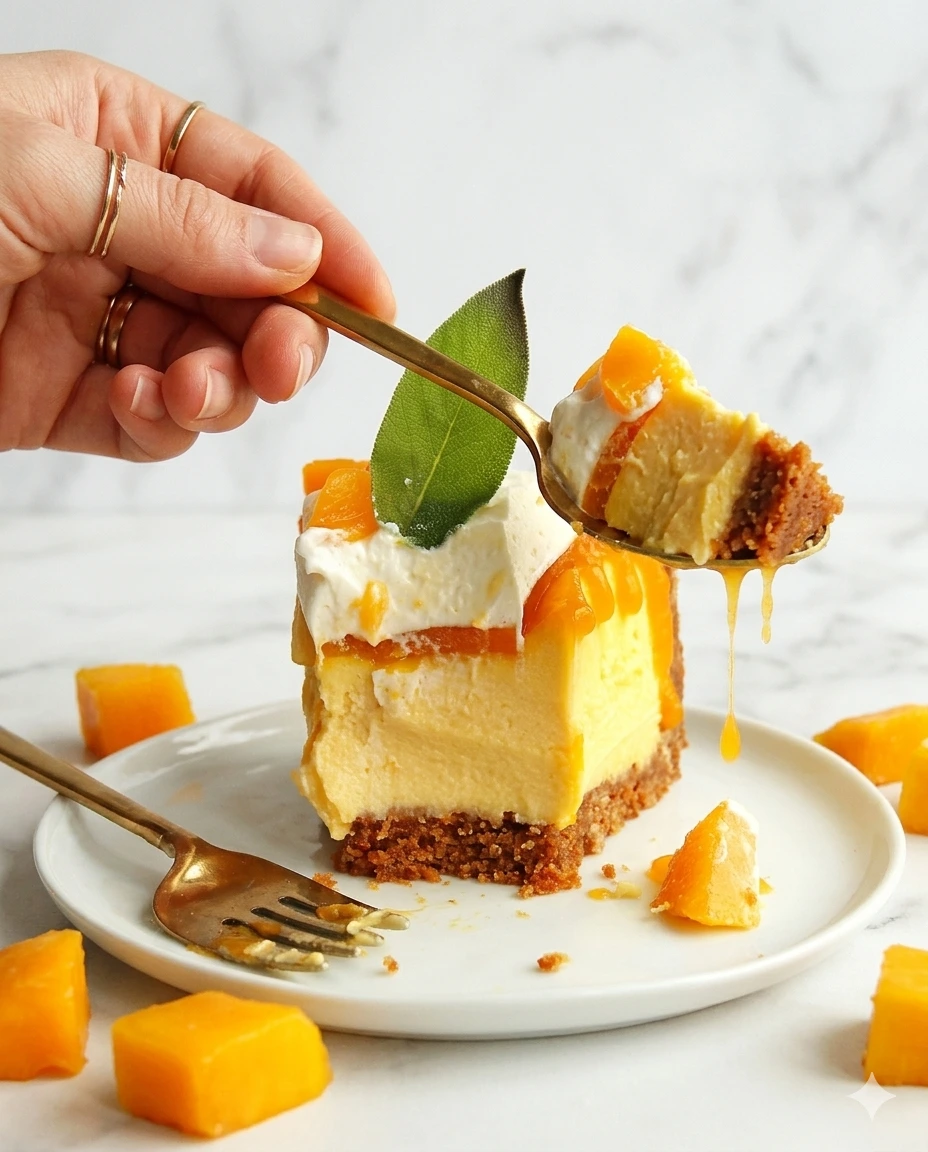
For anyone seeking a bright, tropical, and refreshing dessert that perfectly captures the essence of summer, this No-Bake Vegan Mango Cheesecake by Ruth Mitchell is an absolute masterpiece. Light, airy, and wonderfully sweet, this recipe completely eliminates eggs and dairy while offering a seamless gluten-free adaptation.
By harnessing the rich, natural fats of soaked raw cashews, coconut cream, and plant-based cream cheese, it achieves the iconic velvety density of a premium cheesecake without ever needing an oven. Crowned with a glossy, vibrant mango jelly and cloud-like billows of dairy-free whipped cream, it is a magnificent centerpiece guaranteed to impress vegan and non-vegan guests alike.
Recipe Specifications
-
Author: Ruth Mitchell
-
Course Type: No-Bake Tropical Dessert
-
Dietary Profile: 100% Vegan, Plant-Based, Dairy-Free, Egg-Free (Gluten-Free Option)
-
Setting Duration: Refrigerated overnight (essential for a pristine, firm structural set)
-
Yield: 10 beautiful, decadent servings
-
Baking Tool Requirements: 8-inch loose-base or springform round cake tin
Comprehensive Ingredients Checklist
1. The Tropical Biscuit Base
-
300g digestive biscuits (substitute with certified gluten-free digestives if making a gluten-free version)
-
150g dairy-free butter or margarine
2. The Luscious Mango-Lime Cheesecake Filling
-
200g raw cashew nuts (must be soaked in water overnight and thoroughly drained)
-
400g high-quality dairy-free / vegan cream cheese
-
200g smooth mango pulp
-
Zest of 1 fresh lime (adds a crucial citrus brightness to balance the sweet mango)
-
60g premium coconut cream (have a little extra on hand to loosen the mixture if needed)
-
100g icing sugar (powdered sugar ensures a perfectly smooth, grit-free texture)
3. The Glossy Mango Jelly Topping
-
200g smooth mango pulp
-
2 teaspoons vegan gelatine or vege-gel
-
60g caster sugar
-
50ml water
4. The Presentation & Decoration Garnishes
-
220ml dairy-free whipping cream
-
Fresh mango, beautifully cut into cubes
-
Fresh mint leaves (optional, for a pop of color)
Step-by-Step Production & Assembly Guide
Phase 1: Compacting the Biscuit Base
-
Pan Prep: Line the bottom base of an 8-inch loose-bottomed cake tin cleanly with a round circle of greaseproof paper.
-
Melt the Fat: Melt the 150g of dairy-free butter in a small saucepan over low heat on the hob. Once completely liquefied, remove it from the heat and pour it into a medium, heatproof mixing bowl.
-
Mill the Biscuits: Place your 300g of digestive biscuits into a blender or food processor and pulse until they form a fine, uniform crumb structure.
-
Bind and Mold: Pour the biscuit crumbs directly into the melted butter. Stir thoroughly with a wooden spoon or spatula until it perfectly resembles wet sand and holds its shape tightly when pinched between your fingers.
-
Pack the Crust: Tip the wet crumbs into your lined tin. Using clean hands, press the mixture firmly down into the base and up the interior sides of the tin. Note: Packing the crumbs tightly up the walls creates a sturdy shell that safely holds the thick cheesecake filling in place.
-
Flash Freeze: Place the tin into the freezer to solidify the butter matrix while you construct the filling.
+-------------------------------------------------------------+
|    GARNISH (Dairy-Free Whipped Cream, Mango Cubes, Mint)   | <- Textured crown
+-------------------------------------------------------------+
|    GLOSSY MANGO JELLY TOPPING LAYER                         | <- Sweet & vibrant sheet
+-------------------------------------------------------------+
|    MANGO-LIME VEGAN CHEESECKAE FILLING                      | <- Velvety tropical core
+-------------------------------------------------------------+
|    COMPACTED BISCUIT WALL CRUST (Up the Sides)              | <- Crunchy cookie shell
+-------------------------------------------------------------+
Phase 2: Emulsifying the Tropical Filling
-
Drain the Cashews: Take your raw cashews (which must be soaked overnight in water to soften their cellular structure) and drain them completely.
-
The High-Speed Blend: Place the drained cashews into a high-speed blender or powerful food processor. Add the 400g of dairy-free cream cheese, 200g of mango pulp, the fresh lime zest, 60g of coconut cream, and 100g of icing sugar.
-
Process Until Silky: Whiz the mixture on high speed for approximately 5 minutes. Because this plant-based mixture is incredibly thick, stop the blender a few times to scrape down the sides with a spatula, ensuring everything incorporates uniformly. Chef’s Note: If your blender is struggling with the density, splash in a tiny bit of extra coconut cream to help it emulsify into a perfectly silky, lump-free cream.
-
Layer into the Tin: Retrieve your ice-cold crust from the freezer. Pour the thick cheesecake mixture into the tin in gradual stages. Optional Pro-Tip: For a beautiful interior pattern, drop small swirls of extra raw mango pulp between the stages of cheesecake filling.
-
De-Aerate and Chill: Firmly tap the filled cake tin a few times directly onto your kitchen worktop to force any trapped air bubbles to the surface. Place the cheesecake into the refrigerator to chill and set overnight.
Phase 3: Setting the Glossy Mango Jelly
-
Simmer the Glaze: Once the cheesecake has set overnight, prepare the jelly. In a medium saucepan, combine 200g of mango pulp, 2 teaspoons of vegan gelatine, 60g of caster sugar, and 50ml of water.
-
Thicken on the Hob: Set the pan over medium heat and bring the liquid up to a gentle simmer, stirring continuously with a heatproof spatula or whisk.
-
The Spoon Test: Let the jelly simmer for 3 to 4 minutes, then turn off the heat. The jelly is ready when it has noticeably thickened and easily coats the back of a spoon without sliding off. Remove the pan from the heat and let it rest on the counter for 5 minutes to cool slightly.
-
The Rapid Pour: Pour the warm jelly directly over the top of the chilled cheesecake. Working very fast with an offset spatula, spread it out into a smooth, even sheet before it begins to cool and set.
-
Firm the Layer: Return the cheesecake to the refrigerator for about 30 minutes to allow the mango jelly layer to set rock-solid.
Phase 4: Elegant Piping & Decoration
-
Whip the Cream: Pour your 220ml of dairy-free whipping cream into the bowl of a stand mixer fitted with the balloon whisk attachment (or use an electric hand mixer). Whip the cream until it holds beautiful, luxurious soft peaks.
-
Unmold the Cake: Because you used a loose-based tin, simply press the bottom base upward to cleanly slide the cheesecake out of the metal collar. Transfer the cake onto a serving platter or decorative cake stand.
-
The Cream Swoop: Spoon the whipped cream directly into the absolute center of the mango jelly canopy. Use the back of a spoon to gently spread it outward in a fluid, circular motion to create an elegant, swirled nest effect.
-
Final Touches: Pile a generous handful of fresh mango cubes into the center of the whipped cream nest and scatter a few fresh mint leaves around for a pop of contrasting color. Slice with a sharp knife and serve ice-cold!
Chef’s Professional Success Tips
-
High-Performance Blending is Key: Because cashews provide the structural mimicry for the absence of eggs and dairy fats, they must be broken down entirely. A high-speed blender is highly recommended for this recipe. If you use a standard blender, ensure your cashews are soaked flawlessly and blend for a few extra minutes to avoid a grainy mouthfeel.
-
The Clean-Cut Methodology: Plant-based cheesecakes set with vegan gelatine can be wonderfully delicate. To get pristine, restaurant-quality slices without smudging the white cream or the orange mango layers, run a long, sharp chef’s knife under hot tap water, wipe it completely dry with a kitchen towel, and cut straight down. Clean and re-warm the blade between every single slice.
Frequently Asked Questions (FAQs)
Why do the cashews need to be soaked overnight?
Raw cashews are incredibly dense. Soaking them in water overnight expands and softens the nut, allowing a blender to easily break down its fibers into a rich, fluid cream. If you forget to soak them overnight, you can use a quick-soak method: submerge the cashews in boiling water for 30 to 45 minutes before draining and using, though the overnight soak yields the creamiest final result.
How should I store this cheesecake?
Always store this cheesecake inside an airtight container or under a fitted cake dome in the coldest part of your refrigerator. Because it relies entirely on plant-based fats and vegan gelatine rather than baked egg proteins, it will soften if left out at room temperature for too long. Kept refrigerated, it stays perfectly fresh, stable, and completely delicious for up to 3 to 4 days.
Try Also: Irresistible Dessert Ideas from
-
What is Dubai Chocolate Bar Made Of? Key Ingredients Explained
-
Rose Milk Cake Recipe
-
Strawberry Cheesecake Dump Cake Recipe
No-Bake Vegan Mango Cheesecake
- Total Time: 720 minutes
- Yield: 10 servings 1x
- Diet: Vegan
Description
A bright, tropical, and refreshing dessert that captures the essence of summer, this No-Bake Vegan Mango Cheesecake is light, airy, and sweet, made without eggs and dairy.
Ingredients
- 300g digestive biscuits (or gluten-free digestives)
- 150g dairy-free butter or margarine
- 200g raw cashew nuts (soaked overnight)
- 400g dairy-free vegan cream cheese
- 200g smooth mango pulp
- Zest of 1 fresh lime
- 60g premium coconut cream
- 100g icing sugar
- 200g smooth mango pulp (for jelly)
- 2 teaspoons vegan gelatine or vege-gel
- 60g caster sugar
- 50ml water
- 220ml dairy-free whipping cream
- Fresh mango, cut into cubes
- Fresh mint leaves (optional)
Instructions
- Line the bottom of an 8-inch loose-bottomed cake tin with greaseproof paper.
- Melt the dairy-free butter in a small saucepan over low heat.
- Pulse the digestive biscuits in a blender until fine crumbs form.
- Combine the biscuit crumbs with the melted butter, mixing until it resembles wet sand.
- Press the mixture into the base and sides of the tin, creating a sturdy crust.
- Freeze the crust to solidify while you prepare the filling.
- Drain the soaked cashews thoroughly.
- Add the cashews, cream cheese, mango pulp, lime zest, coconut cream, and icing sugar to a blender.
- Blend on high speed for about 5 minutes until smooth and creamy.
- Pour the cheesecake mixture into the prepared crust, optionally layering with mango pulp.
- Tap the tin to remove air bubbles and refrigerate overnight.
- Simmer the mango pulp, gelatine, caster sugar, and water in a saucepan until thickened.
- Pour the warm mango jelly over the cheesecake and refrigerate for 30 minutes to set.
- Whip the dairy-free cream until soft peaks form.
- Unmold the cheesecake and decorate with whipped cream, fresh mango cubes, and mint leaves before serving.
Notes
For best results, soak cashews overnight for a creamy filling. Store in an airtight container in the refrigerator for 3-4 days.
- Prep Time: 15 minutes
- Cook Time: 15 minutes
- Category: Dessert
- Method: No-Bake
- Cuisine: Tropical
Nutrition
- Serving Size: 1 serving
- Calories: 320
- Sugar: 20g
- Sodium: 150mg
- Fat: 18g
- Saturated Fat: 7g
- Unsaturated Fat: 10g
- Trans Fat: 0g
- Carbohydrates: 40g
- Fiber: 2g
- Protein: 5g
- Cholesterol: 0mg
Keywords: vegan dessert, mango cheesecake, no-bake dessert, summer recipe, tropical dessert