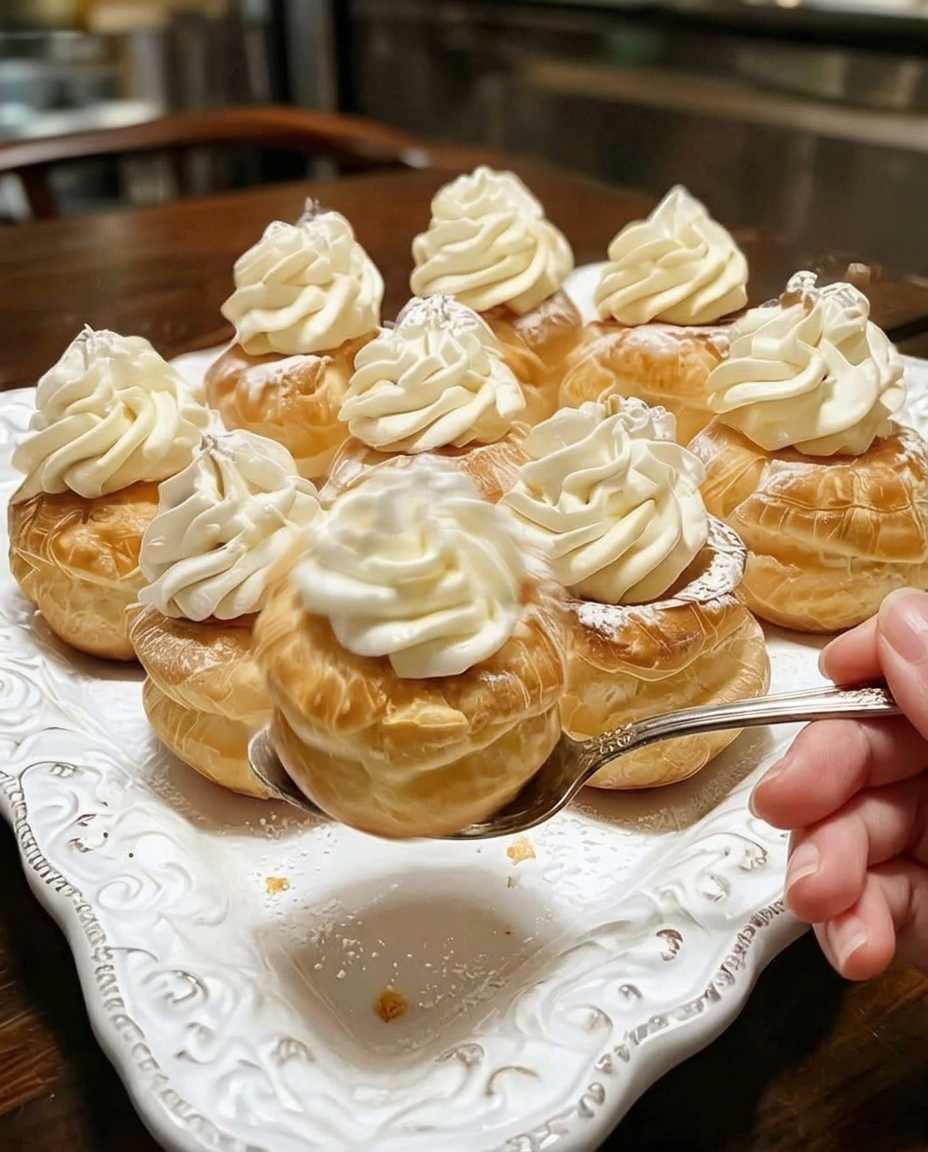
Light, airy pastry shells filled with a rich, velvety vanilla cream—just like mom used to make! Mom’s Famous Cream Puffs are a treasured family treat featuring delicate choux pastry shells packed to the brim with a smooth, fluffy vanilla custard-whipped cream hybrid. With their elegant appearance and nostalgic flavor profile, they make the absolute perfect centerpiece for holiday dessert tables, afternoon tea parties, or an indulgent weekend baking project.
While classic French pastry can feel intimidating, these are surprisingly simple to master. By following a few foundational temperature and steam-trapping rules, you will achieve high-rising, beautifully hollow shells every single time.
Why You Will Love This Recipe
-
Foolproof Choux Pastry Base: Simple, accessible kitchen staples transform magically into crisp, golden pastry balloons using a direct stovetop-to-mixer method.
-
The Ultimate Fluffy Filling: By folding a structured vanilla pudding into freshly whipped sweet cream, you get a stable, rich filling that won’t run or weep.
-
Make-Ahead Friendly: You can bake the pastry shells well in advance and freeze them unfilled, making event-day hosting completely stress-free.
-
Highly Customizable Canvas: The light, neutral pastry shells can easily adapt to a variety of seasonal flavor profiles and glazes.
 Prep Time: 25 mins   |   Bake Time: 35 mins   |   Total Time: 1 hr
 Course: Dessert      |   Cuisine: French      |   Yield: 12 - 14 elegant puffs
Ingredients Checklist
For a perfect pastry expansion and a lump-free filling matrix, ensure your eggs have come to room temperature and your whole milk and heavy cream are ice-cold straight from the refrigerator.
For the Light Choux Pastry Shells
-
1 cup Water: The liquid base that generates the rapid steam necessary to puff the dough.
-
½ cup (1 stick) Unsalted Butter: Provides the essential fats for a rich, tender pastry structure.
-
1 cup All-Purpose Flour: The structural foundation of the choux paste.
-
¼ teaspoon Salt: Sharpens the flavors and balances the dough.
-
4 Large Eggs: Must be at room temperature to incorporate smoothly into the hot flour paste without curdling.
For the Fluffy Vanilla Cream Filling
-
2 cups Cold Whole Milk: Essential for cleanly hydrating and activating the pudding mix.
-
1 box (3.4 oz) Instant Vanilla Pudding Mix: Provides a stable, intensely aromatic vanilla base.
-
1 cup Heavy Whipping Cream: Deeply chilled; whips up to create the cloud-like volume.
-
2 tablespoons Powdered Sugar: Adds a delicate touch of sweetness to the whipped cream layer.
-
1 teaspoon Vanilla Extract: Deepens the classic, warm pastry-shop aroma.
For the Elegant Topping Options
-
Powdered Sugar: For running a classic, snowy dust over the tops.
-
Chocolate Glaze or Melted Chocolate: For drawing a dramatic, high-gloss zigzag drizzle.
Step-by-Step Instructions
Follow these clear, chronological directions to cook your pastry dough, master the egg integration, and assemble your cream-filled masterpieces.
1. Cook and Dry the Choux Paste
-
Preheat your oven to 400°F (200°C) and line a large baking sheet cleanly with parchment paper.
-
In a medium-sized saucepan over medium-high heat, bring the 1 cup of water and ½ cup of unsalted butter to a rolling boil.
-
The moment the liquid boils, add the 1 cup of all-purpose flour and ¼ teaspoon of salt all at once. Reduce the heat to medium and stir quickly and vigorously with a wooden spoon.
-
Continue stirring until the mixture forms a smooth, cohesive ball of dough that pulls away completely from the sides of the pan and leaves a thin film on the bottom. Remove from the heat and let the dough cool for exactly 5 minutes so it doesn’t cook the eggs.
2. Incorporate the Eggs and Bake
-
Add your room-temperature 4 large eggs to the warm dough one at a time. Beat vigorously with a wooden spoon (or use an electric hand mixer/stand mixer) after each addition, ensuring the egg is completely absorbed and uniform before adding the next one.
-
Once the final egg is fully integrated, the dough will magically transition from a slippery, separated mess into a thick, glossy, and smooth pastry paste.
-
Shape the Puffs: Drop heaping tablespoons of the dough onto your prepared baking sheet, leaving at least 2 inches of space between each puff to allow room for significant expansion. (Pro Tip: For a bakery-perfect, uniform appearance, transfer the dough to a piping bag fitted with a large round tip and pipe neat mounds).
-
Bake for 30 to 35 minutes until the shells are magnificently puffed, hollow, and a deep golden brown. Transfer them immediately to a wire rack to cool completely.
3. Whip the Fluffy Cream Filling
-
In a medium mixing bowl, whisk together the 2 cups of cold whole milk and 1 box of instant vanilla pudding mix until smooth. Let it sit undisturbed on the counter for 5 minutes to thicken into a dense custard.
-
In a separate, deeply chilled mixing bowl, combine the 1 cup of cold heavy whipping cream, 2 tablespoons of powdered sugar, and 1 teaspoon of vanilla extract. Beat on high speed until stiff peaks form firmly.
-
The Gentle Fold: Using a flexible rubber spatula, add the whipped cream into the set vanilla pudding. Cut down through the center, sweep around the bottom of the bowl, and fold the mixture over using an under-and-over motion until completely incorporated into a uniform, fluffy blonde cream.
4. Assemble and Decorate
-
Once the pastry shells are entirely cold to the touch, use a serrated knife to gently slice each puff completely in half horizontally, creating a top and a bottom shell (like a sandwich).
-
Spoon or pipe a generous mound of the fluffy vanilla cream filling onto the interior bottom half of each pastry shell.
-
Replace the top pastry halves gently over the cream.
-
To finish, give the tops a beautiful, snowy dusting of powdered sugar or run a rich, warm drizzle of melted chocolate across the crowns. Chill briefly before serving for the absolute best texture experience!
Pro Presentation & Baking Secrets
The Steam Release Secret: Choux pastry relies entirely on trapped water vapor to expand in the oven. If moisture remains trapped inside the hollow core after you pull them out, the steam will condense and turn the shells soft and soggy. To guarantee a permanently crisp shell, poke a tiny slit into the side or bottom of each baked puff with a toothpick the second they exit the oven, then let them cool. This lets the residual steam escape completely, leaving the interior walls perfectly dry and stable!
Storage and Freshness Guidelines
-
Unfilled Pastry Storage: You can bake the empty choux shells up to 2 days in advance and store them inside an airtight container at room temperature. For longer storage, freeze the unfilled shells in a zip-top bag for up to 2 months. To restore their crisp texture after freezing, simply pop the frozen shells onto a baking sheet and crisp them in a 350°F (175°C) oven for 5 minutes before cooling and filling.
-
Filled Pastry Storage: Once filled with the fresh dairy cream, the puffs are best enjoyed within a few hours. However, leftovers can be stored inside an airtight container in the refrigerator for up to 2 days (the shells will naturally soften slightly over time as they absorb moisture from the cream, creating a delightful melt-in-the-mouth texture).
Nutritional Summary
| Metric | Details |
| Yield | 12 – 14 large, uniform cream puffs |
| Baking Temperature | 400°F (200°C) for stable expansion |
| Texture Profile | Crisp, paper-thin golden pastry exterior holding an ultra-light, velvety vanilla cream center. |
Frequently Asked Questions (FAQs)
Can I try different flavors for the filling?
Absolutely! This recipe is incredibly adaptable. You can easily swap out the instant vanilla pudding mix for instant chocolate, coffee, or lemon pudding to completely transform the flavor profile of the cream while keeping the exact same assembly steps.
Why did my cream puffs deflate after I took them out of the oven?
Deflation is almost always caused by opening the oven door too early or taking the puffs out before the structural walls have fully set. Opening the oven during the first 20 minutes lets the trapped steam escape prematurely, causing the expanding balloons to collapse. Ensure they are a deep, uniform golden brown before removing them.
Final Thoughts
These Mom’s Famous Cream Puffs perfectly bridge the gap between elegant French technique and comforting, rustic baking. By honoring the individual egg-beating step and letting the residual steam escape the baked shells, you guarantee a breathtaking, airy centerpiece that honors a timeless family tradition.
Try Also: Irresistible Dessert Ideas from
-
What is Dubai Chocolate Bar Made Of? Key Ingredients Explained
-
Rose Milk Cake Recipe
-
Strawberry Cheesecake Dump Cake Recipe
Be sure to pin or bookmark this recipe so you have these essential choux-drying and steam-venting secrets handy for your next elegant holiday gathering or casual weekend baking triumph!
Mom’s Famous Cream Puffs
- Total Time: 60 minutes
- Yield: 12 - 14 servings 1x
- Diet: Vegetarian
Description
Delicate choux pastry shells filled with a smooth, fluffy vanilla cream, perfect for dessert tables or afternoon tea.
Ingredients
- 1 cup Water
- ½ cup Unsalted Butter (1 stick)
- 1 cup All-Purpose Flour
- ¼ teaspoon Salt
- 4 Large Eggs
- 2 cups Cold Whole Milk
- 1 box (3.4 oz) Instant Vanilla Pudding Mix
- 1 cup Heavy Whipping Cream
- 2 tablespoons Powdered Sugar
- 1 teaspoon Vanilla Extract
- Powdered Sugar (for dusting)
- Chocolate Glaze or Melted Chocolate (for drizzling)
Instructions
- Preheat your oven to 400°F (200°C) and line a baking sheet with parchment paper.
- Bring the water and butter to a rolling boil in a saucepan.
- Add the flour and salt all at once, then stir quickly until a ball of dough forms.
- Remove from heat and let it cool for 5 minutes.
- Add the eggs one at a time, stirring vigorously until smooth.
- Drop tablespoons of dough onto the baking sheet, leaving space for expansion.
- Bake for 30 to 35 minutes until golden brown and puffed.
- In a bowl, whisk together cold milk and pudding mix until smooth, then let sit for 5 minutes.
- In another bowl, whip heavy cream with powdered sugar and vanilla until stiff peaks form.
- Fold the whipped cream into the pudding until combined.
- Slice the cooled pastry shells in half horizontally.
- Fill the bottom halves with the vanilla cream and replace the tops.
- Dust with powdered sugar or drizzle with chocolate before serving.
Notes
For the best results, poke a slit in each puff after baking to allow steam to escape. Shells can be stored unfilled at room temperature or frozen for later use.
- Prep Time: 25 minutes
- Cook Time: 35 minutes
- Category: Dessert
- Method: Baking
- Cuisine: French
Nutrition
- Serving Size: 1 puff
- Calories: 180
- Sugar: 10g
- Sodium: 160mg
- Fat: 7g
- Saturated Fat: 4g
- Unsaturated Fat: 2g
- Trans Fat: 0g
- Carbohydrates: 24g
- Fiber: 0g
- Protein: 3g
- Cholesterol: 40mg
Keywords: cream puffs, choux pastry, vanilla cream, French dessert, holiday baking