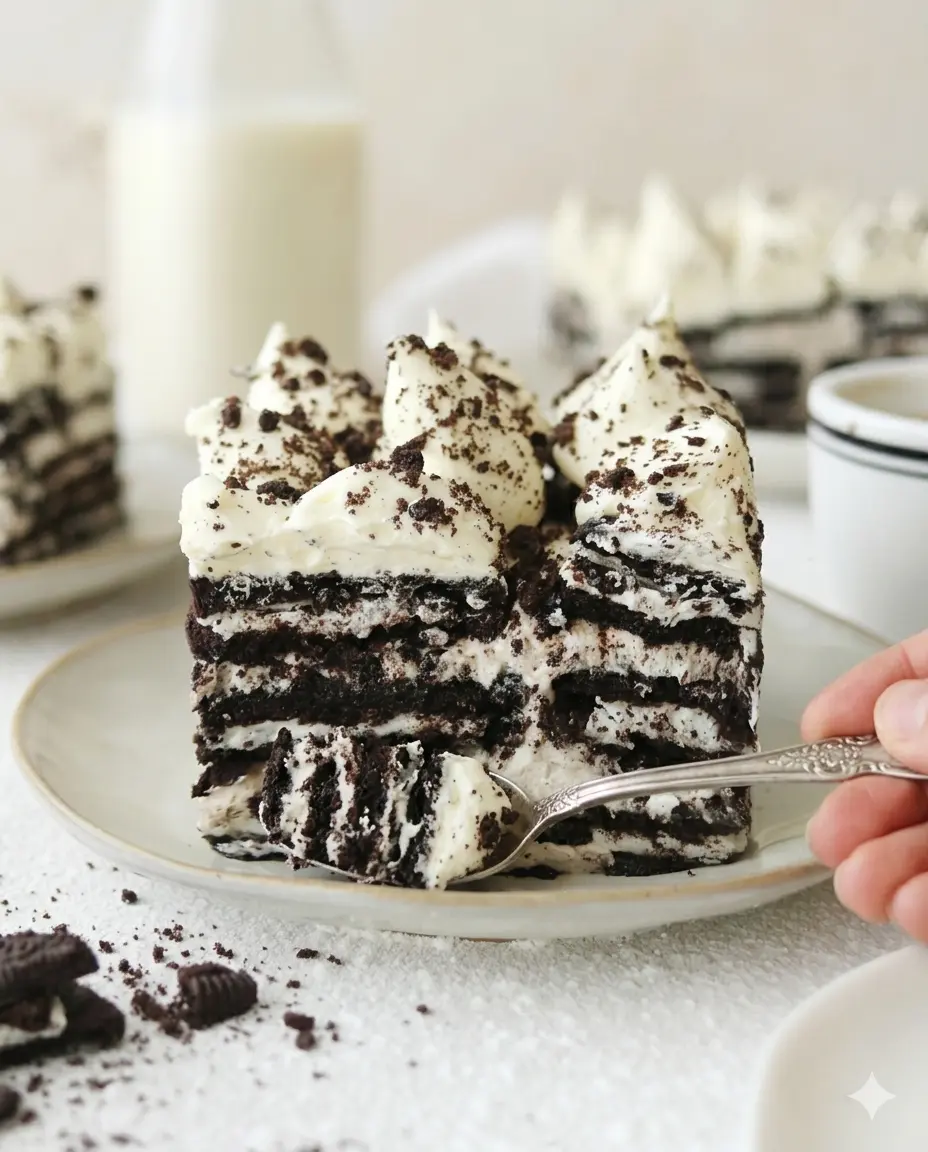
Bringing a bold, contemporary twist to a beloved Italian classic, this Easy Vegan Oreo Tiramisu is a spectacular no-bake fusion dessert. By replacing traditional ladyfingers with dark, cocoa-rich Oreo cookies and subbing dairy elements with a velvety, whipped vanilla bean cream, this dish delivers an exceptionally luxurious texture without a single animal product.
The secret lies in the dual-action whipping process, which transforms dairy-free block fat and cultured vanilla plant yogurt into a thick, structured cream that beautifully mimics traditional Italian mascarpone. Perfect for dinner parties, vegan celebrations, or a high-end weekend project, this dessert sets flawlessly into sliceable layers that look as stunning as they taste.
Recipe Specifications
-
Yield: 8 to 10 rich, uniform dessert portions
-
Prep Time: 10 minutes
-
Setting Time: 4 to 6 hours (or overnight for optimal structural bond)
-
Total Time: 6 hours+ (No-Bake)
-
Baking Vessel: A 10×9-inch rectangular glass or ceramic dish
-
Dietary Profile: 100% Vegan, Plant-Based, Dairy-Free, Eggless.
-
Flavor Profile: Deep, bittersweet espresso balanced by the intense, dark cocoa of cookies and a thick, cloud-like sweet vanilla cream.
Comprehensive Ingredients Checklist
1. The Coffee-Soaked Cookie Strata
-
4 standard packs Oreo cookies (classic Oreos are naturally vegan)
-
1 large mug freshly brewed strong espresso or robust dark coffee, cooled slightly
2. The Mock “Mascarpone” Cookies & Cream Foundation
-
250 g high-quality dairy-free block butter, thoroughly softened at room temperature (ensure you use a solid block variety, not a spreadable tub margarine)
-
420 g icing sugar, finely sifted to eliminate lumps
-
2 teaspoons premium vanilla bean paste or pure extract
-
80 g dairy-free vanilla yogurt (such as soy or coconut-based yogurt to add that essential lactic tang)
-
4 individual Oreo cookies, processed into a microscopic dust crumb
3. The Chantilly Crown & Garnishes
-
100 ml plant-based whipping cream (e.g., Elmlea Plant Double Cream or high-fat coconut cream)
-
Extra Oreo cookies for rustic crushing and whole geometric garnishing
Step-by-Step Production & Assembly Guide
+-------------------------------------------------------------+
|    GARNISH: Whimsical Plant Cream Stars & Whole Oreos       |
+-------------------------------------------------------------+
|    MASCKARPONE: Final Layer of Smooth Cookies & Cream Frost |
+-------------------------------------------------------------+
|    STRATA 2: Espresso-Drenched Soft Oreo Cookie Grid        |
+-------------------------------------------------------------+
|    MASCARPONE: Middle Layer of Velvety Plant Frosting       |
+-------------------------------------------------------------+
|    STRATA 1: Espresso-Drenched Oreo Cookie Base Foundation   |
+-------------------------------------------------------------+
|               ASSEMBLED IN A 10x9-INCH DISH & CHILLED       |
+-------------------------------------------------------------+
Phase 1: Fabricating the Plant-Based Mascarpone
-
The Fat Aeration: Place the 250 g of thoroughly softened dairy-free block butter into a large mixing bowl. Using a stand mixer fitted with the balloon whisk attachment or an electric hand mixer, whip the butter on high speed for 5 to 8 minutes. Stop when the butter changes from yellow to a pale, off-white shade and expands significantly in volume.
-
The Fine Dust: Place 4 Oreo cookies into a high-speed blender or food processor and blitz until they form a completely fine, flour-like sand.
-
The Emulsion Build: Lower the mixer speed and slowly sift in the 420 g of icing sugar. Add the 2 teaspoons of vanilla bean paste and the microscopic Oreo crumbs.
-
The Final Lift: Turn the mixer back to high speed and stream in the 80 g of dairy-free vanilla yogurt. Beat continuously for an additional 5 minutes. Chef’s Note: If the mixture looks grainy or threatens to split during this stage, do not panic! Keep the mixer running on high; the high-speed friction will force the water in the yogurt to cleanly emulsify into the butter fats, resulting in a thick, uniform cream. Transfer this mixture into a pastry bag.
Phase 2: Architectural Layering Logistics
-
The Espresso Submersion: Pour your warm, brewed espresso into a wide, shallow bowl. One by one, submerge an Oreo cookie completely into the coffee for 2 to 3 seconds. Do not let it soak too long, or the wafer starches will collapse before reaching the dish.
-
Lay the Grid: Arrange the soaked cookies in a single, tight geometric grid across the bottom of your 10×9-inch rectangular dish. It will take roughly 15 to 20 cookies to establish a solid base layer.
-
The Cream Spread: Snip the tip of your piping bag and squeeze a generous, even layer of your cookies-and-cream mascarpone over the top of the cookie base. Use an offset spatula to smooth the cream evenly into the corners, then scatter a light dusting of extra Oreo crumbs over the top.
-
Build the Architecture: Repeat the exact process—dipping cookies into espresso, aligning them in a grid, and layering with cream—until you have used up your biscuits and mascarpone foundation. Ensure your final layer is a smooth sheet of cream.
Phase 3: Finishing & Thermal Stabilization
-
The Piping Finish: In a clean, chilled bowl, whip the 100 ml of plant-based whipping cream until it forms stiff, stable peaks. Transfer into a piping bag fitted with a large round tip nozzle. Pipe beautiful, uniform peaks or stars across the entire surface of the tiramisu.
-
The Artistic Garnish: Decorate the top with coarsely broken pieces of Oreos and a final dusting of cookie crumbs for an elegant patisserie look.
-
The Setting Matrix: Slide the completed dish into the refrigerator for 4 to 6 hours (or ideally overnight). This extended resting phase is mandatory; it allows the cookie wafers to absorb the espresso moisture and turn cake-like, while the cold temperature locks the plant fats into a sliceable, stable state.
-
Serving Protocol: Pull the tiramisu from the fridge 10 to 15 minutes before serving to allow the plant fats to soften slightly, ensuring a melting, decadent texture on the spoon.
Chef’s Professional Success Tips
The Block Fat Rule: It is absolutely paramount that you use a dairy-free block butter rather than a spreadable margarine from a tub. Tub spreads contain a high ratio of water and liquid oils to keep them spreadable cold. If you attempt to whip tub margarine into this frosting, the moisture will cause the filling to liquefy, completely flattening your tiramisu into a loose pudding rather than clean, sliceable layers.
Managing the Espresso Temperature: Ensure your espresso has cooled down to lukewarm before dipping your Oreos. If the coffee is boiling hot, it will instantly melt the sweet cream filling inside the Oreo cookies and turn the crisp cocoa wafers into mush before you can cleanly transfer them to your dessert dish.
Storage & Preservation Logistics
Refrigeration Parameters
Because this dessert relies on plant-based fats and stable whipped creams, it must be stored inside the refrigerator at all times. Keep it covered securely with plastic film or beeswax wrap to prevent the cream from absorbing any stray refrigerator odors. It will maintain peak flavor and texture for 3 to 4 days.
Freezing Architecture
While traditional tiramisu freezes well, the high water content in plant-based yogurts can sometimes form tiny ice crystals when frozen. If you must freeze this dessert, ensure it is wrapped airtight in multiple layers of plastic wrap and foil. It can be frozen for up to 1 month. Thaw completely in the refrigerator for 24 hours before serving; never thaw it on the counter or in a microwave, as rapid heat will melt the structured butter cream structure completely.
Frequently Asked Questions
1. Can I use decaffeinated coffee for this recipe?
Absolutely. The coffee’s primary job is to provide a bitter, aromatic contrast to the sweet, sugary cream and cocoa wafers. If you are serving children or avoid caffeine, substitute the espresso with a high-quality decaffeinated brewed coffee or a rich chicory root brew.
2. Why did my mascarpone layer turn grainy or separated?
This typically happens if your plant-based butter was too cold when you started, or if your vanilla yogurt was ice-cold out of the fridge. For a successful emulsion, both elements must be close to room temperature. To fix a split cream, continue whipping on high speed, or warm the base of your mixing bowl with a warm towel for 30 seconds while the mixer is running to help the fats bind.
3. Can I substitute the icing sugar with a liquid sweetener like maple syrup?
No. Sifted icing sugar provides critical dry structure that bulks up and solidifies the whipped butter fats. Introducing a liquid sweetener like maple syrup or agave will over-hydrate the cream, causing the entire mock mascarpone filling to break down into a thin liquid.
Easy Vegan Oreo Tiramisu
- Total Time: 360 minutes
- Yield: 8 to 10 servings 1x
- Diet: Vegan
Description
A bold, contemporary twist on the classic Italian Tiramisu using vegan ingredients for a luxurious no-bake dessert.
Ingredients
- 4 standard packs Oreo cookies
- 1 large mug freshly brewed strong espresso, cooled slightly
- 250 g dairy-free block butter, softened
- 420 g icing sugar, finely sifted
- 2 teaspoons vanilla bean paste or pure extract
- 80 g dairy-free vanilla yogurt
- 4 individual Oreo cookies, processed into crumbs
- 100 ml plant-based whipping cream
- Extra Oreo cookies for garnish
Instructions
- Place dairy-free block butter in a large mixing bowl and whip on high speed for 5 to 8 minutes.
- Blitz 4 Oreo cookies in a blender until fine.
- Sift icing sugar into the whipped butter and add vanilla bean paste and Oreo crumbs.
- Stream in dairy-free vanilla yogurt and beat for an additional 5 minutes.
- Pour brewed espresso into a wide bowl and submerge Oreo cookies for 2 to 3 seconds.
- Arrange soaked cookies in a single layer in the dish.
- Squeeze a layer of the cookies-and-cream mascarpone over the cookies.
- Repeat the process until all components are used up.
- Whip plant-based whipping cream until stiff peaks form and garnish the tiramisu.
- Refrigerate for 4 to 6 hours or overnight before serving.
Notes
Ensure using dairy-free block butter for the best results. Store in the refrigerator for up to 4 days.
- Prep Time: 10 minutes
- Cook Time: 0 minutes
- Category: Dessert
- Method: No-Bake
- Cuisine: Italian
Nutrition
- Serving Size: 1 serving
- Calories: 320
- Sugar: 28g
- Sodium: 200mg
- Fat: 14g
- Saturated Fat: 5g
- Unsaturated Fat: 9g
- Trans Fat: 0g
- Carbohydrates: 43g
- Fiber: 2g
- Protein: 4g
- Cholesterol: 0mg
Keywords: vegan tiramisu, no-bake dessert, Oreo tiramisu