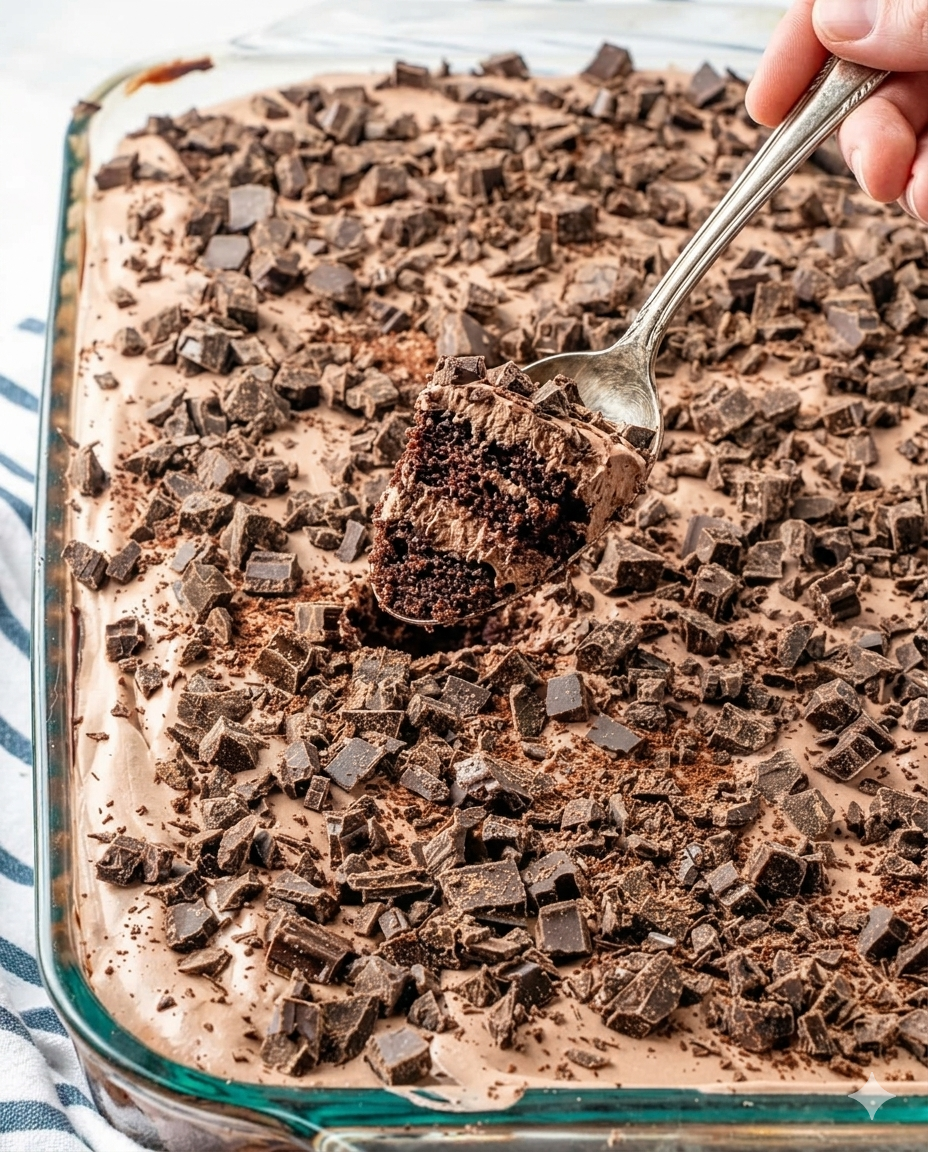
Tailor-made for the uncompromising chocolate purist, this Death By Chocolate Poke Cake is a decadent, high-contrast dessert masterpiece. Built from a deep dark chocolate sponge base, it is systematically poked, saturated with a rich dark chocolate pudding infusion, layered with a hot fudge barrier, and blanketed under an airy, cocoa-pudding whipped cream mousse. A heavy crown of chopped giant dark chocolate candy bars seals the cake, offering an incredible textural snap against the ultra-moist crumb underneath.
By strategically layering multiple textures of dark cocoa—from fluid fudge and silken pudding to stable whipped cream and solid chocolate blocks—this no-fuss sheet cake achieves a professional, multi-tiered pastry profile using efficient, streamlined assembly methods.
Recipe Specifications
-
Yield: 12 to 16 rich dessert portions
-
Prep Time: 20 minutes
-
Baking Time: 33 minutes
-
Total Active Time: 53 minutes (plus cooling and structural setting)
-
Presentation Vessel: A standard 9×13-inch rectangular baking pan or ceramic dish.
-
Nutritional Estimate: ~252 kcal per serving
-
Flavor Profile: An intense, unapologetic celebration of deep, bittersweet dark cocoa balanced by smooth, cool vanilla-dairy undertones.
Comprehensive Ingredients Checklist
1. The Dark Chocolate Sponge Foundation
-
1 package (15.25 oz) dark chocolate cake mix (or any standard high-quality instant chocolate cake mix)
-
Box Ingredients: The precise measures of eggs, vegetable oil, and water specified by your chosen cake mix brand to execute a standard 9×13-inch bake.
2. The Internal Liquid Fudge Saturation
-
1 box (3.56 oz) Hershey’s Special Dark Chocolate Instant Pudding mix (standard instant chocolate pudding is an excellent direct substitute)
-
2 cups whole milk, cold
3. The Hot Fudge Barrier Shield
-
1 bottle (12.8 oz) Hershey’s Special Dark Chocolate topping (or your preferred premium ice cream fudge sauce)
4. The Cloud-Mousse Topping & Garnish
-
1 box (3.56 oz) Hershey’s Special Dark Chocolate Instant Pudding mix
-
2 cups whole milk, cold
-
1 container (8 oz) frozen whipped topping (such as Cool Whip), thoroughly thawed in the refrigerator
-
1 bar (6.8 oz) Giant Hershey Dark Chocolate candy bar, roughly chopped into rustic, irregular shards
Step-by-Step Production & Assembly Guide
+-------------------------------------------------------------+
|    GARNISH: Rustic Shards of Crisp Dark Chocolate Candy Bar |
+-------------------------------------------------------------+
|    TOPPING: Light, Fluffy Dark Chocolate Pudding Cream      |
+-------------------------------------------------------------+
|    SHIELD: Rich, Glossy Layer of Pourable Dark Fudge Sauce  |
+-------------------------------------------------------------+
|    CORE: Moist Dark Sponge Perforated and Saturated with    |
|          Silken Liquid Chocolate Pudding                    |
+-------------------------------------------------------------+
|               4-HOUR DEEP REFRIGERATION SET REQUIRED        |
+-------------------------------------------------------------+
Phase 1: Structuring & Perforating the Sponge
-
The Core Bake: Preheat your oven according to the parameters listed on your dark chocolate cake mix box. Prepare your 9×13-inch baking pan with non-stick cooking spray. Mix the cake batter using your mixing bowl and hand mixer as directed by the manufacturer, and bake for approximately 33 minutes until a toothpick inserted into the center emerges clean.
-
The Ventilation Protocol: Remove the cake from the oven. While the cake is still piping hot, take a wooden spoon with a rounded handle (roughly 1 cm in diameter). Press the round end of the handle straight down into the cake at uniform 1-inch intervals, creating neat rows of vertical channels across the entire surface. Ensure you plunge two-thirds of the way down without ripping the bottom base of the cake.
Phase 2: Liquid Infusion & the Fudge Layer
-
The Pudding Flood: In a medium bowl, vigorously whisk the first box (3.56 oz) of instant dark chocolate pudding mix into 2 cups of cold milk for about 1 minute until completely combined but still liquid. Immediately pour this fluid pudding slowly over the hot cake, using a spatula to guide the mixture directly down into the open poke holes to guarantee deep saturation.
-
The Fudge Liquefaction: Remove the lid from your 12.8 oz bottle of dark chocolate topping. Microwave the open bottle for 45 seconds (or until fluid and easily pourable). Pour this hot fudge topping evenly over the entire surface of the cake to create a glossy, foundational mid-layer.
-
The Ambient Cool: Leave the cake pan on a wire rack at room temperature to cool down completely. Note: Do not add the cream topping while the fudge or sponge is warm, or the heat will instantly collapse the whipped matrix.
Phase 3: Compounding the Cream Topping & Set
-
The Chocolate Mousse Build: In a clean medium bowl, whisk the second box (3.56 oz) of instant dark chocolate pudding mix with the remaining 2 cups of cold milk until smooth. Using a rubber spatula, gently fold the 8 oz of thawed whipped topping into the pudding pudding until completely integrated, streak-free, light, and airy.
-
The Blanket Coat: Spread this chocolate pudding cream evenly across the completely cooled fudge layer, smoothing it flat with an offset spatula.
-
The Texture Crown: Scatter the 6.8 oz of roughly chopped dark chocolate candy bar shards generously over the top of the cream layer, pressing them very lightly so they adhere to the mousse.
-
The Structural Chill: Cover the baking dish tightly and transfer it to the refrigerator for a minimum of 4 hours. This critical cooling window locks the internal puddings, thickens the fudge, and marries the layers into a cohesive, perfectly sliceable dessert architecture.
Pastry Chef Success Tips
The Hot Cake Rule: Always pour your liquid pudding mixture over the cake while the sponge is still hot from the oven. Hot cake starches are highly absorbent and pull liquids into their cell structure like a sponge. If you let the cake cool completely before pouring, the liquid pudding will simply sit on top of the holes, resulting in a soggy surface and a dry base.
Achieving Crisp, Non-Smudged Slices: Because this poke cake is exceptionally moist and loaded with gooey fudge, slicing it cleanly can be challenging. For bakery-clean square lines, ensure the cake completes its full 4-hour chill. When ready to carve, dip a long chef’s knife into hot water, wipe it completely dry with a towel, and make one clean vertical slice. Wipe the blade clean and re-dip in hot water before every subsequent cut.
Storage & Preservation Parameters
Refrigerator Maintenance
Due to the perishable dairy components in the instant pudding and the delicate structure of the whipped cream topping, this cake must live in the refrigerator at all times when not being served. Keep the 9×13-inch pan tightly covered with plastic wrap or a fitted lid. The cake will remain incredibly moist, rich, and pristine for up to 4 to 5 days.
Try Also: Irresistible Dessert Ideas from
Death By Chocolate Poke Cake
- Total Time: 53 minutes
- Yield: 12 to 16 servings 1x
- Diet: Vegetarian
Description
A decadent dessert featuring a deep dark chocolate sponge base, infused with chocolate pudding, layered with hot fudge, and topped with a fluffy chocolate mousse and dark chocolate shards.
Ingredients
- 1 package (15.25 oz) dark chocolate cake mix
- Box ingredients: eggs, vegetable oil, and water as specified
- 1 box (3.56 oz) Hershey’s Special Dark Chocolate Instant Pudding mix
- 2 cups cold whole milk
- 1 bottle (12.8 oz) Hershey’s Special Dark Chocolate topping
- 1 box (3.56 oz) Hershey’s Special Dark Chocolate Instant Pudding mix
- 1 container (8 oz) thawed frozen whipped topping
- 1 bar (6.8 oz) Giant Hershey Dark Chocolate candy bar, chopped
Instructions
- Preheat your oven and prepare the 9×13-inch baking pan with non-stick spray. Mix the cake batter as directed and bake for approximately 33 minutes.
- Remove the cake from the oven and use a wooden spoon to poke holes at 1-inch intervals.
- Whisk the pudding mix with cold milk for 1 minute, then pour it over the hot cake to fill the holes.
- Microwave the hot fudge topping until fluid, then pour it over the cake.
- Cool the cake completely on a wire rack.
- Whisk the second box of pudding mix with cold milk until smooth. Gently fold in the thawed whipped topping.
- Spread the mousse over the cooled fudge layer.
- Scatter the chopped chocolate bar shards on top and press lightly.
- Cover and refrigerate for a minimum of 4 hours before serving.
Notes
For clean slices, dip a knife in hot water and wipe it dry before each cut. Store in the refrigerator for up to 5 days.
- Prep Time: 20 minutes
- Cook Time: 33 minutes
- Category: Dessert
- Method: Baking
- Cuisine: American
Nutrition
- Serving Size: 1 serving
- Calories: 252
- Sugar: 25g
- Sodium: 300mg
- Fat: 12g
- Saturated Fat: 5g
- Unsaturated Fat: 7g
- Trans Fat: 0g
- Carbohydrates: 35g
- Fiber: 2g
- Protein: 3g
- Cholesterol: 25mg
Keywords: chocolate cake, poke cake, dessert, chocolate dessert, easy dessert