Indulge in this dreamy Cookies and Cream Mousse Cake that will absolutely steal your heart and delight your taste buds! This spectacular, no-bake layered masterpiece fuses a deeply decadent, buttery chocolate cookie crust with a velvety, air-whipped cream cheese mousse, all capped off with a playful cookie crunch.
By gently folding beautifully structured whipped cream into a sweet, smooth cream cheese base, you unlock a cloud-like texture that pairs perfectly with the nostalgic flavor of cookies and cream. It is the ultimate showstopping centerpiece for summer gatherings, milestone birthday parties, or any weekend baking triumph that demands maximum decadence with effortless preparation.
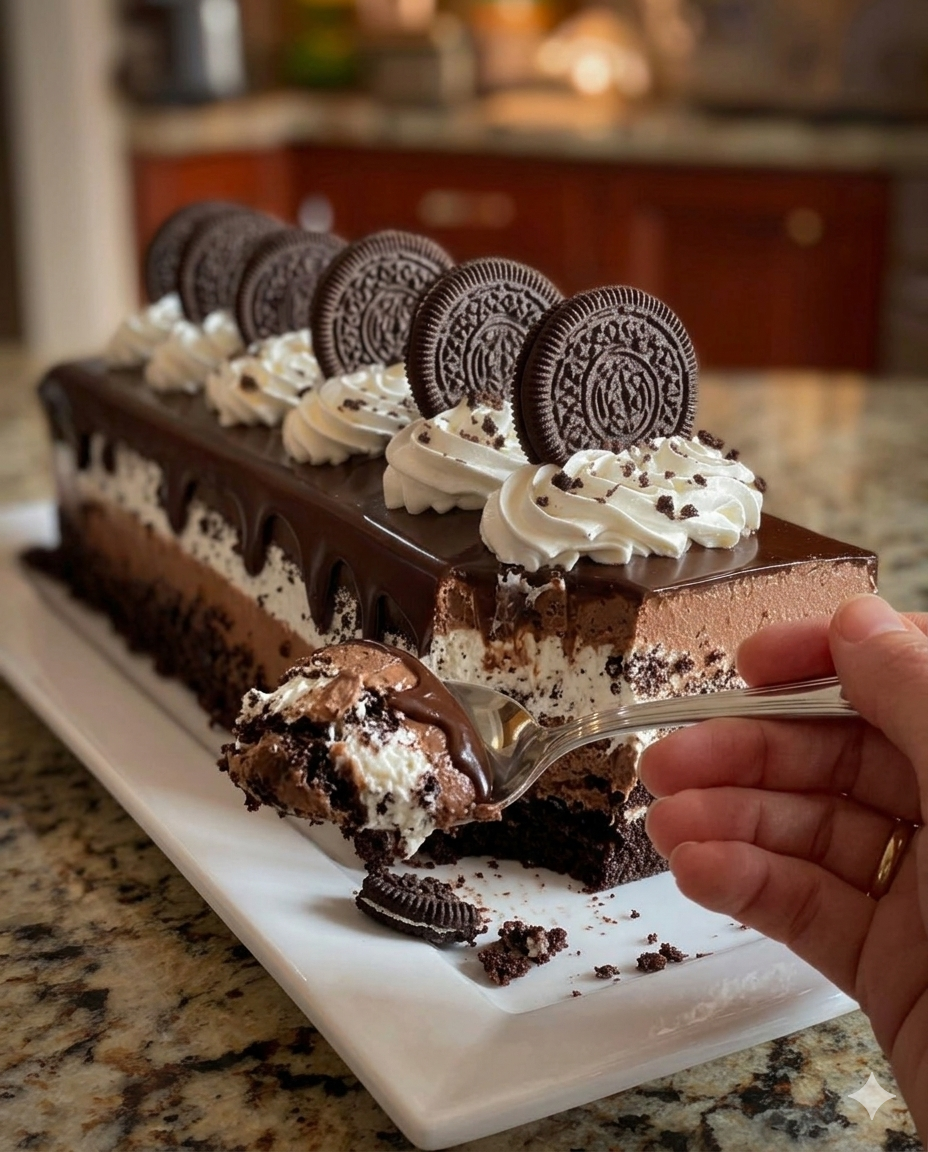
Why You Will Love This Layered Delight
-
No-Bake Mousse Convenience: Keep your kitchen completely cool—once your quick crust is pressed, the entire luscious filling sets up beautifully in the chill of your freezer.
-
Flawless, Air-Whipped Texture: The harmony of softened cream cheese and stiff-peaked heavy cream creates a velvet-smooth mouthfeel that melts instantly on the tongue.
-
The Ultimate Crowd-Pleaser: Packed with classic cookies-and-cream flavor notes, this dessert is an absolute hit with kids and adults alike at any celebration.
-
Beautiful Presentation Contrast: The striking visual contrast between the dark chocolate cookie layers and the pristine white cream cheese mousse makes it an instant showstopper.
 Prep Time: 30 mins   |   Cook Time: 0 mins   |   Freeze Time: 4 hrs minimum
 Course: Dessert      |   Cuisine: American   |   Yield: 8 - 10 exquisite servings
Ingredients Checklist
To ensure your mousse achieves a perfectly seamless, lump-free texture, make sure your cream cheese is entirely softened to room temperature and your heavy cream is ice-cold before you begin mixing.
For the Decadent Cookie Crust
-
1 package Chocolate Sandwich Cookies: Crushed into a fine sand to build a sturdy, deeply flavorful foundation.
-
½ cup Unsalted Butter (Melted): Binds the dry cookie crumbs so they compress cleanly into your pan.
For the Velvety Mousse Filling
-
8 ounces Cream Cheese: Must be fully softened to room temperature. Cold cream cheese will stubbornly retain tiny lumps that ruin the velvety mouthfeel.
-
1 cup Powdered Sugar: Dissolves effortlessly to guarantee an impeccably smooth, grit-free finish.
-
2 cups Heavy Cream: Must be deeply chilled straight from the fridge so it can trap enough air to build rigid, stable volume.
-
1 teaspoon Vanilla Extract: Infuses the cream base with a warm, elegant pastry-shop aroma.
For the Finishing Touch Garnish
-
1 cup Crushed Cookies: Kept slightly chunky to provide a wonderful rustic texture and a beautiful final presentation pop.
Step-by-Step Instructions
Follow these clear, chronological directions to press your crust, whip your velvety filling, and perfectly set your cookies-and-cream masterpiece.
1. Construct the Cookie Base
-
Lightly grease the vertical sides of a standard springform pan (an 8-inch or 9-inch pan works beautifully for gorgeous slice height).
-
Take your 1 package of chocolate cookies and crush them thoroughly into fine crumbs using a food processor or by placing them in a zip-top bag and rolling over them with a rolling pin.
-
In a medium-sized bowl, mix the cookie crumbs with the ½ cup of melted unsalted butter until the crumbs are uniformly moistened and resemble wet sand.
-
Transfer the mixture into the bottom of your springform pan. Using the flat bottom of a glass or a measuring cup, press the crumbs firmly and evenly across the base to form a highly compact, solid foundation.
2. Whip the Velvet Mousse Layers
-
In a large mixing bowl, combine your room-temperature 8 ounces of softened cream cheese and 1 cup of powdered sugar. Beat with an electric hand mixer or a stand mixer on medium-high speed until the mixture is beautifully smooth, uniform, and completely creamy.
-
In a separate, deeply chilled mixing bowl, pour your 2 cups of cold heavy cream and 1 teaspoon of vanilla extract.
-
Using clean beaters, whip vigorously on high speed until the cream expands and holds stiff peaks firmly in the air when the beaters are lifted.
3. Fold, Assemble, and Freeze
-
The Gentle Fold: Add your stiff whipped cream directly into the cream cheese paste. Using a flexible rubber spatula, cut down through the center, sweep around the bottom of the bowl, and fold the cream over using an under-and-over motion. Repeat this patiently just until completely incorporated and no white streaks remain. Be exceptionally gentle here; over-mixing will pop the microscopic air bubbles inside the cream, causing your mousse to turn loose and runny rather than fluffy and sliceable.
-
Pour the luscious, fluffy mousse directly over your prepared cookie crust inside the springform pan. Use an offset spatula to smooth the top surface into a flat, pristine sheet.
-
Pop the pan into the freezer for a minimum of 4 hours (or overnight) until the mousse has set up completely firm.
4. Garnish and Serve
-
Right before you are ready to carry this masterpiece to the table, sprinkle the 1 cup of crushed cookies generously across the top surface for that perfect finishing touch.
-
The Clean-Molding Secret: Run a thin plastic knife carefully around the interior edge of the springform pan before opening the latch. Release the outer collar to reveal your gorgeous, clean borders.
-
The Flawless Slice Hack: To capture pristine, professional vertical lines that showcase the distinct boundary between the dark cookie crust and the white mousse, dip a long, sharp chef’s knife into a tall glass of hot water. Wipe it completely dry with a clean towel, and make one swift cut downward. Slide the knife out from the bottom edge rather than pulling it back up, and wipe the blade completely clean before making your next cut. Dig into this layered delight and let the flavors dance on your palate!
Pro Presentation Secrets
The Marbled Mousse Upgrade: If you want to elevate the interior look of your cake slices, reserve about a ½ cup of the fine cookie crumbs from your crust preparation. Just before pouring the mousse into the pan, gently toss those extra crumbs into the filling and fold exactly twice. This creates beautiful, elegant dark ribbons throughout the white mousse layer, giving it a stunning gourmet appearance when sliced!
Storage and Freshness Guidelines
-
In the Freezer/Fridge: Because this dessert features a light, air-whipped dairy mousse without gelatin, it keeps best in cold storage. You can store it covered tightly in the freezer for up to 2 weeks.
-
The Perfect Serve: For an ultra-velvety, melt-in-your-mouth texture, pull the cake from the freezer and let it sit in the refrigerator for about 15 to 20 minutes before slicing. This slightly softens the cream cheese matrix into a luxurious ice-cream-cake consistency while keeping it perfectly structural.
Nutritional Summary
| Metric | Details |
| Yield | 8 – 10 uniform, decadent portions |
| Setting Time | 4 hours minimum in the freezer |
| Texture Profile | Crisp, buttery chocolate cookie crunch holding a feather-light, velvet cream crown. |
Frequently Asked Questions (FAQs)
Can I use low-fat cream cheese for this recipe?
It is highly recommended to stick strictly to brick-style, full-fat cream cheese. Low-fat alternatives and spreadable cream cheeses sold in plastic tubs contain a much higher water-to-fat content. Because this recipe is entirely no-bake and does not use gelatin, it relies completely on the natural firming properties of full-fat dairy when frozen. Using low-fat varieties will likely result in a loose, watery mousse that refuses to hold its shape cleanly upon slicing.
My heavy cream isn’t forming stiff peaks. What can I do?
Heavy cream needs to be exceptionally cold to trap air bubbles effectively. If it isn’t whipping up, your cream or your mixing bowl might be too warm. Pop your bowl, beaters, and cream into the freezer for 10 minutes to chill them down completely, then try whipping again on high speed.
Final Thoughts
This Cookies and Cream Mousse Cake represents the absolute height of playful, high-reward dessert styling. By honoring the room-temperature rule for your cream cheese blending and protecting your whipped cream with a gentle, patient folding hand, you guarantee an immaculate centerpiece that perfectly celebrates a timeless flavor combination.
Try Also: Irresistible Dessert Ideas from
-
What is Dubai Chocolate Bar Made Of? Key Ingredients Explained
-
Rose Milk Cake Recipe
-
Strawberry Cheesecake Dump Cake Recipe
Be sure to Print Recipe or Pin Recipe so you have these essential air-folding and clean-slicing hacks completely handy for your next casual dinner party or family gathering! Feel free to share your stunning creations online using #CookiesAndCream, #MousseCake, #DessertLovers, #BakingJoy, and #SweetTreats to inspire your fellow dessert enthusiasts!
Cookies and Cream Mousse Cake
- Total Time: 240 minutes
- Yield: 8-10 servings 1x
- Diet: Vegetarian
Description
A dreamy no-bake layered dessert combining a chocolate cookie crust with a smooth cream cheese mousse, topped with cookie crunch.
Ingredients
- 1 package Chocolate Sandwich Cookies, crushed
- ½ cup Unsalted Butter, melted
- 8 ounces Cream Cheese, softened
- 1 cup Powdered Sugar
- 2 cups Heavy Cream, chilled
- 1 teaspoon Vanilla Extract
- 1 cup Crushed Cookies for garnish
Instructions
- Lightly grease the sides of a standard springform pan.
- Crush the chocolate cookies until they resemble fine crumbs.
- Mix the cookie crumbs with melted butter until moistened.
- Transfer the mixture to the pan and press firmly to form a base.
- Combine softened cream cheese with powdered sugar in a bowl and beat until smooth.
- Pour heavy cream and vanilla into a separate bowl and whip until stiff peaks form.
- Fold the whipped cream into the cream cheese mixture carefully.
- Pour the mousse over the cookie crust and smooth the top.
- Freeze for at least 4 hours until firm.
- Sprinkle crushed cookies on top before serving.
- Run a knife around the edges to release the mousse before slicing.
Notes
For the best texture, ensure cream cheese is at room temperature and heavy cream is very cold.
- Prep Time: 30 minutes
- Cook Time: 0 minutes
- Category: Dessert
- Method: Freezing
- Cuisine: American
Nutrition
- Serving Size: 1 serving
- Calories: 350
- Sugar: 22g
- Sodium: 200mg
- Fat: 25g
- Saturated Fat: 15g
- Unsaturated Fat: 7g
- Trans Fat: 0g
- Carbohydrates: 30g
- Fiber: 1g
- Protein: 4g
- Cholesterol: 50mg
Keywords: Cookies and Cream, Mousse Cake, No-Bake Dessert, Chocolate Dessert