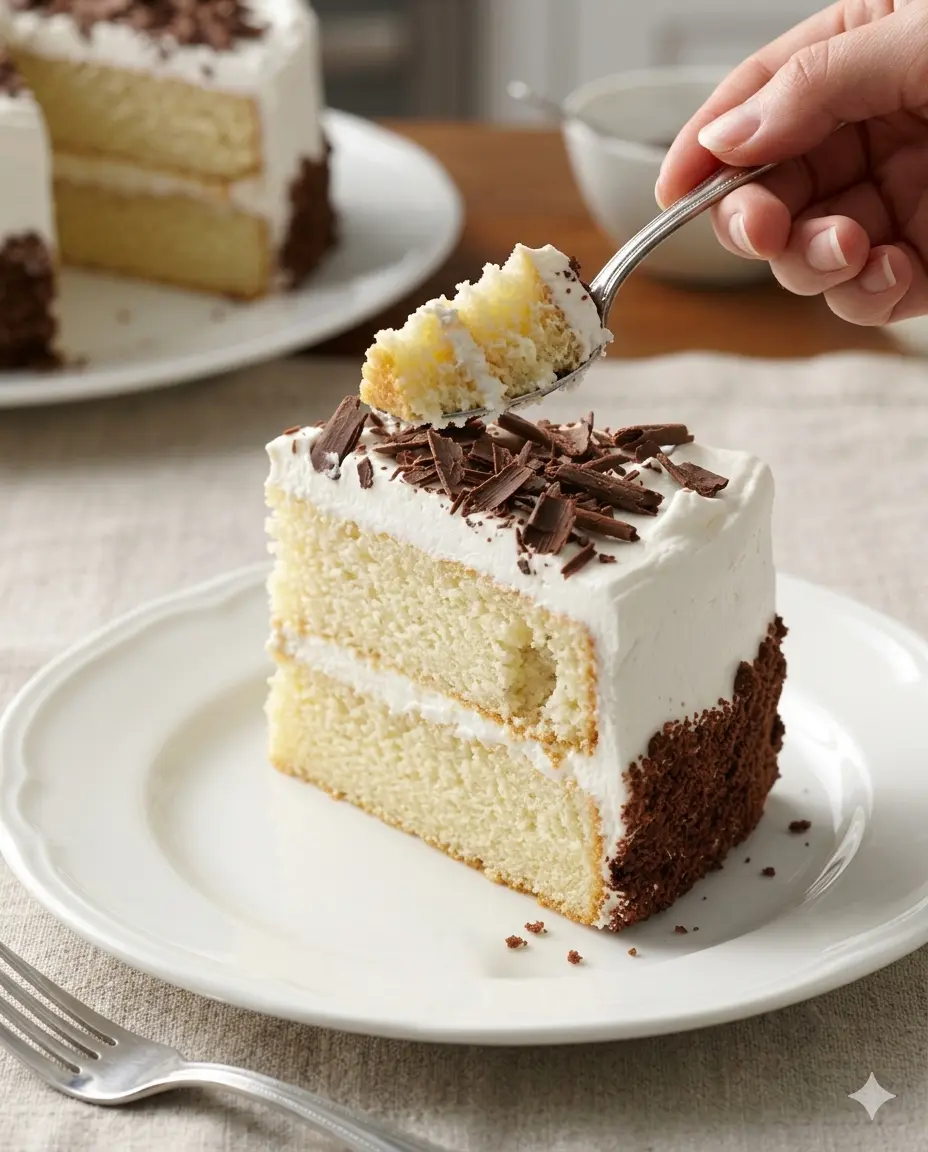
This Classic Vanilla Sponge Cake is a timeless bakery triumph. By utilizing an expert hot-milk method, the cake achieves an exceptionally tender, tight-knit, yet cloud-like sponge crumb. It features two beautifully even tiers sandwiched and blanketed in a silken, snow-white vanilla frosting, elegantly finished with a delicate crown of dark chocolate curls and a crisp chocolate crumb border along the back edge.
This recipe balances simple, pure vanilla flavors with just enough bitter chocolate contrast to make it a standout showpiece for birthdays, Sunday teas, or professional recipe portfolios.
Recipe Specifications
-
Yield: 10 to 12 elegant servings
-
Prep Time: 30 minutes
-
Baking Time: 25–30 minutes
-
Total Time: 1 hour 30 minutes (plus cooling)
-
Presentation Vessel: Two 8-inch (20 cm) round cake pans, greased and parchment-lined
-
Flavor Profile: Pure, comforting vanilla cream aromatics accented by light, crisp chocolate shavings and a deep cocoa crunch.
Comprehensive Ingredients Checklist
1. The Tender Vanilla Sponge Base
-
2 ½ cups (300 g) all-purpose flour
-
2 ½ teaspoons baking powder
-
½ teaspoon fine sea salt
-
4 large eggs, room temperature
-
1 ½ cups (300 g) granulated white sugar
-
1 tablespoon pure vanilla bean paste or high-quality vanilla extract
-
1 cup (240 ml) whole milk
-
½ cup (115 g) unsalted butter, cubed
2. The Snow-White Vanilla Frosting
-
1 ½ cups (340 g) unsalted butter, thoroughly softened at room temperature
-
4 ½ cups (540 g) icing sugar (confectioners’ sugar), finely sifted
-
3–4 tablespoons heavy cream, room temperature
-
1 ½ teaspoons clear vanilla extract (keeps the frosting perfectly white)
-
A tiny pinch of fine salt
3. The Chocolate Decors & Borders
-
50 g high-quality dark or semi-sweet chocolate block (for shaving)
-
½ cup fine chocolate cake crumbs or dark cocoa cookie crumbs (for the classic back-edge coat)
Step-by-Step Production & Assembly Guide
+-------------------------------------------------------------+
|    GARNISH: Elegant Dark Chocolate Shavings & Side Crumbs   |
+-------------------------------------------------------------+
|    COATING: Ultra-Smooth, Snow-White Vanilla Frosting       |
+-------------------------------------------------------------+
|    CORE: Two Tiers of Velvet-Crumb Hot Milk Sponge Cake     |
|          Sandwiched with an Even Layer of Sweet Cream       |
+-------------------------------------------------------------+
|    BASE: Golden, Evenly Baked Sponge Cake Foundation        |
+-------------------------------------------------------------+
Phase 1: Baking the Perfect Sponge
-
Oven Prep: Preheat your oven to 175°C (350°F). Lightly grease two 8-inch round cake pans and line the bottoms with circles of parchment paper.
-
The Dry Sift: In a medium bowl, whisk together the 2 ½ cups of flour, 2 ½ teaspoons of baking powder, and ½ teaspoon of salt. Set aside.
-
The Sabayon Ribbon: In a large bowl or a stand mixer fitted with the whisk attachment, beat the 4 large eggs and 1 ½ cups of sugar on medium-high speed for 5 full minutes. The mixture must expand drastically, transforming into a thick, pale yellow, ribbon-like paste that holds its shape for a few seconds when the whisk is lifted. Stir in the vanilla bean paste.
-
The Hot-Milk Infusion: While the eggs are whipping, combine the 1 cup of whole milk and ½ cup of cubed butter in a small saucepan over medium heat. Heat just until the butter is completely melted and the milk begins to steam (do not let it boil violently).
-
Combining the Emulsion: Alternately fold the dry ingredients and the hot milk mixture into the whipped egg base in three slow batches, using a rubber spatula. Move gently to preserve the trapped air bubbles until a smooth, fluid batter forms.
-
The Precision Bake: Divide the batter evenly between your two prepared pans. Bake for 25 to 30 minutes. The sponges are perfectly done when a toothpick inserted into the dead center comes out completely clean and the golden tops spring back resiliently to a light touch.
-
Cooling Matrix: Allow the cakes to rest in their pans for 10 minutes. Run a thin palette knife around the edges, carefully invert them onto wire cooling racks, and let them cool down completely to room temperature before assembling.
Phase 2: Whipping the Snow-White Frosting
-
Aerating the Fats: In a clean bowl, beat the 1 ½ cups of softened unsalted butter on medium-high speed for 3 to 4 minutes until pale, smooth, and fluffy.
-
The Sugar Build: Turn the mixer speed to low and gradually add the 4 ½ cups of sifted icing sugar one cup at a time, allowing it to fully integrate into the butter to avoid a sugar cloud.
-
The Silk Treatment: Stream in the clear vanilla extract, the pinch of salt, and 3 tablespoons of heavy cream. Increase the speed to high and beat for an additional 3 minutes until the frosting turns snow-white, silky, and effortlessly spreadable. Add the remaining tablespoon of cream if the frosting needs a softer texture.
Phase 3: Architectural Assembly & Presentation
-
Leveling the Foundation: If your sponge cakes have slight domes, use a long serrated bread knife to slice away the top crust evenly, ensuring perfectly level surfaces.
-
The Layer Stacking: Place your first sponge layer onto a serving plate. Spread roughly 1 cup of the white frosting evenly across the top with an offset spatula. Center the second cake layer directly on top, cut-side down, to ensure a flat, stable upper surface.
-
The Perfect Coat: Frost the top and outer sides of the entire cake using your remaining frosting. Use a bench scraper held at a 45-degree angle against the sides of the cake to sweep the frosting into a clean, flawlessly smooth cylinder.
-
The Artistic Accents: Use a vegetable peeler or a sharp knife held flat against a room-temperature dark chocolate block to create delicate, rustic curls. Scatter these curls generously across the top center of the cake. Finally, take your fine chocolate crumbs and gently press them against the bottom and back edge of the frosted cake to achieve a beautiful, high-contrast texturing.
-
Serving: Chill for 20 minutes to set the frosting structure, then slice using a warm, clean chef’s knife for a flawless presentation.
Chef’s Professional Success Tips
The Secret to Clear Frosting: Opt for clear vanilla extract rather than dark vanilla bean paste in the frosting layer. Standard pure vanilla extract carries a deep amber tint that will turn your frosting an off-white or cream color. Clear vanilla preserves that stark, professional, high-contrast white finish.
Perfecting Chocolate Shavings: If your chocolate block is too cold straight out of the fridge, your vegetable peeler will only yield tiny, splintered shards instead of elegant, wide curls. Microwave your chocolate block for a mere 5 to 8 seconds before shaving to soften the cocoa butter slightly, allowing the blade to glide smoothly into beautiful ribbons.
Try Also: Irresistible Dessert Ideas from
Classic Vanilla Sponge Cake
- Total Time: 90 minutes
- Yield: 10 to 12 servings 1x
- Diet: Vegetarian
Description
A timeless bakery classic featuring two fluffy sponge layers filled with vanilla frosting, beautifully decorated with chocolate curls.
Ingredients
- 2 ½ cups (300 g) all-purpose flour
- 2 ½ teaspoons baking powder
- ½ teaspoon fine sea salt
- 4 large eggs, room temperature
- 1 ½ cups (300 g) granulated white sugar
- 1 tablespoon pure vanilla bean paste or high-quality vanilla extract
- 1 cup (240 ml) whole milk
- ½ cup (115 g) unsalted butter, cubed
- 1 ½ cups (340 g) unsalted butter, thoroughly softened
- 4 ½ cups (540 g) icing sugar, finely sifted
- 3–4 tablespoons heavy cream, room temperature
- 1 ½ teaspoons clear vanilla extract
- A tiny pinch of fine salt
- 50 g high-quality dark or semi-sweet chocolate block (for shaving)
- ½ cup fine chocolate cake crumbs or dark cocoa cookie crumbs
Instructions
- Preheat your oven to 175°C (350°F). Lightly grease two 8-inch round cake pans and line the bottoms with parchment paper.
- Whisk together the flour, baking powder, and salt in a medium bowl. Set aside.
- Beat the eggs and sugar on medium-high speed for 5 minutes until thick and pale. Stir in the vanilla bean paste.
- Combine the milk and butter in a saucepan over medium heat. Heat until the butter melts and the milk steams.
- Fold the dry ingredients and hot milk mixture into the egg mixture in three batches until smooth.
- Divide the batter evenly between the pans. Bake for 25 to 30 minutes until a toothpick comes out clean.
- Cool the cakes in the pans for 10 minutes, then transfer to wire racks to cool completely.
- Beat the softened butter until pale and fluffy. Gradually add the sifted icing sugar.
- Stream in vanilla extract, salt, and cream, mixing until smooth and spreadable.
- If the cakes are domed, slice the tops to level them. Place the first sponge layer on a plate, frost the top with one cup of frosting, then add the second layer.
- Frost the top and sides of the cake with the remaining frosting.
- Create chocolate curls and sprinkle them on top. Press chocolate crumbs against the bottom edge of the cake.
- Chill for 20 minutes, then slice and serve.
Notes
For a professional-looking frosting, use clear vanilla extract to maintain a bright white color.
- Prep Time: 30 minutes
- Cook Time: 30 minutes
- Category: Dessert
- Method: Baking
- Cuisine: American
Nutrition
- Serving Size: 1 slice
- Calories: 400
- Sugar: 35g
- Sodium: 250mg
- Fat: 22g
- Saturated Fat: 14g
- Unsaturated Fat: 8g
- Trans Fat: 0g
- Carbohydrates: 50g
- Fiber: 1g
- Protein: 4g
- Cholesterol: 100mg
Keywords: vanilla sponge cake, dessert, cake recipe, baking, chocolate decorations